Iframe—Customize ACH elements with CSS
The Clover iframe lets you customize the payment form with Automated Clearing House (ACH) elements to match your website branding. You can use an object containing Cascading Style Sheets (CSS) to define the style of the iframe and its elements. Use the following procedure to create a visually styled, iframe-powered, and tokenized ACH payment form.
Before you begin
- Complete the steps to set up a payment form.
- Create an interactive payment form where you can create instances of iframe card elements and insert (mount) them in
<div>containers.
Step 1: Initialize the SDK and define styles
When creating an iframe, use a custom JavaScript-style object to:
- Define the iframe style. The iframe always inherits 100% of the width and height of its container element. Use the CSS applied to the container to change the iframe dimensions.
- Define the styles inside the iframe, such as the border and custom font of the ACH elements:
| Variable name | Element type | Description |
|---|---|---|
| achForm | ACH_ELEMENTS | ACH payment form for bank account input. |
// const clover = new Clover('7e525404872b8186b82b5057cfacebff');

const clover = new Clover('88234a49d5fc111d7361c29d257fb117', {
    merchantId: 'GXKFE78VX63D1'
  });

const elements = clover.elements();
const styles = {
    body: {
      fontFamily: 'Roboto, Open Sans, sans-serif',
      fontSize: '16px',
    },
    label: {
      display: 'block',
      fontSize: '12px',
    },
    input: {
      height: '38px',
      fontSize: '15px',
      boxShadow: 'none',
      backgroundColor: 'transparent',
      borderBottom: '1px solid gray',
      width: '270px',
      color: '#727272',
    },
    select: {
      height: '1.6em',
      fontSize: '15px',
      border: 'none',
      backgroundColor: 'transparent',
      borderBottom: '1px solid gray',
      width: '270px',
      color: '#727272',
    },
    section: {
      display: 'flex',
      flexWrap: 'wrap',
      width: '100%',
      '& div': {
        width: '50%',
        marginTop: '0.5em',
      }
    },
    '.sectionHeader': {
      width: '100%',
      marginTop: '35px',
      fontSize: '12px',
      marginBottom: '3px',
      fontWeight: 'bold',
    },
    '.checkoutElements': {
      width: '560px'
    }
  };
const achForm = elements.create('ACH_ELEMENTS', styles);

achForm.mount('#ach-form');

const cardResponse = document.getElementById('ach-response');

const form = document.getElementById('payment-form');
form.addEventListener('submit', function(event) {
  event.preventDefault();

  clover.createAchToken({
      amount: 1000
    })
    .then(function(result) {
    if (result.errors) {
      Object.values(result.errors).forEach(function (value) {
        console.log(value);
      });
    } else {
      alert(JSON.stringify(result));
    }
  }).catch(function(data){
    console.log(data);
  });
});
Step 2: Create and mount ACH elements
The HTML to customize ACH elements within the iframe payment form provides the following fields:
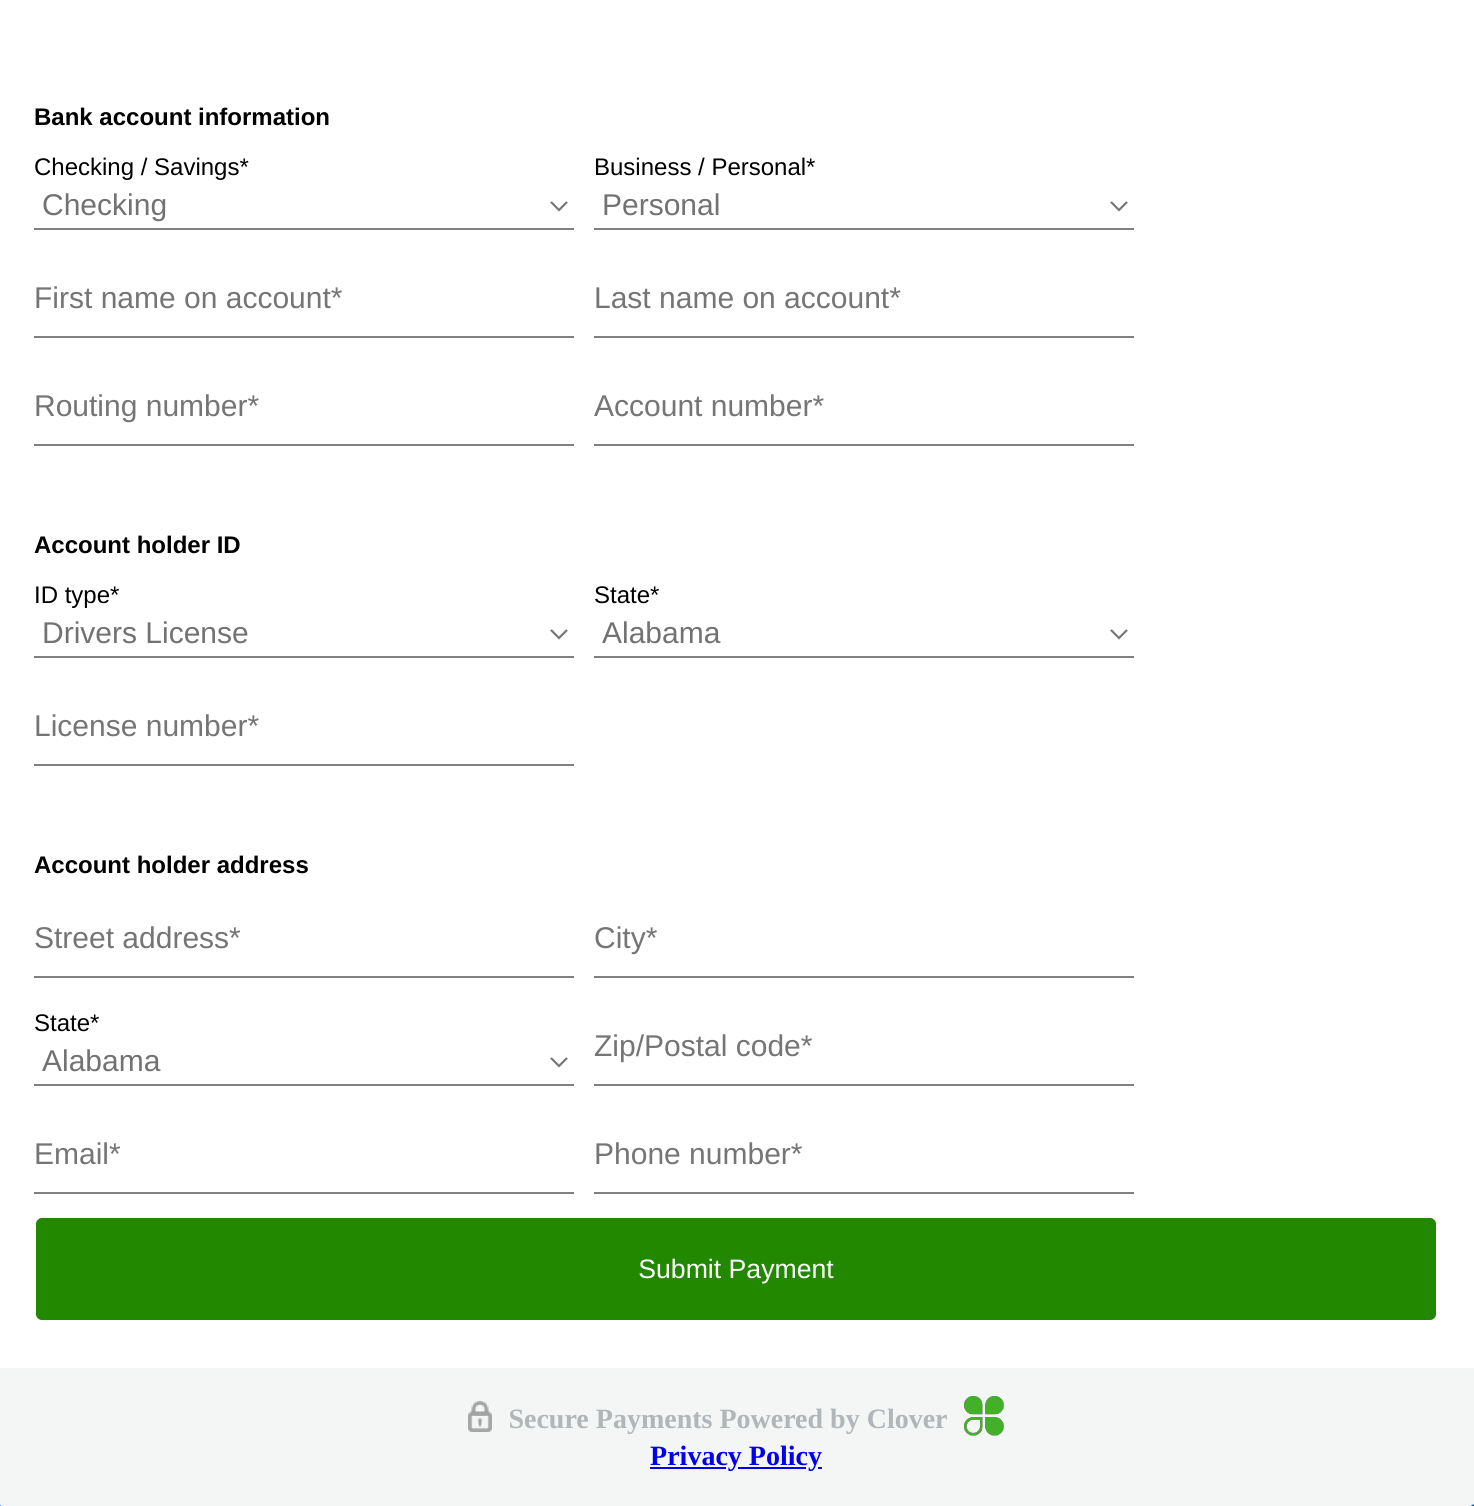
Iframe Payments form with ACH elements
Step 3: Design and handle form submission
If you are adding a form submission button, use your website's CSS container element to define the style and dimensions of the button. This lets you create a button that matches your website style standards. See Clover iframe features.
Code sample
In this example, the form submission button—Submit Payment—is the button inside .button-container, and the ACH button container is #payment-request-button.
body {
  background-color: #134db9;
  margin: 0;
  width: 700px;
}

.container {
  background-color: #ffffff;
  border-top-left-radius: 15px;
  border-top-right-radius: 15px;
  box-shadow: 0 0 6px 0 rgba(141, 151, 158, 0.2);
  padding: 24px;
}

.container {
  font-family: Roboto, "Open Sans", sans-serif;
  font-size: 16px;
}

#payment-request-button {
  width: 240px;
  height: 40px;
}

.input-errors {
  font-size: 12px;
  position: absolute;
  margin-left: 5px;
  margin-top: 54px;
  color: red;
}

.container .button-container {
  display: flex;
  flex-direction: row;
  justify-content: center;
}

.container .button-container button {
  background-color: #228800;
  border: none;
  border-radius: 3px;
  color: #ffffff;
  display: block;
  height: 51px;
  width: 700px;
}

@media (min-width: 300px) {
  body {
    width: auto;
  }
}

@media (min-width: 750px) {
  body {
    width: 750px;
  }

  .container {
    height: 100%;
  }

  .container .form-row .field.card-number {
    width: 460px;
  }

  .container .form-row .field.third-width {
    width: 218px;
  }
}

.clover-ach-modal {
  display: block;
  background-color: unset;
  height: 100%;
  width: 100%;
  margin: 0 auto;
  position: fixed;
  z-index: 90;
}

.clover-ach-modal-container {
  background-color: white;
  margin: 10%;
  padding: 30px;
  position: relative;
}

.clover-ach-modal-container button:first-child {
  right: 0px;
  margin-right: 30px;
  position: absolute;
}

.clover-ach-modal-accept-button {
  position: relative;
  display: block;
  margin: 0 auto;
  margin-top: 40px;
  background-color: #228800;
  border: none;
  border-radius: 3px;
  color: #ffffff;
  display: block;
  height: 51px;
  width: 300px;
}
Related topics
Updated 28 days ago