Apple Pay integration—Implementation options
Apple Pay payments integration with Clover Ecommerce API integration and Clover-hosted iframe
You can integrate Apple Pay® payments with Clover Ecommerce in the following two implementations:
Option 1: Clover Ecommerce API for custom integrations for merchant
Option 2: Clover-hosted iframe on a merchant's ecommerce website
Option 1: Apple Pay for Ecommerce Clover API integration
This Clover implementation for Apple Pay is for merchants who may already have Apple Pay on their ecommerce websites and native mobile apps. Their Apple Pay integration is with non-Clover payment gateways, and they want to migrate to Clover or use custom API integrations.
The required elements for this implementation are:
- Apple merchant ID identifier—The identifier for the Apple Merchant ID is a unique string value created when you register a Merchant ID in the Apple developer platform. The identifier is required to establish mutual TLS communication between the Clover server and the Apple Payments server.
- Merchant payment processing certificate—The merchant payment processing certificate in a .csr file format is used to decrypt the encrypted payment payload for Apple Pay.
Merchants or their developers need to add a Certificate Signature Request (CSR) from Clover to the Apple Pay developer platform using their developer account. See the following procedures for information.

Apple Pay integration with Clover Ecommerce API
Upload the Certificate Signing Request (CSR) file
Prerequisite
Read the Apple documentation to activate the merchant CSR file for Clover.
Step 1: Copy existing Apple merchant ID
You need to share the registered identifier for the Apple merchant ID from your merchant's Apple developer account with Clover. The Apple merchant ID identifier uniquely identifies a business and lets the merchant accept payments using Apple Pay services. This identifier never expires and can be used across multiple apps and websites.
- Log in to your Apple Developer account.
- In Program Resources, click Certificates, IDs & Profiles > Identifiers. The Identifiers page appears.
- In the search field, enter Merchant IDs. Available Apple merchant IDs display on the page.
- From the Identifier column, copy the identifier that you need to share with Clover.
Step 2: Share the identifier and download a CSR file from Clover
- Log in to the Developer Dashboard.
- Under Your Apps, select your Ecommerce app.
- Click App Settings > Ecommerce Settings.
- Under Integration Type, select API. An API Integration message appears.
- Click the blue link in the instructions. The Share your Apple merchant information with Clover pop-up appears.
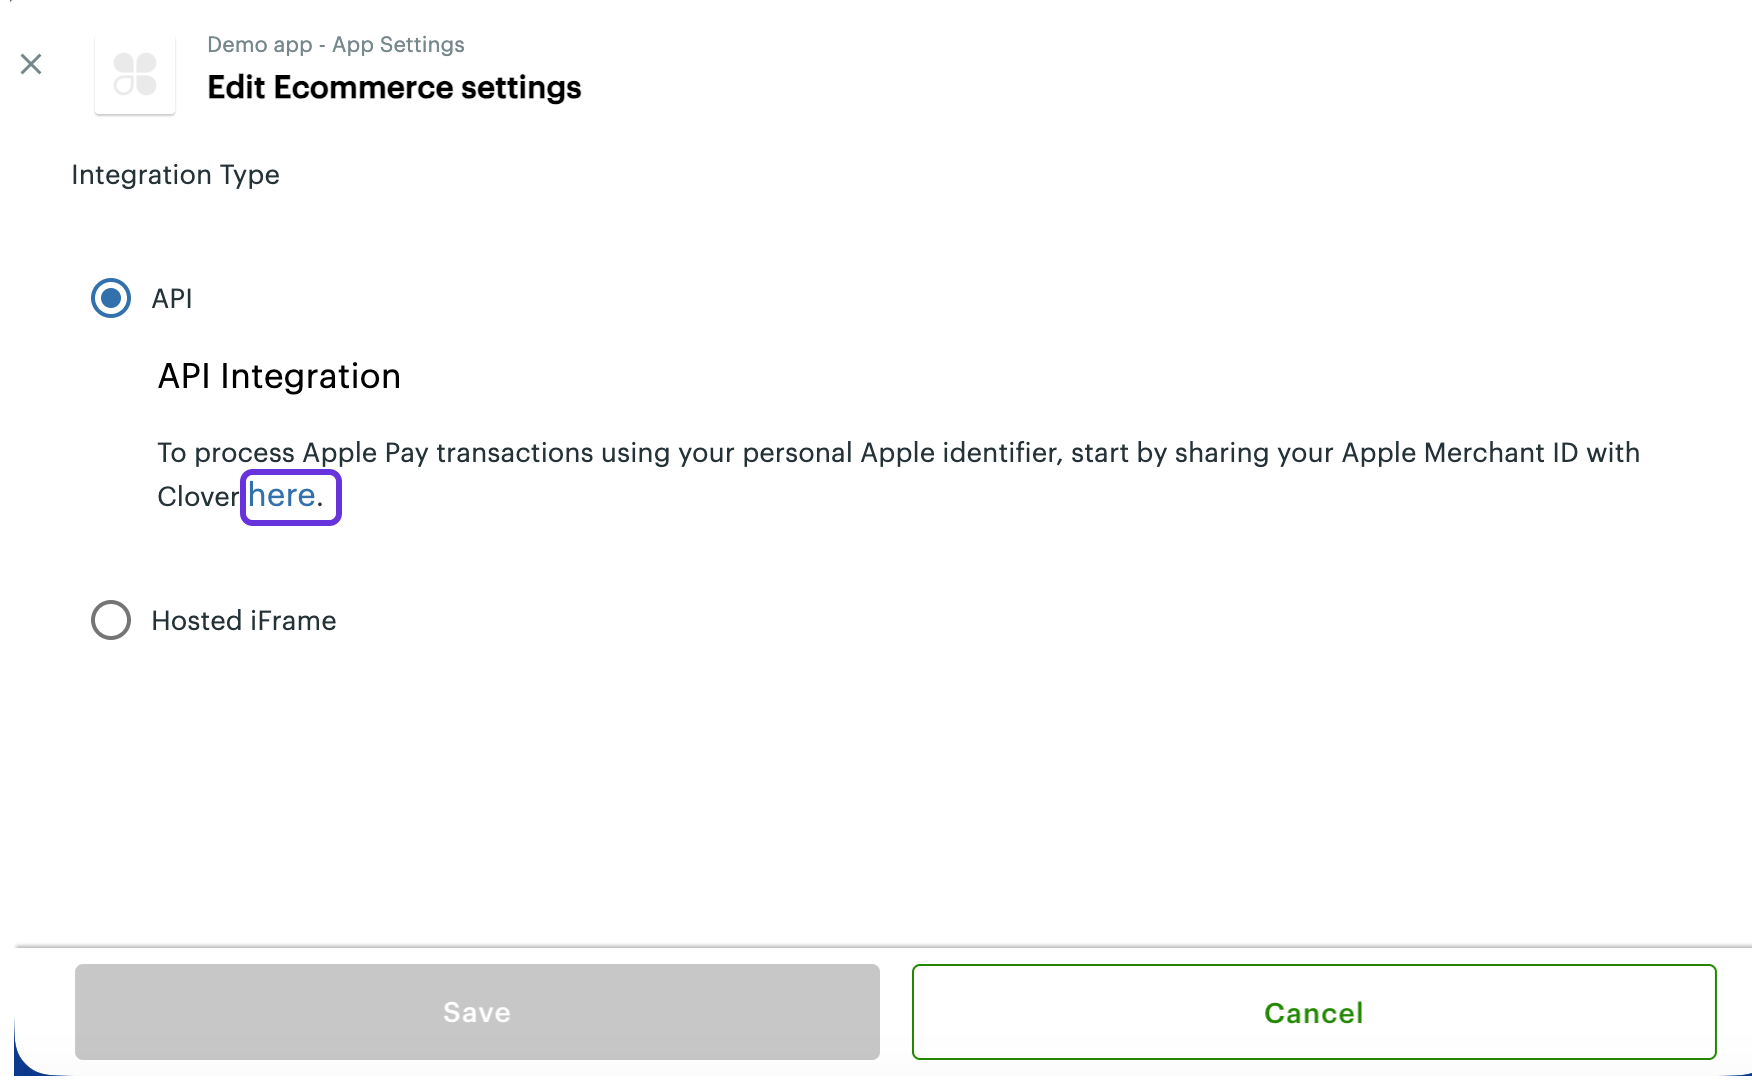
- In the Identifier field, enter the Apple merchant ID identifier you copied in Step 1 and complete the other fields.
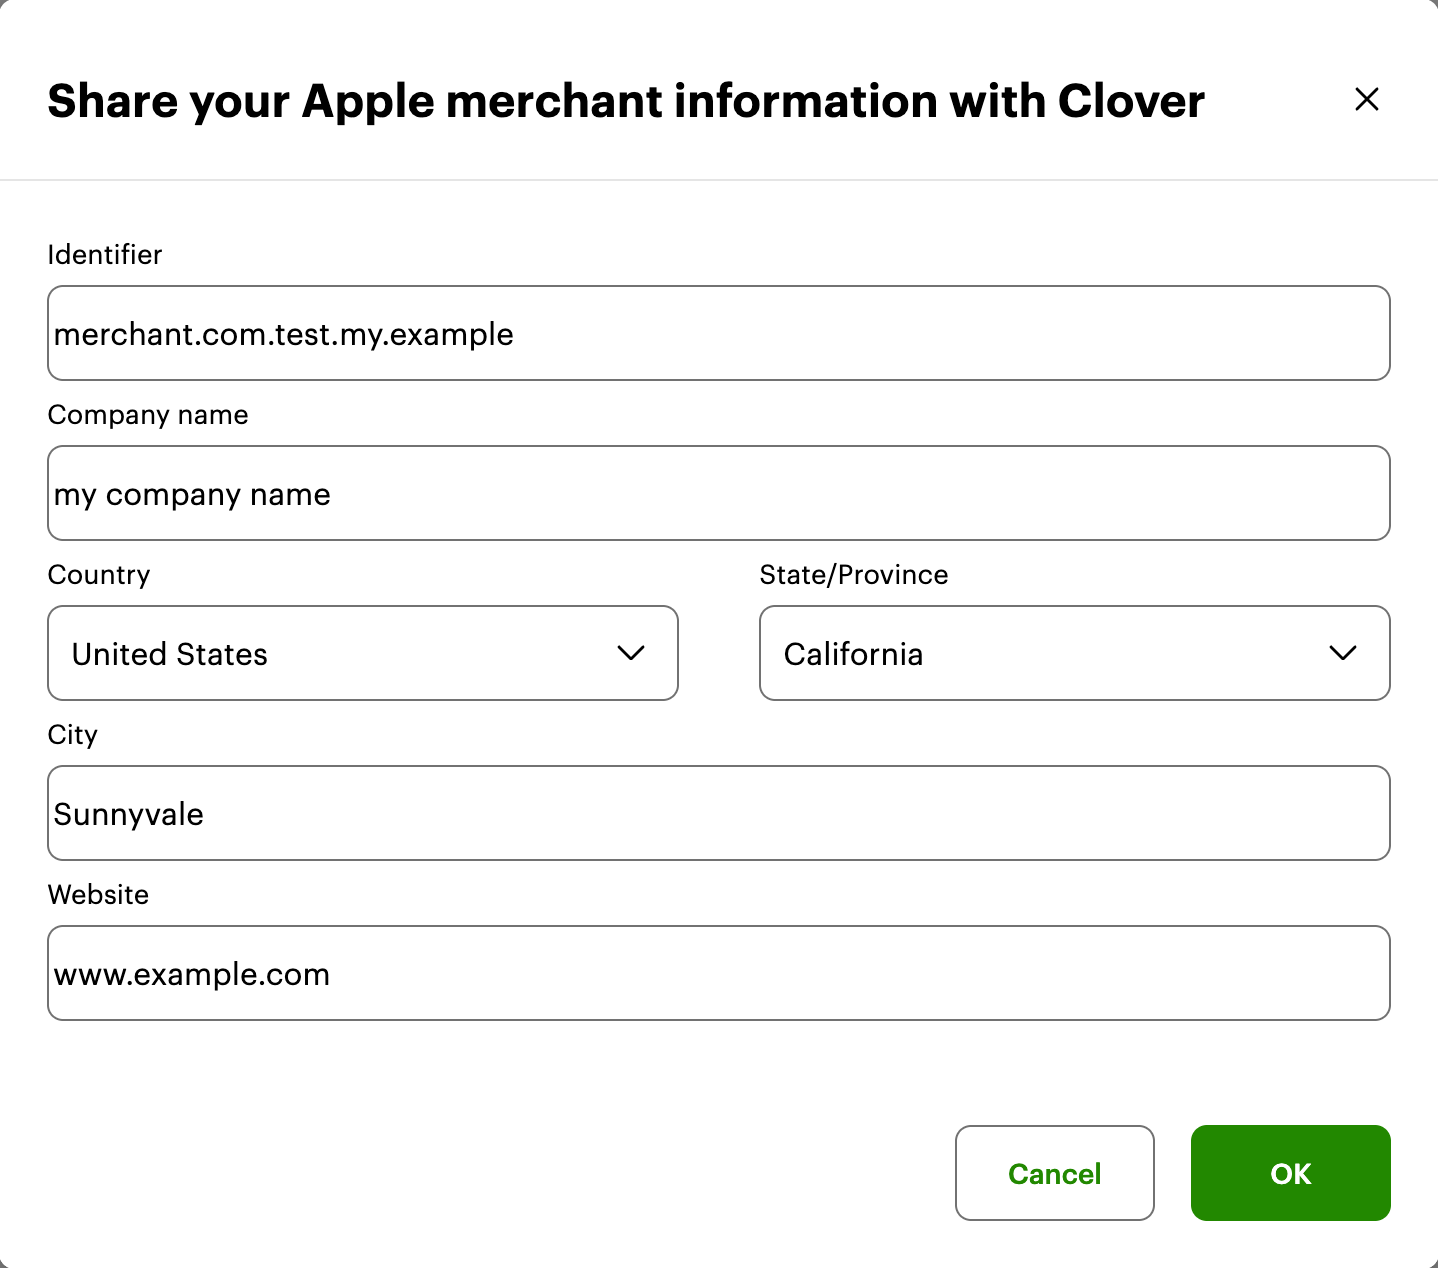
Clover Merchant Dashboard: Share your Apple merchant information with Clover
- Click OK.
Step 3: Upload the CSR file to your Apple developer account
The payment processing certificate is associated with a registered Apple merchant ID identifier and used to secure transaction data. After you generate the certificate in Step 2, you need to upload the downloaded Certificate Signing Request (CSR) file to your Apple developer account.
- Log in to your Apple Developer account.
- In Program Resources, click Certificates, IDs & Profiles > Identifiers. The Identifiers page appears.
- In the search field, enter Merchant IDs. Available merchant IDs display on the page.
- Click the merchant ID for which you created a CSR file on the Clover Merchant Dashboard. The Edit or Configure Merchant ID page appears.
- Click No on the message confirming that payments associated with the Apple merchant ID will not be processed exclusively in mainland China.
- Click Continue.
- In the Apple Pay Payment Processing Certificate section, click Create Certificate. The Create a New Certificate page appears.
- In the Upload a Certificate Signing Request section, click Choose File and browse to the previously downloaded CSR file (in the .csr file format).
- Click Continue to upload the CSR file to your Apple developer account. The Apple Pay Payment Processing Certificate section displays the certificate name, type, and expiry date. In this section, you can activate, revoke, or download a certificate. If multiple certificates are displayed in the section, remember to activate the latest certificate you added for Clover for successful Apple Pay integration.
Once the CSR file is successfully uploaded, Clover has the encryption key, and Apple has the decryption required to process Apple Pay payments securely.
Manage Certificate Signing Request (CSR) files
The CSR file is valid for a year on the Apple Pay developer platform. Clover lets you create two CSR files at a time. The best practice is to create a new CSR file just before your current CSR file expires, so you can upload the new CSR file to the Apple Pay developer platform and delete the CSR that will expire. You can also remove the revoked or expired CSR file from Clover.
Prerequisite
Read the Apple documentation to activate the merchant CSR file for Clover.
Steps
- Log in and do one of the following:
- On the Developer Dashboard:
- Under Your Apps, select your Ecommerce app.
- Click App Settings > Ecommerce Settings.
- Under Integration Type, select API.
- Scroll down to Apple Pay > API Integration.
—or—
- On the Merchant Dashboard:
- Select Settings > View all settings.
- Under Ecommerce**, select Ecommerce Payments**.
- Scroll down to Apple Pay > API Integration.
The Apple merchant ID identifier file you previously shared with Clover displays in the section.
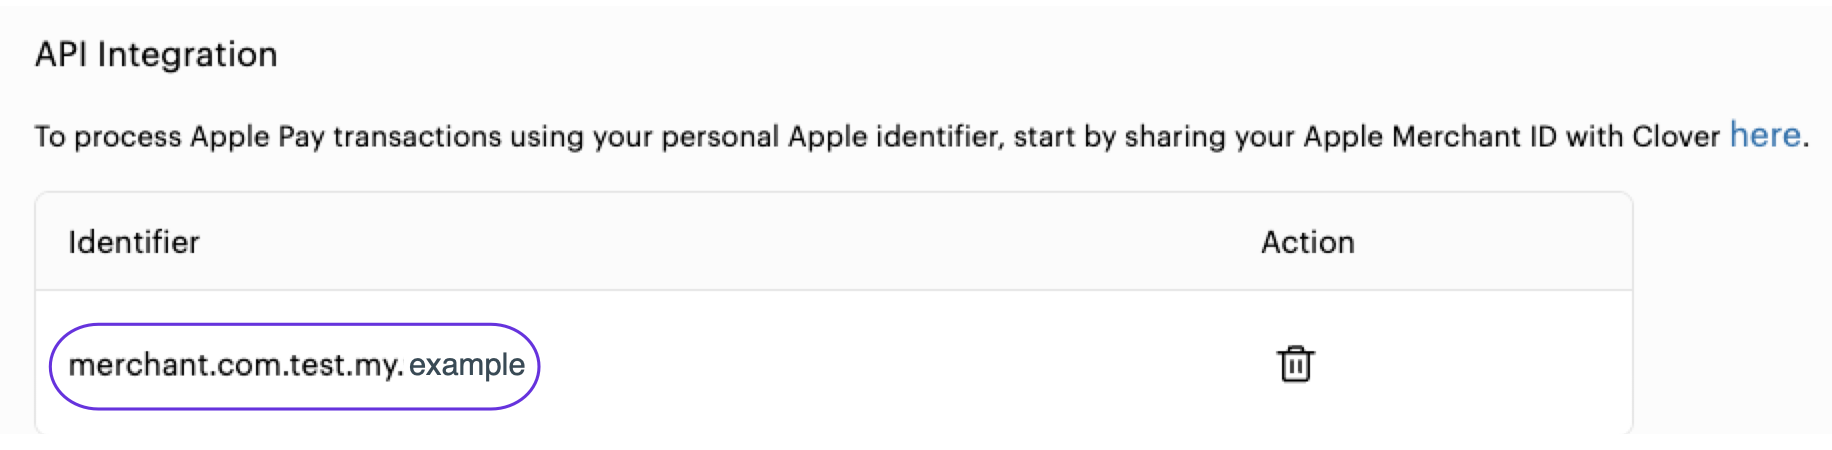
Clover Merchant Dashboard: Ecommerce Payments page > Apple Pay section > API Integration
- Do one of the following, as needed:
-
In the Action column, click the delete icon to delete the Apple merchant ID identifier.
-
In the Identifier section, click the Apple merchant ID identifier. The Manage Certificate Signing pop-up appears.
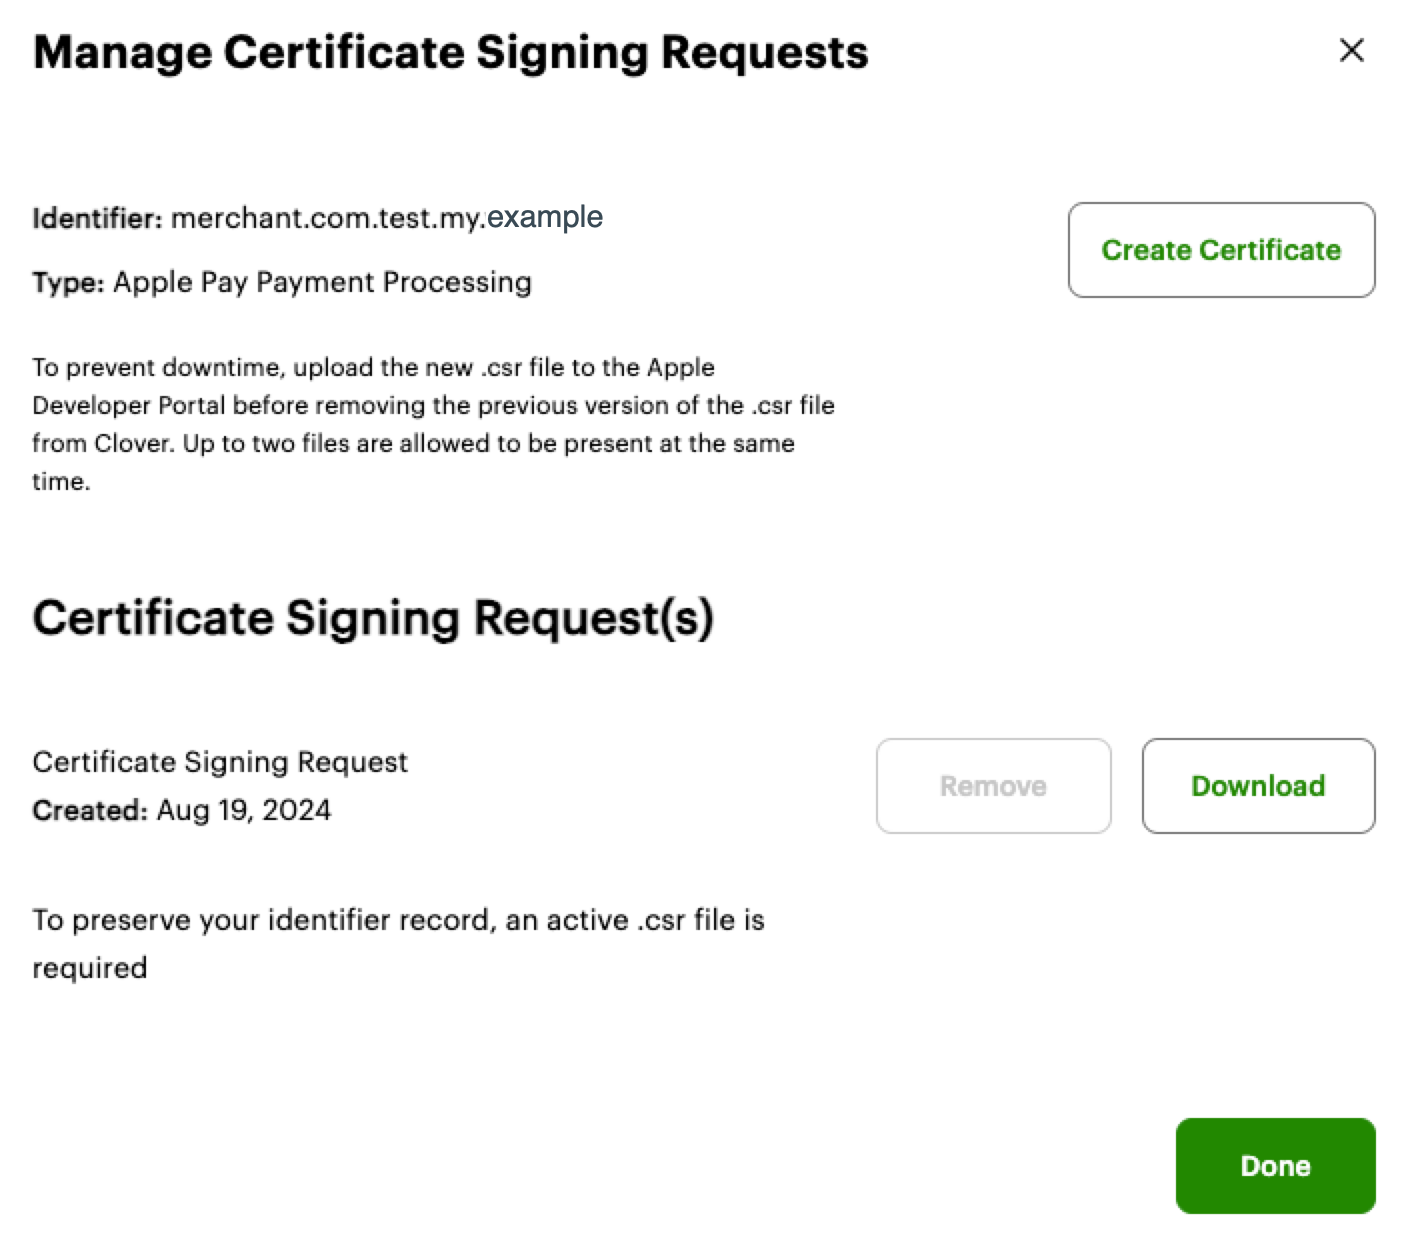
Clover Merchant Dashboard: Manage Certificate Signing Requests pop-up
On the Manage Certificate Signing pop-up:
- Click Create Certificate to create a CSR file.
- In the Certificate Signing Request(s) section, click Download to download the CSR file in .csr format to your default Downloads folder.
- Click Done.
- Upload the new .csr to the Apple Developer account.
Create an Apple Pay payment token
To use Apple Pay as part of your payment integration, you need to pass information received from Apple Pay in your payment token request.
To start the integration with the Clover Ecommerce API, create a payment token for the Apple Pay digital wallet transaction. The server returns a source token that begins with clv\_. With a source token, you can create a charge, create and pay for orders, accept tips, and save customer cards for future transactions.
See the Create an Apple Pay payment token tutorial for the steps and the request and response example.
Option 2: Apple Pay for Clover-hosted iframe integration
Merchants can accept Apple Pay payments using the Clover-hosted iframe on their ecommerce website. You need to verify the merchant's ecommerce website domain and subdomain before you can integrate the Apple Pay button on the Clover iframe. Clover provides a verification file for the domain and subdomain.

Apple Pay integration with Clover iframe
Step 1: Verify your ecommerce website domain with Apple Pay
- Log in and do one of the following:
-
On the Developer Dashboard:
-
Go to Your Apps > app name > App Settings. The App Settings page appears.
-
Click Ecommerce Settings. The Edit Ecommerce Settings page appears.
-
In the Hosted Iframe option > IFrame integration section, click the blue link in the instructions to enter information about the ecommerce website domain.
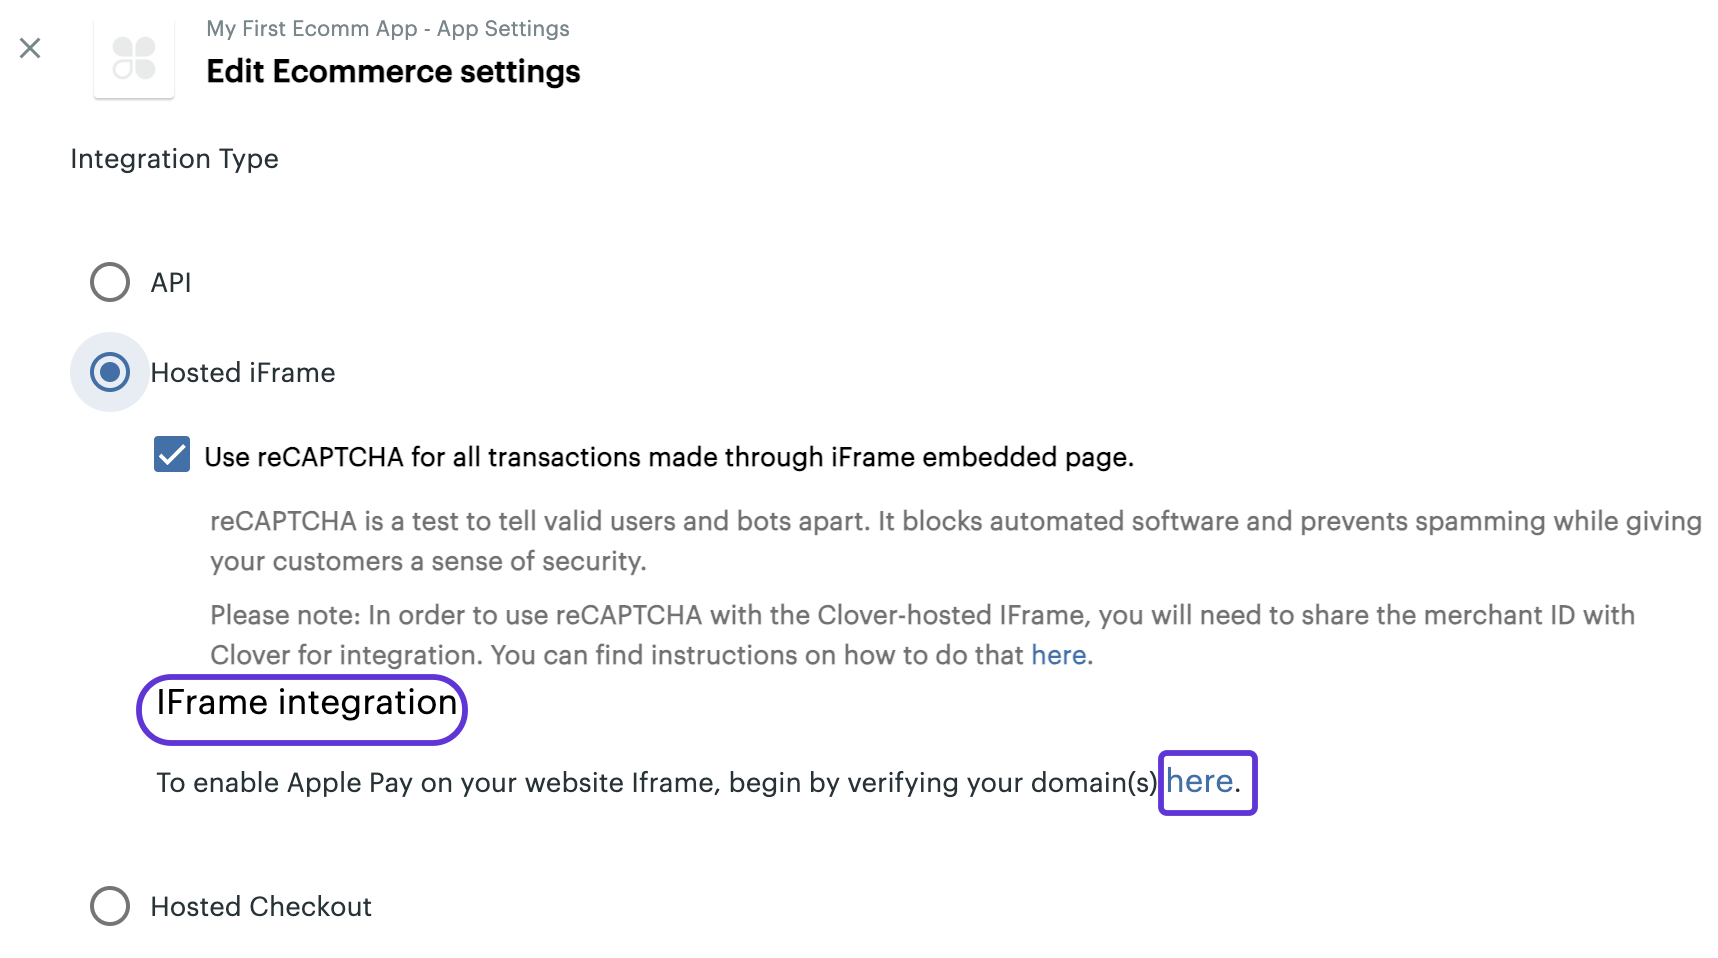
Clover Developer Dashboard: Apple Pay iframe integration domain verification link
-
-
On the Merchant Dashboard:
-
Go to View all settings > Ecommerce section > Ecommerce Payments. The Ecommerce Payments page appears.
-
In the Apple Pay > iFrame integration section, click the blue link in the instructions to enter information about the ecommerce website domain.
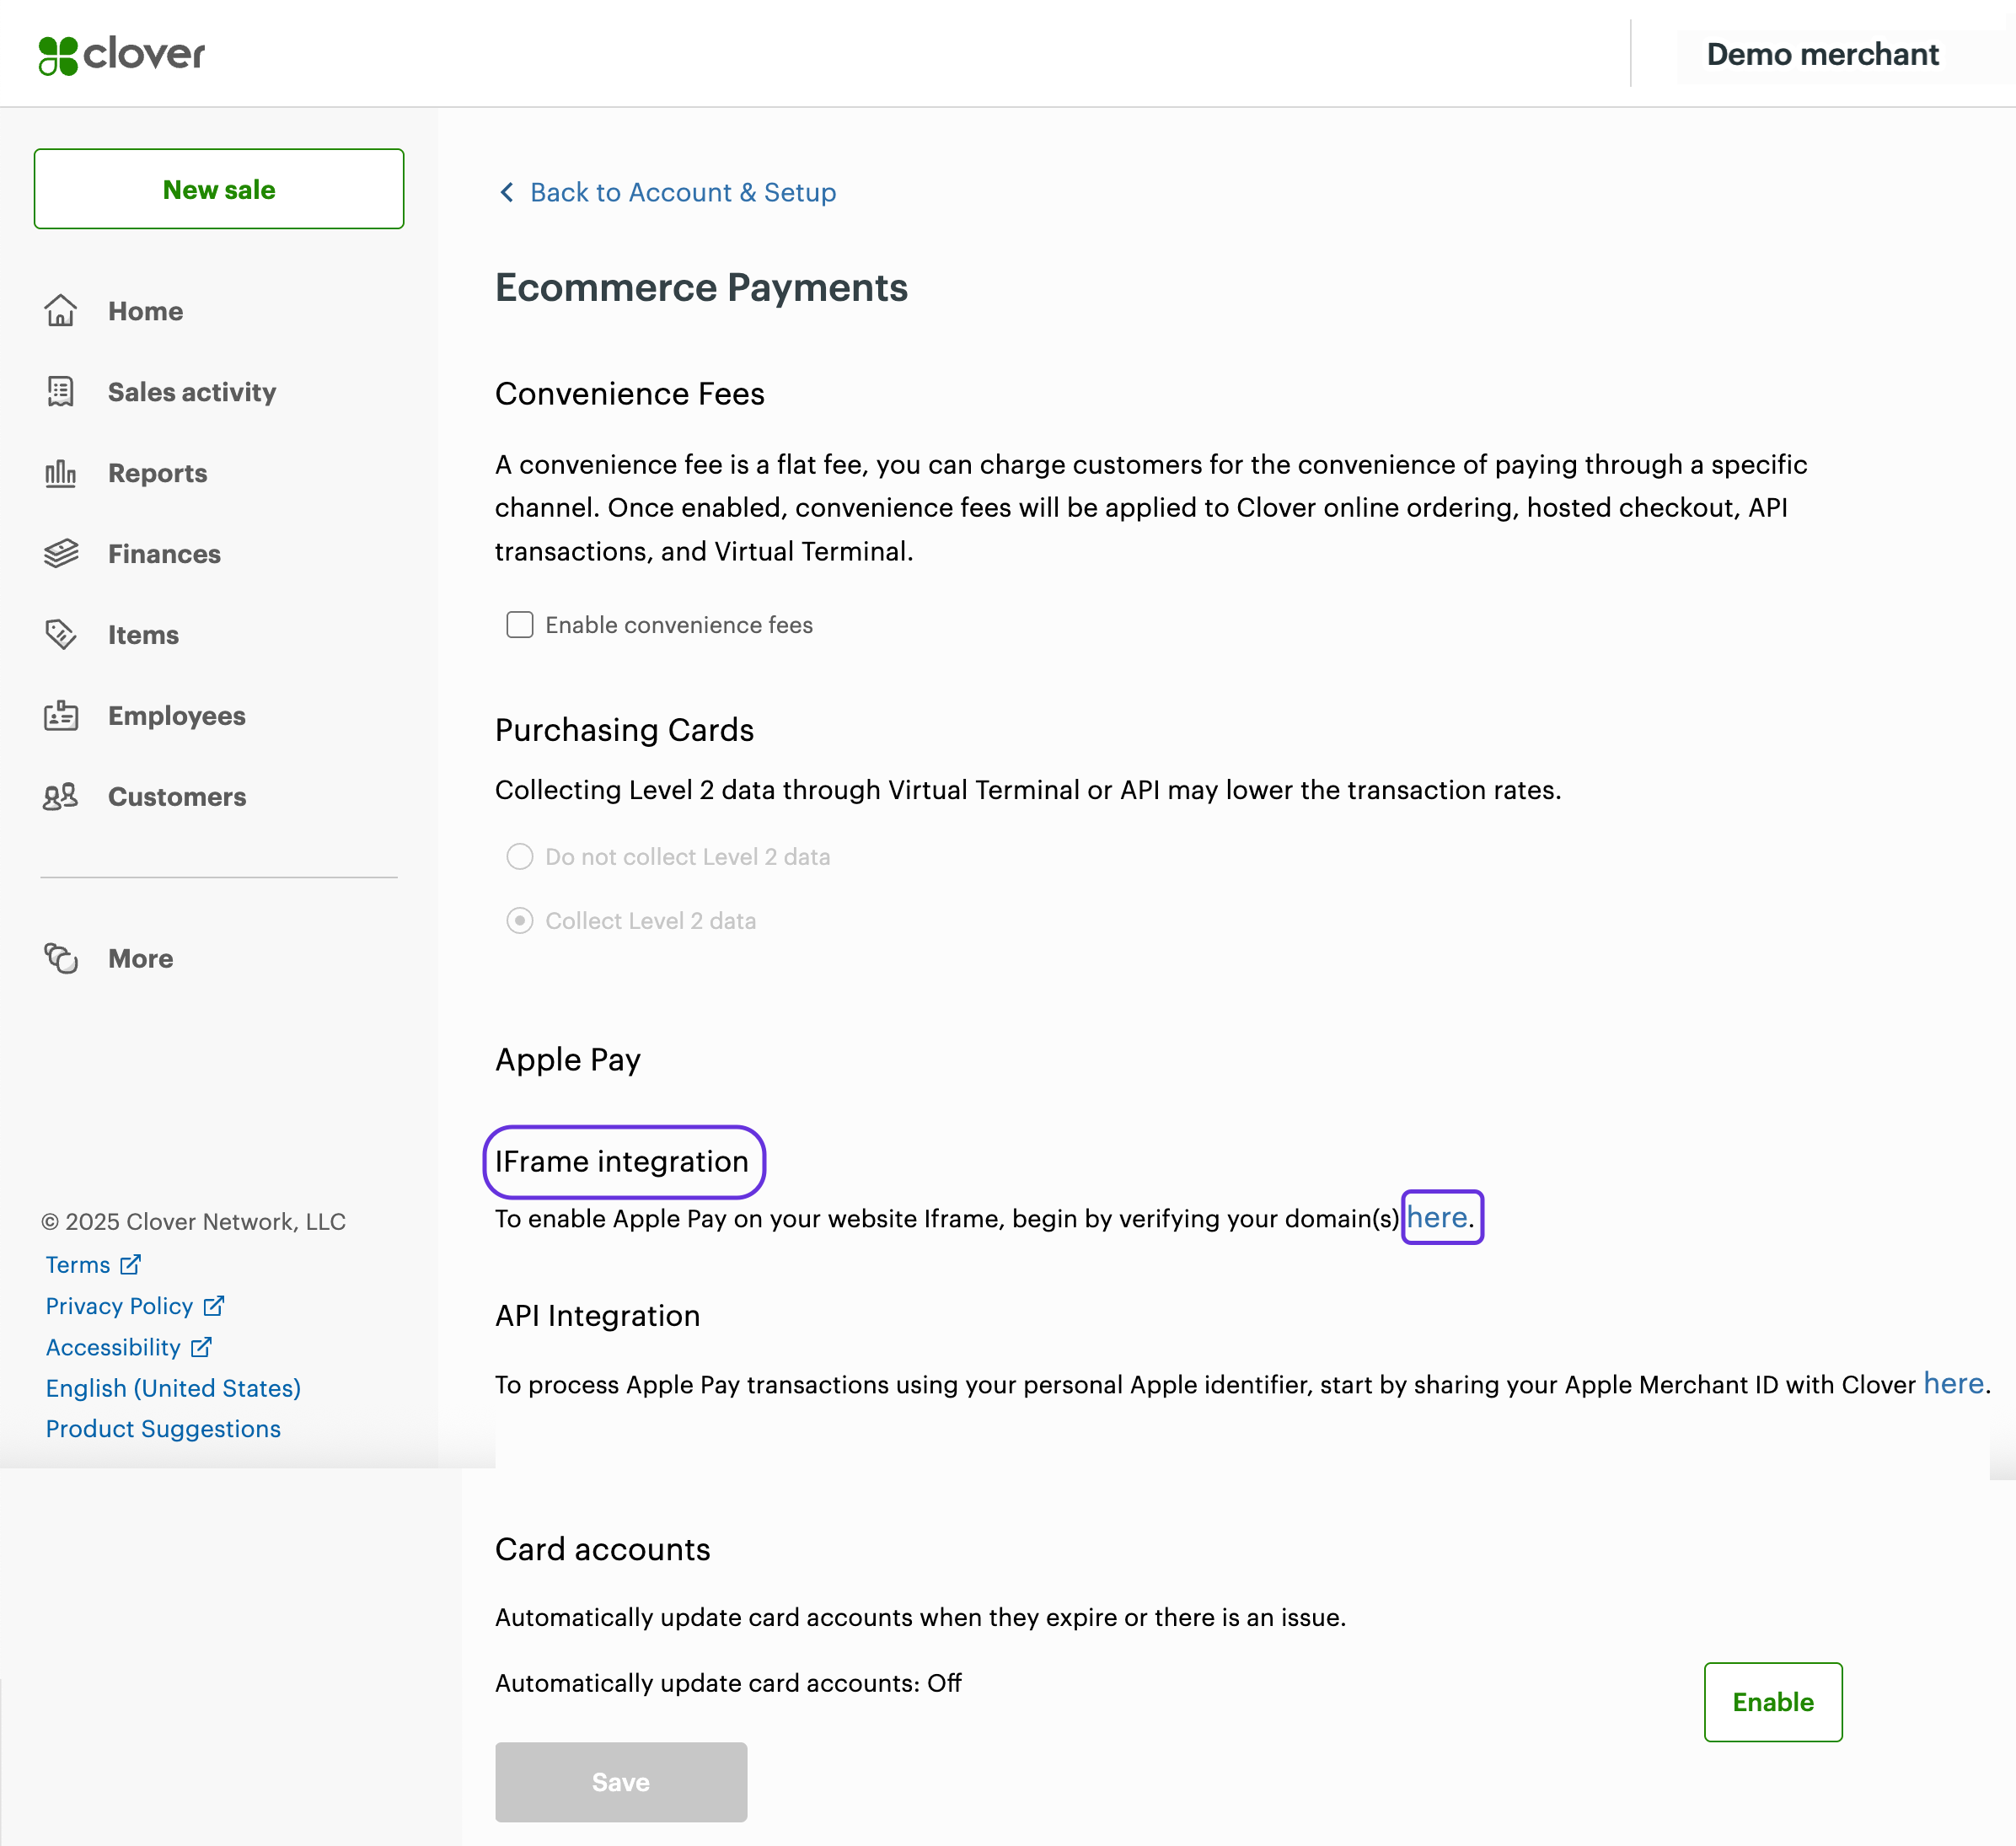
Clover Merchant Dashboard: Apple Pay iframe integration domain verification link
-
When you click the blue link either on the Developer Dashboard or the Merchant Dashboard, the Enable Apple Pay pop-up appears.
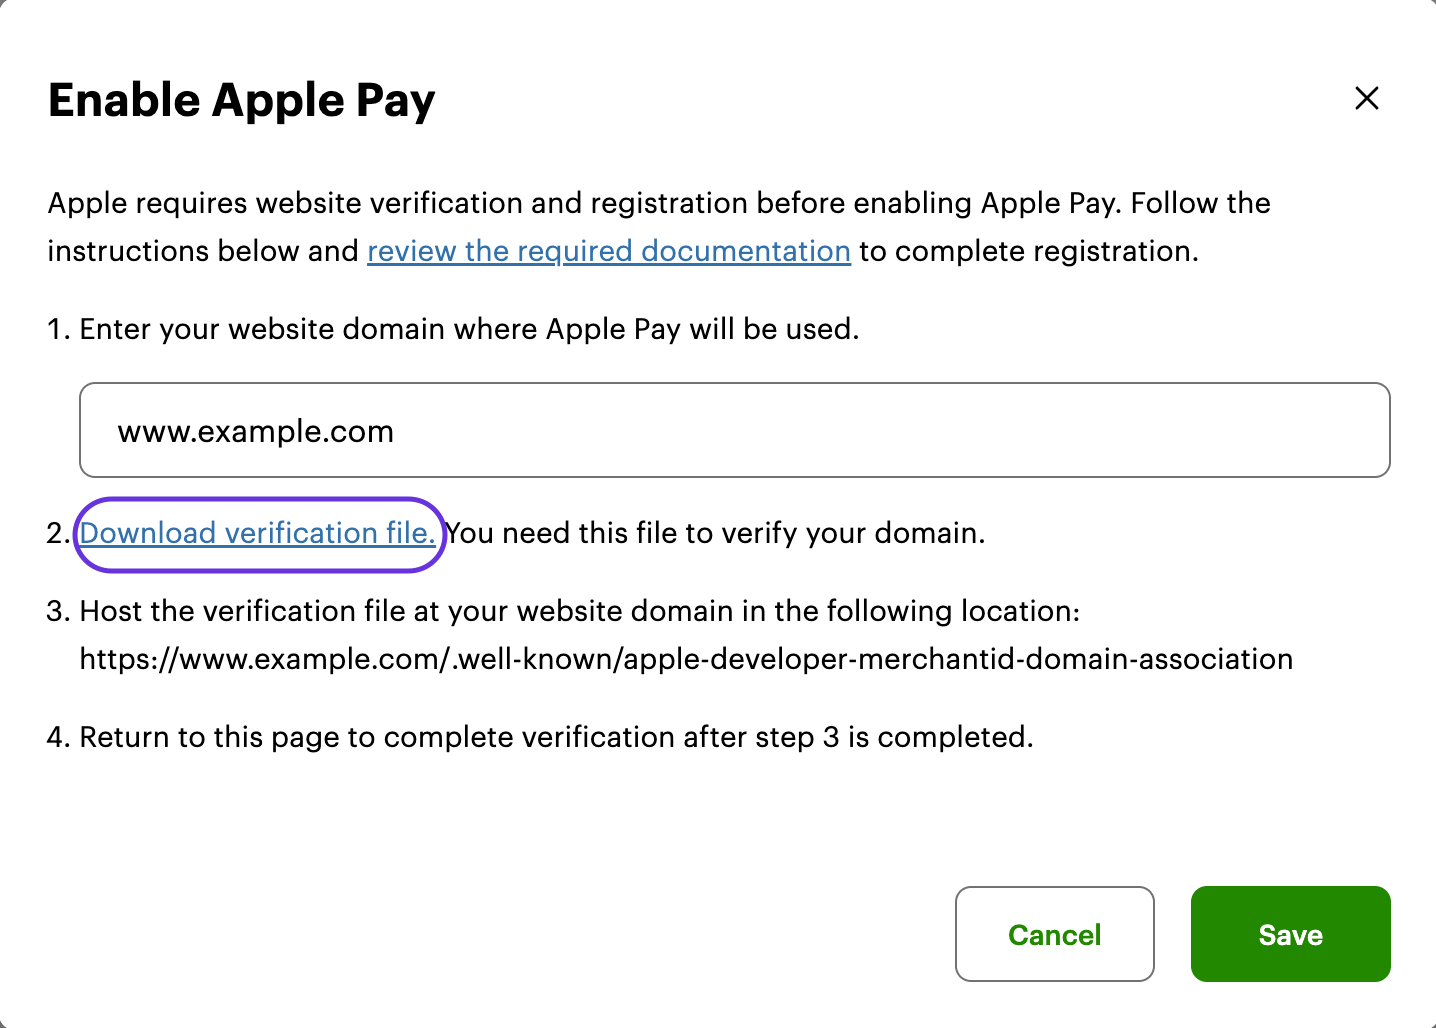
Clover Hosted iframe settings: Enable Apple Pay pop-up
-
In the Website domain field, enter the merchant ecommerce website link.
-
Click the Download verification file link.
-
From instruction 3 on the pop-up, copy the location where you need to host the verification file and click Save.
-
Host the verification file at the location you copied.
Note: Clover recommends copying and saving the location to host the verification file, as the entire process to verify the file can take a few days. -
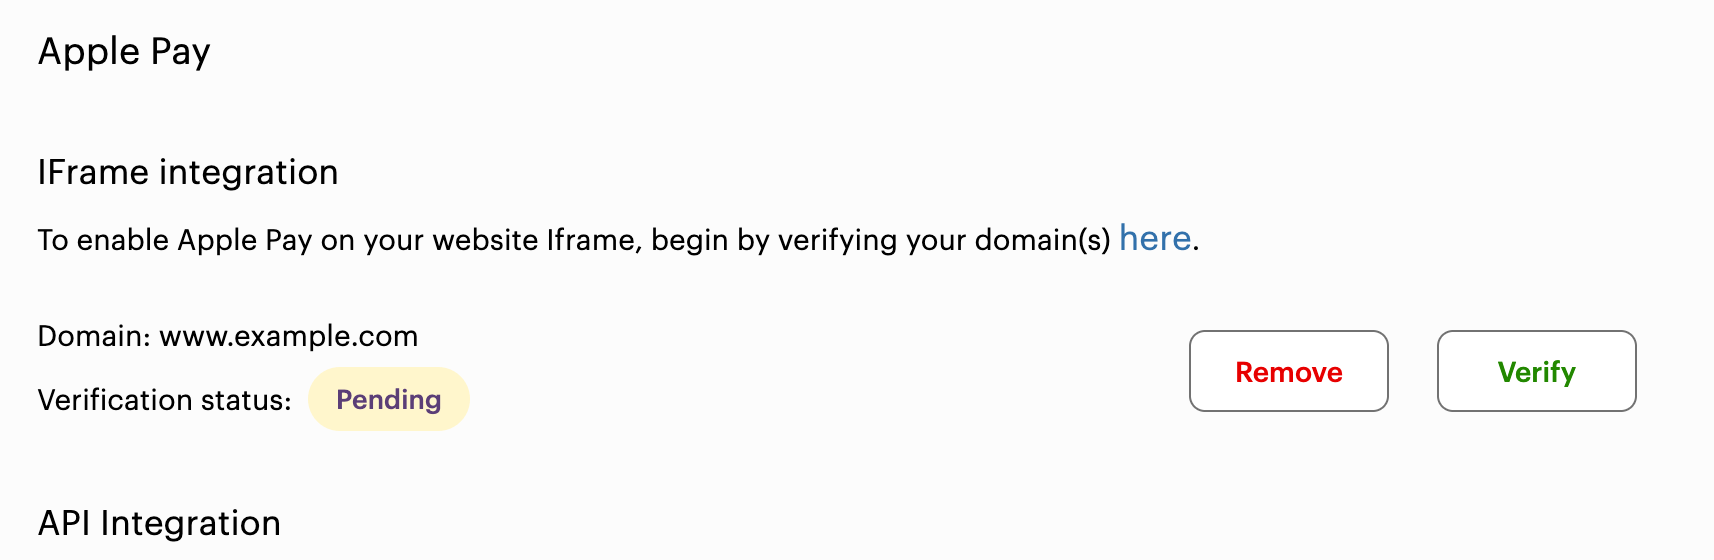
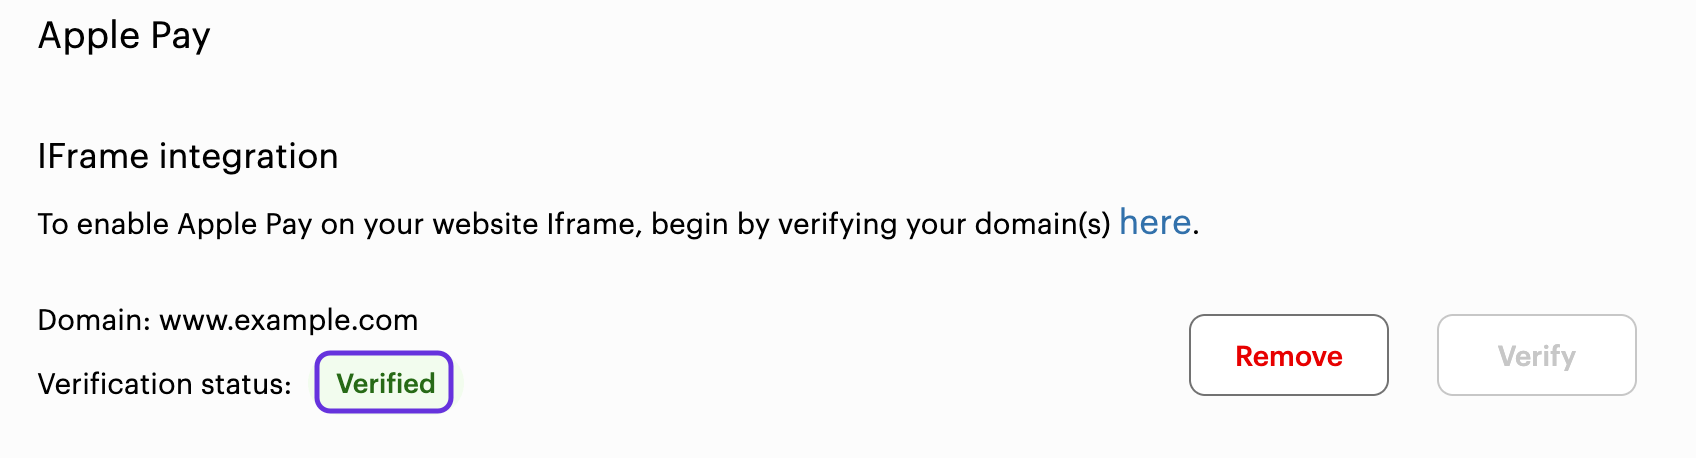
Go back to the IFrame integration section, and click Verify next to the domain you added.
Apple Pay: iframe integration domain verification
One of the following status appears:
-
Successful verification—Status updates to Verified.
Apple Pay: iframe integration domain verification status
-
Unsuccessful verification—An error message appears. In this case:
- Make sure the verification file is in the correct location on your ecommerce website:
https://{domain}/.well-known/apple-developer-merchantid-domain-association. - Check that the embedded file doesn't have a .txt extension.
- Make sure the domains are not behind a proxy or redirect and are accessible to Apple servers.
- Make sure the verification file is in the correct location on your ecommerce website:
Step 2: Add Apple Pay button to the Clover iframe
Once the ecommerce website is verified, you can add the Apple Pay button to a Clover iframe on the website to start accepting payments. When a customer clicks the Apple Pay button on a Clover-hosted iframe, the server redirects to clover.com. This domain is already verified with Apple as per their requirements for using Apple Pay on the web. Once the payment checkout flow is completed, the customer is redirected to the merchant's ecommerce website.
Related topics
Updated about 1 month ago