Iframe integrations
Overview
The Clover iframe provides the simplest form of ecommerce integration with secure card data entry through a customizable HTML payment form that you can embed in a merchant's ecommerce website. With the Clover iframe, you can quickly set up an online store with a payment form for card-not-present payments. The iframe returns a tokenized card for use with the Clover payment system. This reduces the PCI DSS compliance burden for merchants.
Key features
Some key points about the Clover iframe are:
- Secure payment processing—Send sensitive payment information directly to Clover servers, significantly reducing the PCI DSS compliance burden for merchants. You can also enable reCAPTCHA for all transactions made through the Clover iframe pages. This helps to distinguish customers from bots or automated software.
- Seamless API integration—Integrate Clover Ecommerce APIs into your merchant’s website to provide a smooth and reliable checkout experience.
- Customizable form design—Use iframe elements to align with your merchant's ecommerce website brand and embed payment buttons, such as Apple Pay® and Google Pay™.
- Card-not-present payment setup—Quickly configure an online store that supports PCI-compliant processing for card-not-present (CNP) transactions.
- TeleCheck® ACH payment support—Customize the iframe payment form to include Automated Clearing House (ACH) elements and apply Cascading Style Sheets (CSS) to style the iframe and its components. TeleCheck ACH is enabled for merchants in the United States (US) at the time of onboarding. If you face issues related to ACH setup, contact Clover Merchant Support.
Information flow for a charge request using an iframe
You can build a secure payment experience on your website using iframe card and page elements to securely transfer the customer's payment information from the merchant browser to the Clover server. Quick steps to set up a Clover iframe integration are:
- Import the iframe SDK to the merchant's webpage by adding a
<script>tag to the<head>section of the HTML. This lets you use the Clover iframe features. - Configure the iframe SDK with the merchant’s public key retrieved from the PAKMS endpoint. This is necessary to make payment requests on behalf of the merchant.
- Add an HTML payment form to the merchant webpage. The iframe collects and processes a customer's card information.
- Customize the iframe elements to match the website design and branding, providing a seamless user experience.
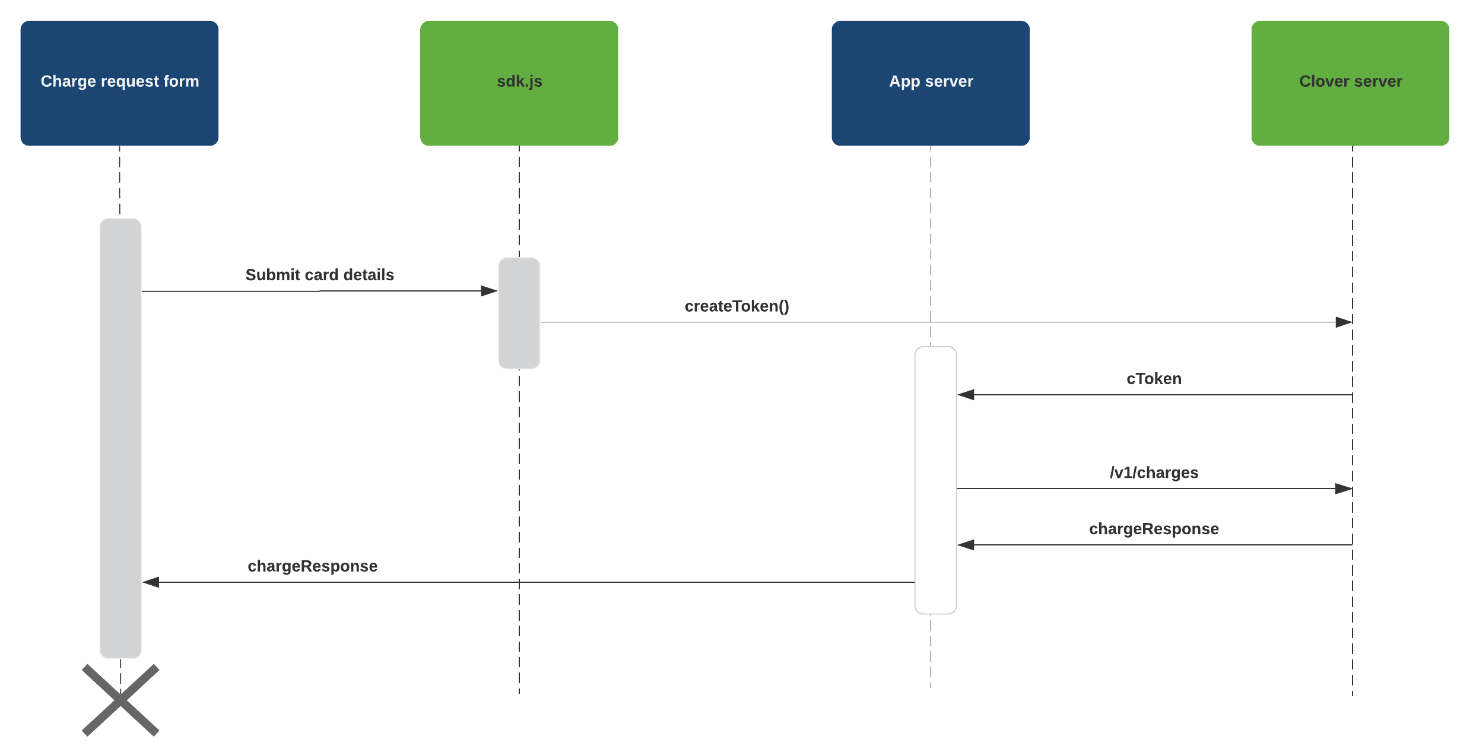
- Generate a card token and create a charge. Tokenize the customer card information entered in the payment form. Use a server-to-server call between the app server and the Clover server to create a charge.
- Test the integration in the sandbox environment to ensure that the payment process is smooth and secure.
The following diagram displays the information flow and the interaction of software components required to complete a charge request using a Clover iframe.

Information flow for a charge request
Green: Clover software
Blue: your apps software
Offer flexible payment options to customers—Clover hosted checkout page versus Clover iframe payment form
Clover hosted checkout page is ideal for simple orders where a Clover terminal isn't available on-site, such as event ticket sales. Customers are redirected to a Clover-hosted payment page to enter their payment and shipping details. After the transaction, they are redirected to the merchant's website.
The Clover iframe integration is suitable for merchants who want to maintain a seamless user experience on their own ecommerce website. The payment form is embedded directly on the merchant's website using an iframe. Customers enter their payment details without leaving the website.
Get started
Use the following to integrate the Clover iframe with your merchant's ecommerce website:
Payment form with Clover iframe
Use to create an interactive payment form that tokenizes customer’s card information and creates a charge to take a payment.
Clover iframe elements
Learn about the card and page elements that you can use in your payment form to get a customer’s payment information.
Payment buttons
Learn how you can add and customize payment buttons to your payment form.
Custom styling for iframe elements
Use cascading style sheets (CSS) to customize the look and feel of the payment form to match an ecommerce website's brand.
Custom styling for ACH elements
Customize a Clover iframe for ACH payment forms, with steps to initialize the SDK, define styles using CSS, create and mount ACH elements, and design form submission button.
Updated 6 months ago
