Customize a Hosted Checkout page
On the Global Developer Dashboard—Hosted Checkout Settings page, you can make the following changes to your checkout experience:
- Style your Hosted Checkout page to match the merchant's brand.
- Enable reCAPTCHA for security.
- Set up URL redirects to help your customers navigate back to your site after completing the checkout process.
- Add a callback URL to receive webhook messages when customers make a payment.
Prerequisites
- Create a global developer account.
- Select the Hosted Checkout checkbox in the Ecommerce Settings.
Customize your checkout page
- Log in to the Global Developer Dashboard.
- Click the Sandbox toggle icon to go to either the sandbox or the production environment.
- From the left navigation menu, click Test Merchants. The Test Merchants page lists the default test merchant account.
- Click the Launch Dashboard icon. The Test Merchant Dashboard appears.
- From the top-right menu, click Settings. The Settings side panel appears.
- Go to View all settings > Ecommerce section > Hosted Checkout. The Hosted Checkout page appears. From here, you can view and edit the Default page settings and styles. You cannot delete the Default page.
- (Optional) Select the arrow to preview the Default page.
- Select Edit to customize the Default page.
- If you want to create multiple Hosted Checkout pages, in the Upgrade to create multiple pages section, click Manage service plans and then select the Essentials plan or above.
- In the Custom pages section, select Create new page. The Create New Checkout page appears.
- In the General information section, enter the custom Hosted Checkout page name and a brief description.
- Complete all other sections to customize the Hosted Checkout page:
- Styling: Customize the appearance of the Hosted Checkout page, such as business name, colors, and footer content, to match your brand.
- Customer details: Collect customer information during checkout using the available customer fields, for example, first name, last name, and email, depending on which customer information features are enabled.
- Custom fields (available based on Service plan): Configure additional fields to capture extra information from customers during checkout.
- reCAPTCHA: Enable reCAPTCHA to help block automated bots and reduce fraud; it is triggered when repeated purchase attempts are detected. It helps prevent spam and fraudulent activity by blocking automated software. It does not appear for every transaction.
- Redirect URLs: Set success, failure, and cancellation redirect URLs to direct customers back to your site after checkout.
- Webhook callback URL: Add a callback URL to receive webhook notifications when a customer completes a payment.
- Check the Page Preview on the right.
- Select Save. When you create custom Hosted Checkot pages, the name and a unique page ID are displayed in the Custom pages section. The page ID is used to complete your Hosted Checkout integration.
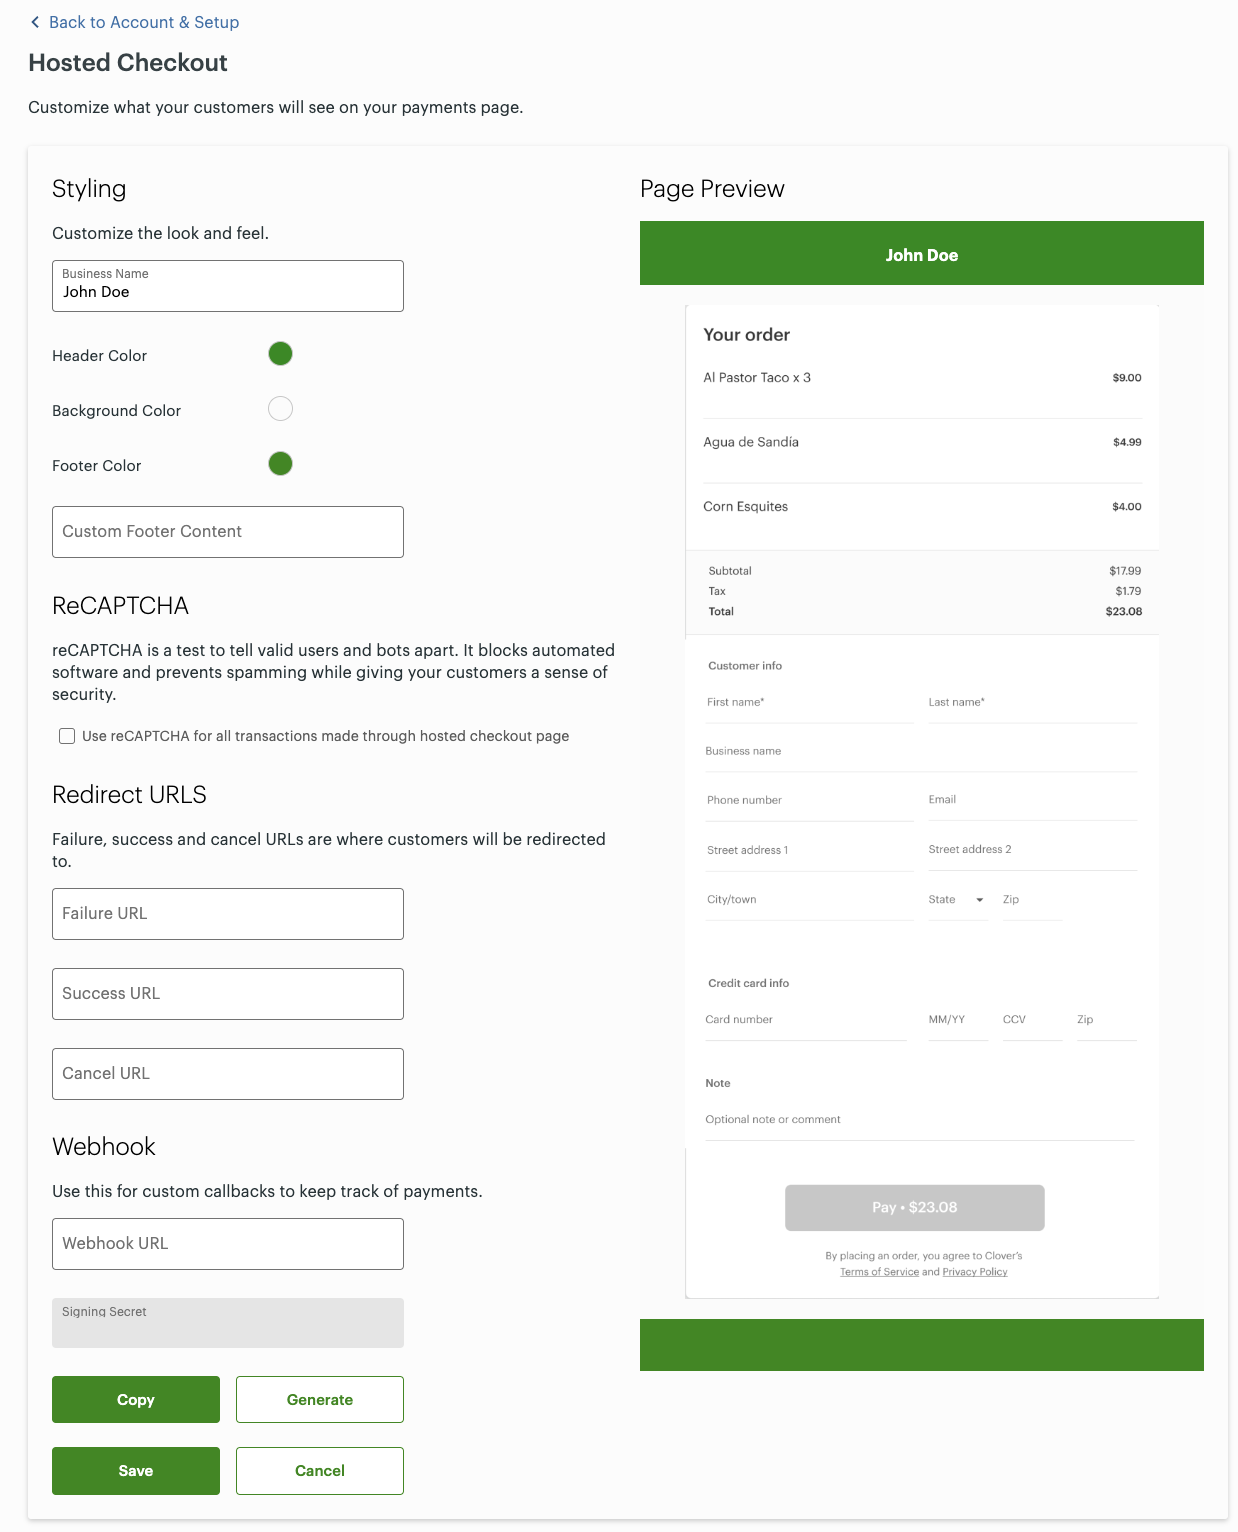
In the Styling section, enter the following information:
- Business Name—Merchant or business name that you want to display on the Hosted Checkout page.
- Colors—Select each of the color options—Header Color, Background Color, or Footer Color—and then select a new color using the color picker. Use the brand-approved colors for your merchant website.
- Custom Footer Content—Text you want to display at the bottom of the Hosted Checkout page.
The Page Preview on the right displays all the changes based on the Styling section fields.
Use reCAPTCHA
ReCAPTCHA is a Google service to test to distinguish valid users from bots. It blocks automated software and prevents spamming and fraud. ReCAPTCHA is triggered when it detects multiple repeated purchase attempts and a reCAPTCHA field is presented to consumers to confirm they are not bots.
The reCAPTCHA checkbox for Hosted Checkout is selected by default for all new Clover merchants to combat fraud on card-not-present (CNP) transactions. Merchants can turn the feature on or off in the Merchant Dashboard on the Hosted Checkout page.
In the ReCAPTCHA section, select or clear the Use reCAPTCHA for all transactions made through the hosted checkout page checkbox.
For more information on reCAPTCHA see Blog: Clover Ecommerce vs. Bots: reCAPTCHA Your Website.
Related topics
Updated about 1 month ago