Set up emulator in Android Studio
This topic covers the procedures that you need to complete to set up an Android Emulator for a Clover device.
Before you Begin
- Review Custom Android basics for Clover devices.
- Complete all the steps in the Android Emulator overview: Before you begin section.
- Note that if you build an emulator for a device using an API level other than what this topic covers, the configuration may have minor Android-specific differences.
Watch video: Clover Android Emulator setup demo
| Watch | Learn |
|---|---|
|
|
In this video, learn:
|
Prerequisites
1. Download and extract Clover device profiles
Hardware profiles define the characteristics of a device as shipped from the factory. Clover maintains a profile of each device that you can import into the emulator.
- Download the Clover device profiles ZIP file.
- Extract the files to a location on your computer. You need to import the Clover device profiles into the Android Studio Device Manager.
2. Access Android Studio Device Manager
- Open Android Studio.
- To access the Device Manager, do one of the following on the Android Studio Welcome page:
- Click the More Actions icon > Virtual Device Manager.
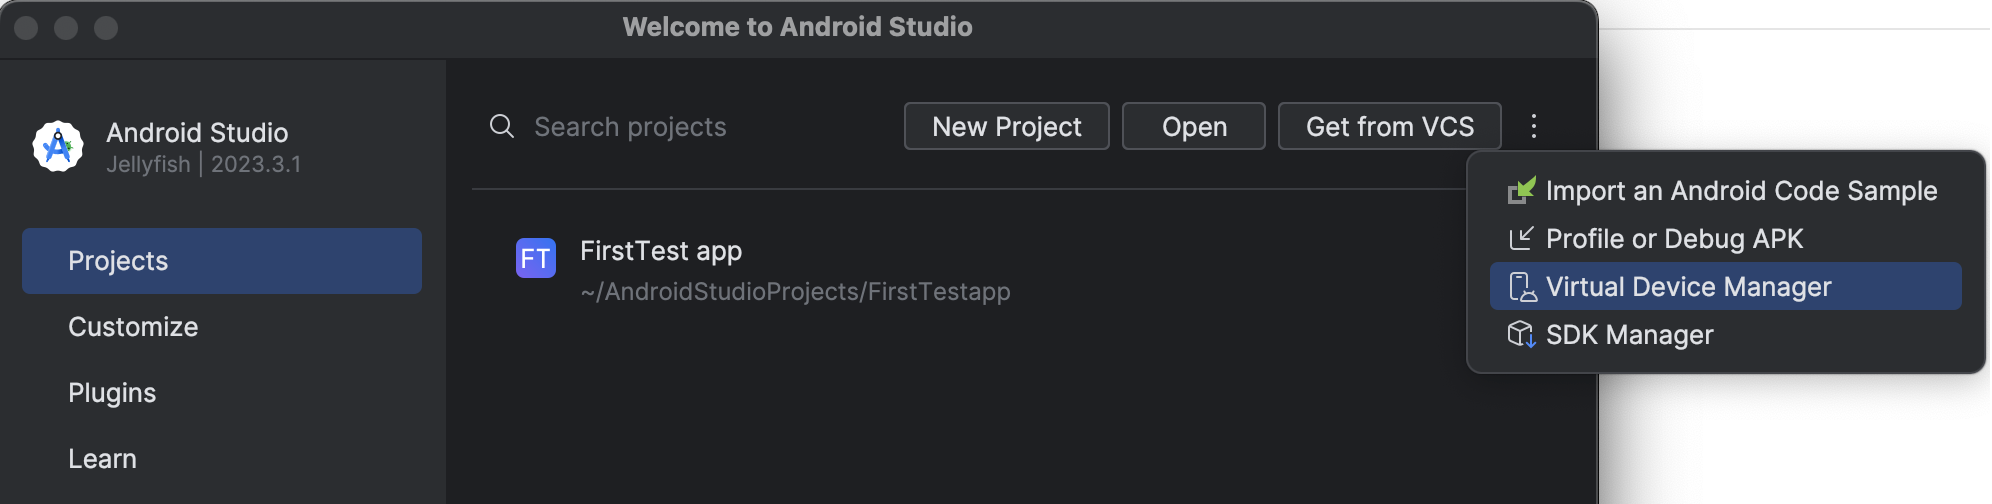
Android Studio: More Tools > click Virtual Device Manager
- Open your app project, and on the project page, from the main menu, click View > Tool Windows > Device Manager.
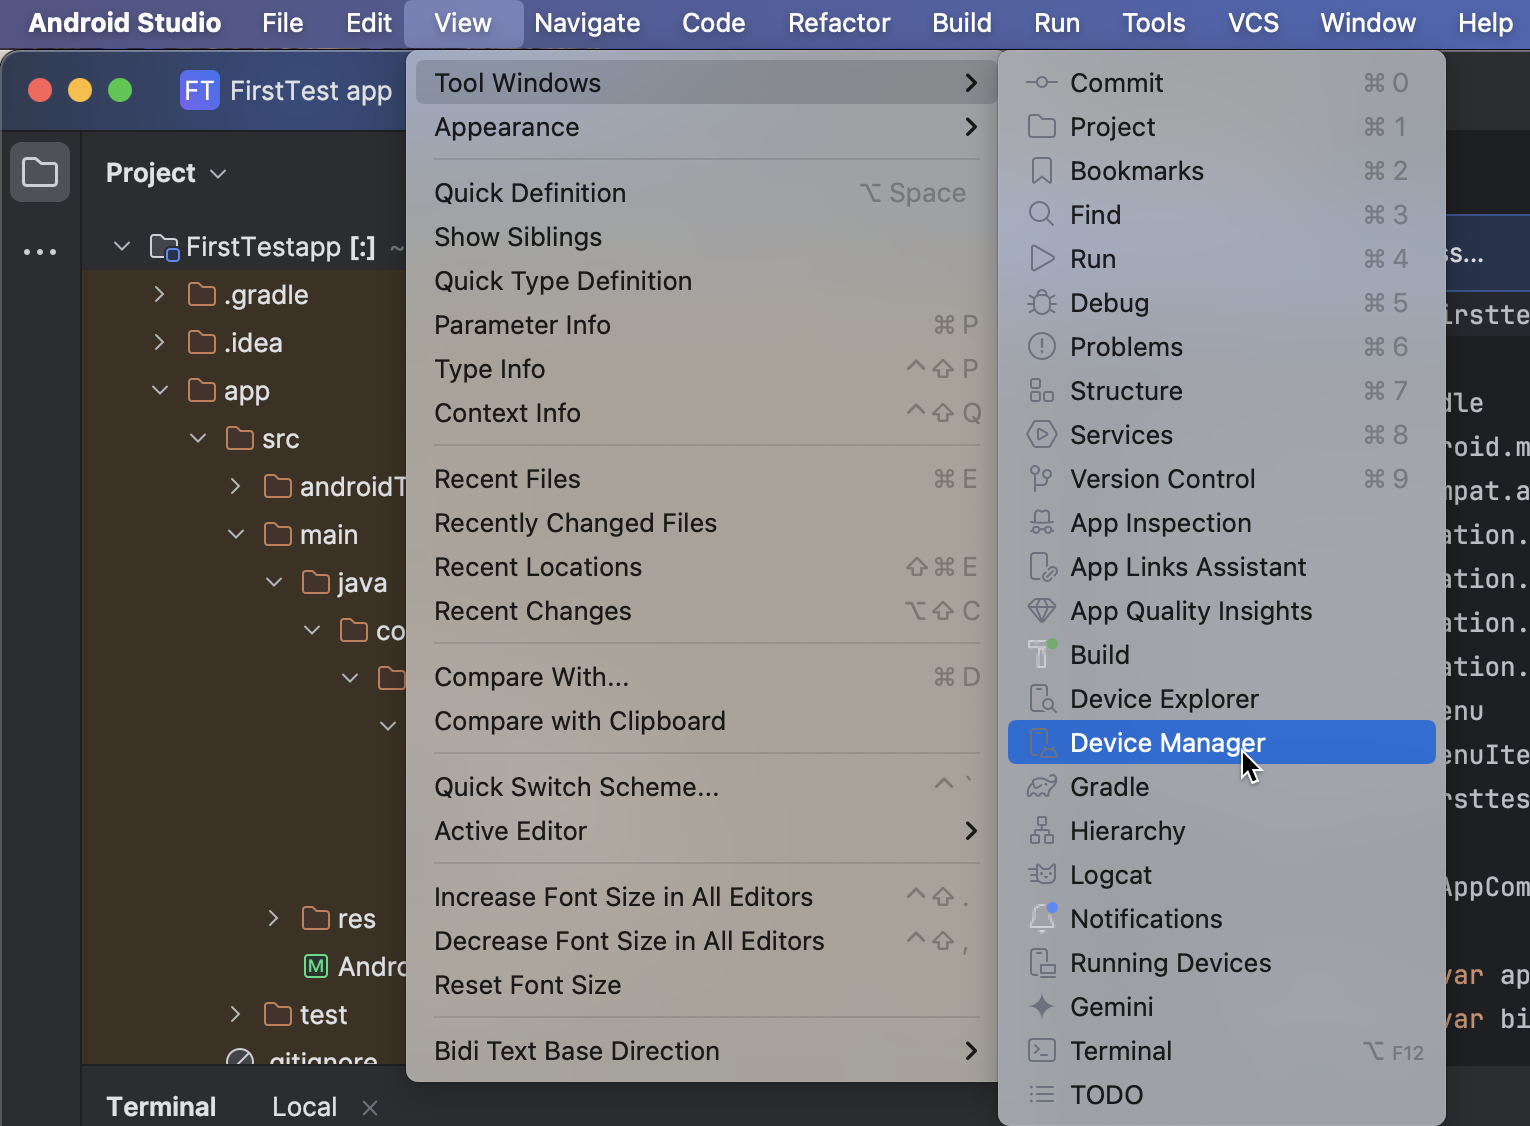
Android Studio: Main menu > View > Tools window > click Device Manager
3. Import Clover device profiles
- Open Android Studio and access the Device Manager.
- Click the + icon to Create Virtual Device. The Select Hardware page appears.
- At the bottom of the page, click Import Hardware Profiles.
- Browse to the folder where you downloaded the Clover device profiles and select the device profiles to import.
- Click Open. The selected Clover device profiles are imported into the Device Manager.
- On the Select Hardware page, in the search field, enter Clover. All Clover device profiles display in the Choose a device definition list.
- Select one or more Clover device profiles from the list and click Next. The System window page appears.
- Review the System information for the Clover device profile and click Next. The Verify Configuration page appears.
- Review or update the configuration information for the device profile and click Finish. The device profile displays on the Device Manager page.
You can now create a new emulator for the Clover device profile. See Set up an emulator in Android Studio.
4. Verify the DPI settings of the Clover device
Android runs on a variety of devices that have different screen sizes and pixel densities. The Clover Mini 2 and Mini 3 device profiles require a specific DPI that may be overridden if you make changes to the profile. To verify the DPI setting is correct, go to the Device Manager in Android Studio.
- Open Android Studio and access the Device Manager.
- Click the ⋮ more icon next to the device profile, and from the menu, click one of the following to view and verify the device profile DPI settings:
- Click View Details. The device profile details display in the lower pane.
- Click Show on Disk. The device details folder
[user_home]/.android/avd/[virtual-device-name].avddisplays on your computer. Search for and click theconfig.inifile. The file details display in Android Studio.
- To verify the DPI settings for the Clover Mini 2 and Mini 3 profiles, check the
hw.lcd.densityvalue is set to213.
5. Run ADB as root
The Android Debug Bridge (ADB) is a command-line tool that lets you communicate with an emulator instance or connected Android device. It's included in the Android SDK Platform-Tools package, which you can download from the Android SDK Manager. To use adb commands, you need install and properly configure ADB on your computer.
To verify that ADB can run as root, that is, it can execute commands with root-level permissions on an Android device or emulator:
- Open Android Studio and then open a project.
- From the main menu, click View > Tool Windows > Terminal. The Terminal window appears.
- In the Terminal window, run
adbroot. ADB is restarted to allow commands as root. - Run
adb shell id. A list of system IDs appears. - Verify that the user ID
uidvalue is0(root).
Gen 1 devices, including Clover Station (C010), Mobile (C020/C021), Mini (C030/C031), and Flex (C041/C042), are approaching End-of-App-Update (EOAU) on May 15, 2026.
Action required: Review your apps for device compatibility before the deadline, and plan device upgrades.
Learn more: Device lifecycle and support.
Set up an emulator in Android Studio
1. Create a new emulator profile
Creating an emulator profile sets your emulator with the required device hardware configuration.
- Complete the steps to import Clover device profiles.
- Click the + icon to Create Virtual Device. The Select Hardware page appears.
- In the search field, enter Clover. All Clover device profiles display in the Choose a device definition list.
- Select a device profile from the list and click Next. The System Image page appears.
- Select the image for the API Level supported on the Clover device you are emulating.
Click to view: Clover devices with API level, ABI, and other information on the System Image page
Important: Use ABI: arm64-v8a if you are using the Apple M chip series for Mac computers or the Qualcomm® Snapdragon® X Elite processor.
| Clover device | Release name | API level | ARM Images tab (Use for Apple M chip or Qualcomm Snapdragon X Elite processor) | Other Images tab (Use for Intel chip) | Target |
|---|---|---|---|---|---|
| Station 2018 | Nougat | 25 | arm64-v8a | x86_64 | Android 7.1.1 |
| Flex 2 Flex 3 Mini 2 Mini 3 Station Solo | Q/10 | 29 | arm64-v8a | x86_64 | Android 10 |
- Click Next. The Verify Configuration page appears.
- Verify that the correct Startup orientation, landscape or portrait, is selected based on the device you are emulating.
Click to view: Clover device with Startup orientation information
| Clover device | Startup orientation |
|---|---|
| Flex 2 and Flex 3 | Portrait |
| Mini 2 and Mini 3 | Landscape |
| Station 2018 | Landscape |
| Station Solo | Landscape |
- Click Show Advanced Settings. Additional information displays on the page.
- Scroll down to the Memory and Usage section:
- Set the RAM value based on the device you are emulating.
- Set the Internal Storage value based on the device you are emulating:
Note: Android Studio may reset the Internal Storage value to 800MB. Verify that the correct value is set so you do not run out of storage space during Clover app installation.
Click to view: Clover device with RAM information
| Clover device | RAM (GB) |
|---|---|
| Station 2018 | 3 GB |
| Flex 2 and Flex 3 Mini 2 and Mini 3 Station Solo | 2 GB |
Click to view: Clover device with Internal storage information
| Clover Device | Internal storage (GB) |
|---|---|
| Mini 2 | 7 GB |
| Station 2018 | 10 GB |
| Flex 2 and Flex 3 Mini 3 Station Solo | 16 GB |
- Click Finish. A new virtual device is added on the Device Manager page based on the Clover device profile you selected.
- Click the Launch icon for the device. The device emulator is launched.
2. Sideload the required Clover APK using ADB
Sideloading an APK using Android Debug Bridge (ADB) means installing an Android application package (APK) file directly to an Android device without using the Clover App Market. For Clover device emulators, you need to sideload certain Clover-specific APKs using ADB to simulate the Clover environment fully. With your device profile, install the Clover APK you need to configure the emulator. For more information, see Work with APKs.
- Open the Clover Development APKs page for the Clover environment on which you want to test:
- Download the Clover Engine APK (
com.clover.engine-{version}.apk). - Open Android Studio and then open a project.
- From the main menu, click View > Tool Windows > Terminal. The Terminal window appears.
- To verify that ADB is connected to the emulator, run the following command:
adb devices. A response appears:
List of devices attached
emulator-5554 device- To install the Clover Engine APK, run
adb install {download_folder}/com.clover.engine-{version}.apk.
A success message appears.
NOTEThe next time you sideload an app, open a Clover app and then click the sync button at the top-left of the app. This ensures that you have the latest version of your sideloaded app on the emulator.
Install and manage apps on the device emulator
1. Install required Clover merchant apps using Python
In this procedure, all Clover apps for merchants, such as Register, Orders, and Inventory, are installed on the virtual device by running a Python script. Any apps installed to the test merchant you select are also installed.
NOTEPython 3.5 or later is required to run the
Pythonscript. If your machine falls back on Python 2 as a default, you may need to use thepip3andpython3commands to install the required modules and run the script.urllib3is a required module for the script.
Add Clover as an account in the device emulator
- Open Android Studio and access the Device Manager.
- Search for the virtual device you want to start and click the Play icon next to it. The emulator runs the virtual device.
- On the virtual device, click the Settings app.
- Enter Account in the Search field and click Accounts. The Add an Account page appears.
- Click Clover. The Clover Developer Dashboard Login page appears.
- Log in to the Developer Dashboard and select a test merchant.
Download and run the app install script in Android Studio
- In Android Studio, from the main menu, click View > Tool Windows > Terminal. The Terminal window appears.
- Run the following command to download the app install script to the current directory:
curl https://raw.githubusercontent.com/clover/clover-android-sdk/master/scripts/install_apps.py -O.
Note: This step is not needed if you are setting up a second or subsequent emulator and have already downloaded the script. - Run the install script (
./install_apps.py) and wait for all of the apps to be installed. You may need to change the access permissions to make the file executable for your user. - In the Virtual Terminal window, run
adb reboot. The emulator reboots, and the Select a Home app pop-up appears. - Select the Clover Launcher option and then click Always. The Clover homepage appears.
2. Install your test Android app
You can install your test Android apps once your initial emulator setup is complete.
- Log in to the Developer Dashboard.
- From the left navigation menu, click Your Apps > app name > Market Listing. The app name Market Listing page appears.
- Click Preview in App Market. The Merchant Dashboard for your test merchant account appears with an App Market preview of your app.
- Click Connect.
- On the Install app pop-up, select a pricing tier or accept the default, and then click Accept.
- In the Virtual Terminal window, run the install script (
./install_apps.py). Your app is downloaded and installed on the emulator.
$ ./install_apps.py
Getting installed versions...
Getting current app data...
Updating package: your.package.name from version: ?, to version: 1...
3. Install new versions of your app
Emulators do not function exactly like Clover devices, so the app update process is not automatic. After you've uploaded a new APK on the Developer Dashboard, complete the following steps to update the APK installed on the emulator.
- Open Android Studio and then open a project.
- From the main menu, click View > Tool Windows > Terminal. The Terminal window appears.
- If you have not restarted the emulator since installing the previous version of the APK, run
adb reboot. The emulator is restarted. - Run the install script (
./install_apps.py). The new APK is downloaded and installed on the emulator.
$ ./install_apps.py
Getting installed versions...
Getting current app data...
Updating package: your.package.name from version: 1, to version: 2...
4. Uninstall and sideload APKs
You can also sideload APKs to your emulator, but you must first uninstall the previous version manually with theadb uninstall your.package.name. When updating to a new version of your app, you must install the new version using the same method as the previous version. This method can be the install script or sideloading. If you try to use the other method, Android's signature verification returns an error:
Failure [INSTALL_FAILED_UPDATE_INCOMPATIBLE:
Package your.package.name signatures do not match
the previously installed version; ignoring!]
5. Update device settings for production testing
If you are testing your app in the United States (US) or European region production environment, you must change the Android device configuration before proceeding. Use the following steps for separate commands for the US and Europe.
- Open Android Studio and then open a project.
- From the main menu, click View > Tool Windows > Terminal. The Terminal window appears.
- Run one of the following commands to set the
clover_cloud_url:
- US:
adb shell settings put secure clover_cloud_url "https://www.clover.com" - Europe:
adb shell settings put secure clover_cloud_url "https://www.eu.clover.com"
- Run one of the following commands to set the
clover_target:
- US:
adb shell settings put secure clover_target "prod_us" - Europe:
adb shell settings put secure clover_target "prod_eu"
Delete a virtual device from the Android Emulator
You can delete data, such as sensitive information, from a virtual device or permanently delete the virtual device. Clover recommends backing up any app data, system settings, and user profiles before wiping data or deleting a virtual device. Use the adb pull command to copy files or directories from the virtual device to your local system. For example, to back up a file located at /data/data/com.example.myapp/myfile, use the command adb pull /data/data/com.example.myapp/myfile ./, where ./ is the destination on your local system.
To wipe data or delete a virtual device:
- Open Android Studio and access the Device Manager. A list of available virtual devices appears.
- Click the ⋮ more icon next to a virtual device, and from the menu, click one of the following:
- Wipe Data to delete all user profiles and information from the virtual device. This ensures that all sensitive data and test information is deleted.
- Delete to permanently delete the virtual device and all its information from the emulator.
- Click Yes on the confirmation message pop-up.
- To turn off a running Android Emulator, close the emulator window.
Related topics
Updated 2 months ago