Set up pricing tiers
On the legacy Developer Dashboard
You can set up pricing tiers for your apps on the Developer Dashboard. You can then use the REST API endpoint or the Android AppsConnector method to send metered events to Clover. See Handle app billing.
Before you begin
- Create your production developer account.
- Add or update bank account information to set up your billing details.
- Complete your app settings.
- Understand each pricing tier to set up the pricing for your app. See Monetize your apps.
Set up pricing tiers for an app
You can set up:
- Free trial period (14–90 days) for your app approved for publishing on the Clover App Market.
- Subscription pricing and tiers for each country. Your app must have at least one subscription country.
- Metered event pricing for each country. Follow the best practices so that you do not have to change the metered event pricing on your approved app:
- Plan your pricing strategy.
- If you need to change the metered event pricing, think through your use case and justification for the change.
- Send an email request to Clover Developer Relations (DevRel): [email protected] with a business justification of why you want to change the metered event pricing.
- Work with the Clover developer support team to review the request and update the prices.
Enable a free tier for your app
- Log in to the Developer Dashboard.
- From the left navigation menu, click Your Apps > app name > Pricing & Distribution. The Pricing & Distribution page appears.
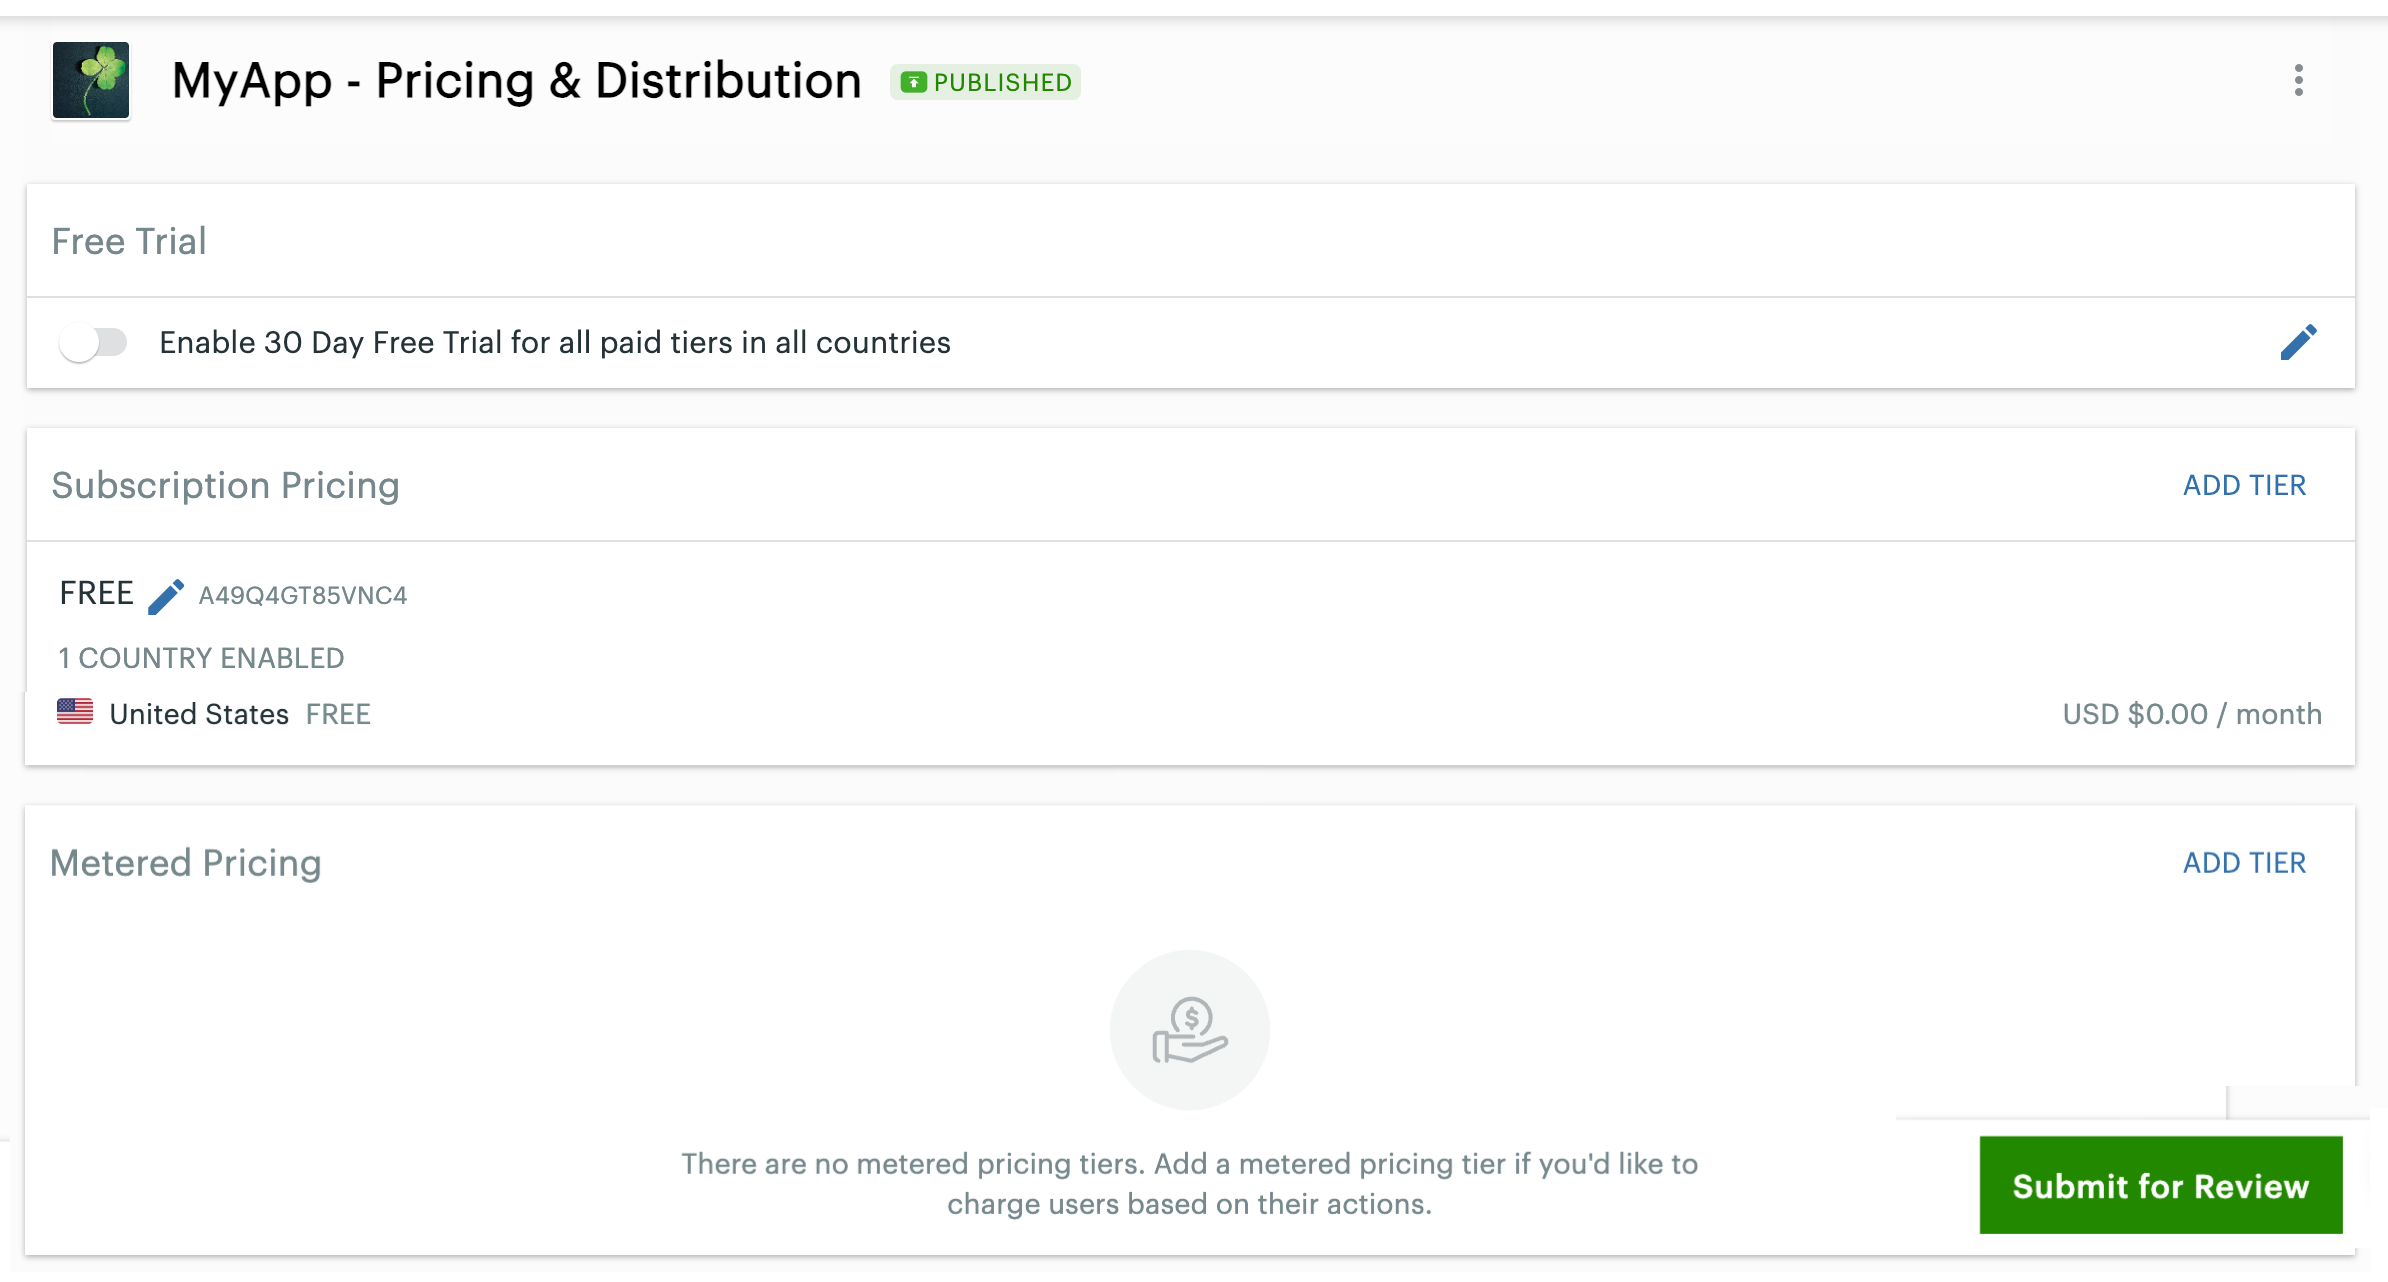
App - Pricing & Distribution page
- In the Free Trial section, click the edit icon. The Edit Free Trial pop-up appears.
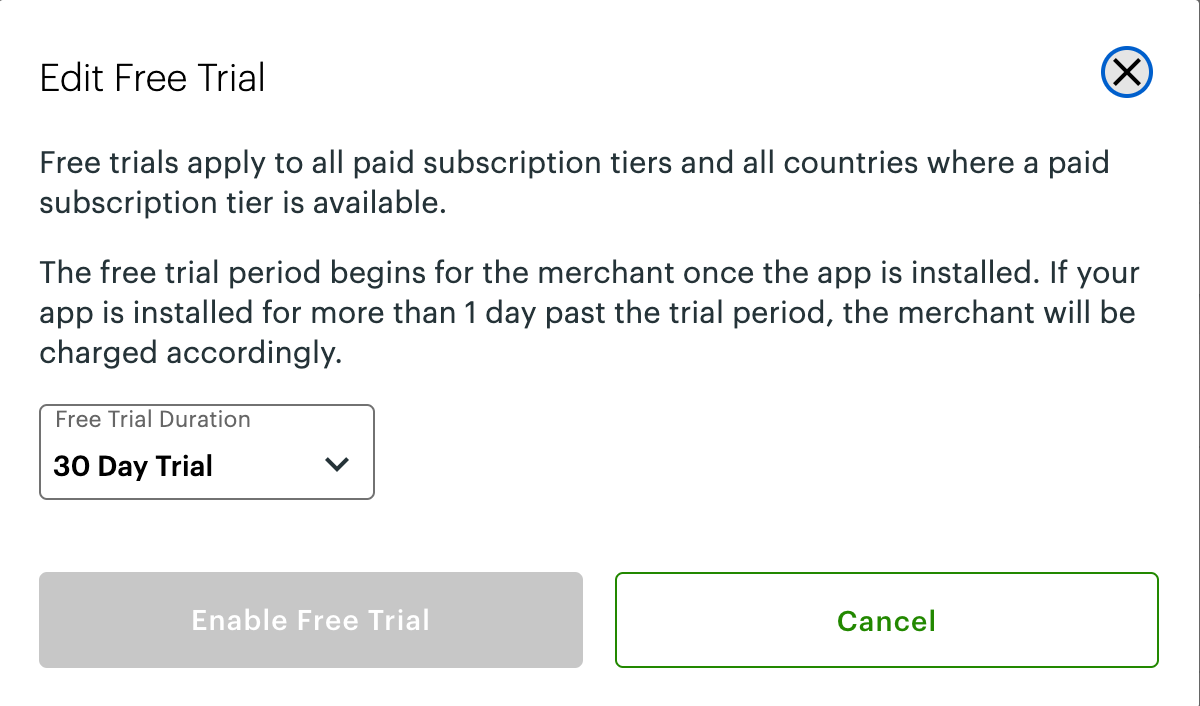
Edit free trial pop-up
- From the Free Trial Duration drop-down list, select a duration: 14 days, 30 days, 60 days, or 90 days.
- Click Enable Free Trial. The status of the free trial displays in the Free Trial section.
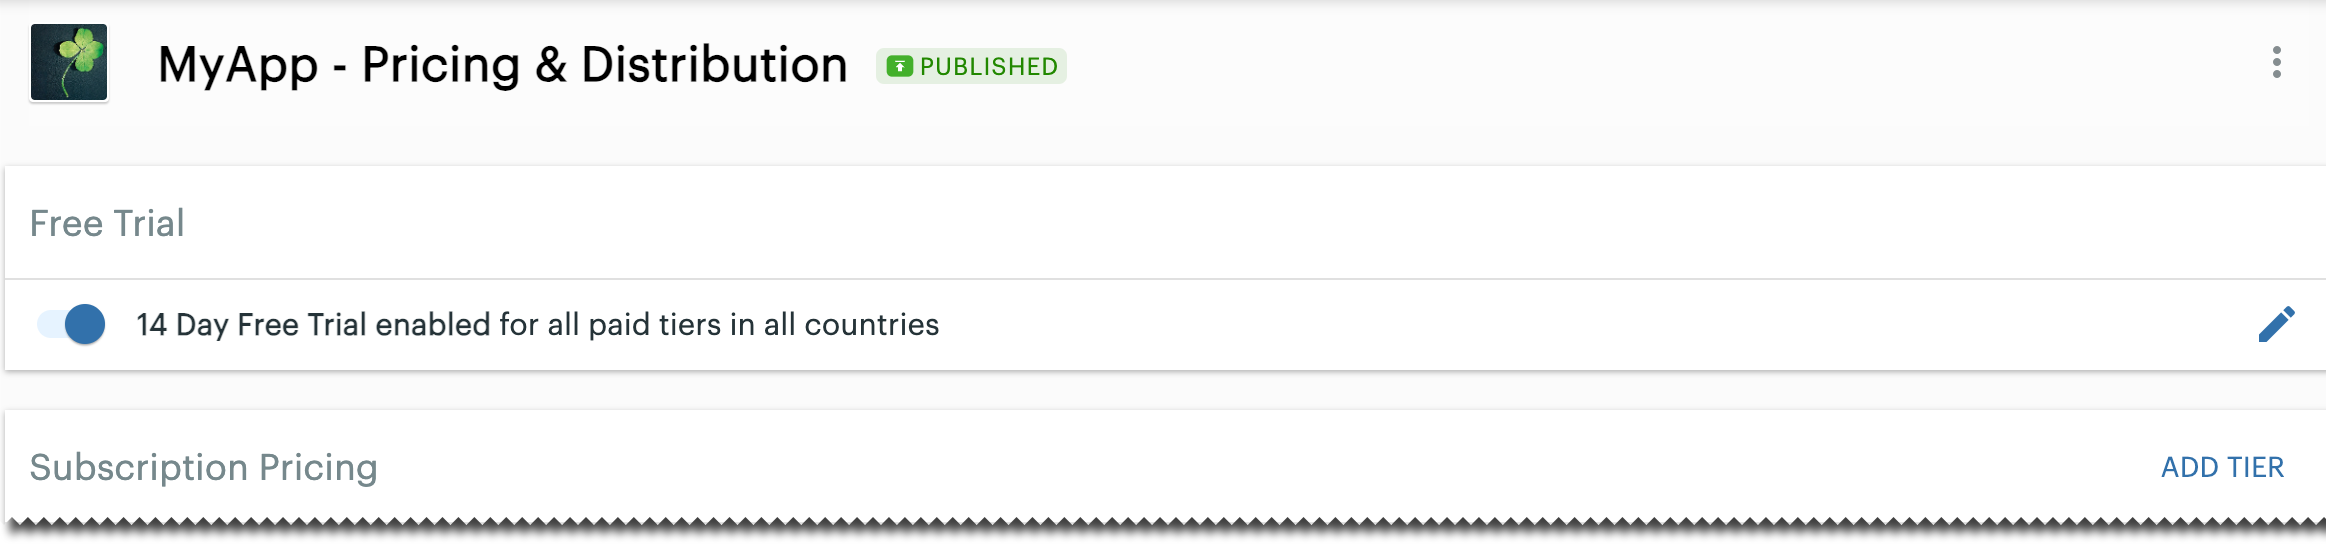
App - Pricing & Distribution page - with Free Trial enabled
Billing begins on the day of the app's installation or after the end of the trial period. Clover adds a partial month charge in the Pending charge status at the end of the trial period. The charge status changes to In Progress after Clover generates the merchant statement at the end of the month.
Edit default subscription pricing
- Log in to the Developer Dashboard.
- From the left navigation menu, click Your Apps > app name > Pricing & Distribution. The Pricing & Distribution page appears.
- In the Subscription Pricing section, click the edit icon next to the default country where your app is available. The Edit Subscription - Free pop-up appears.
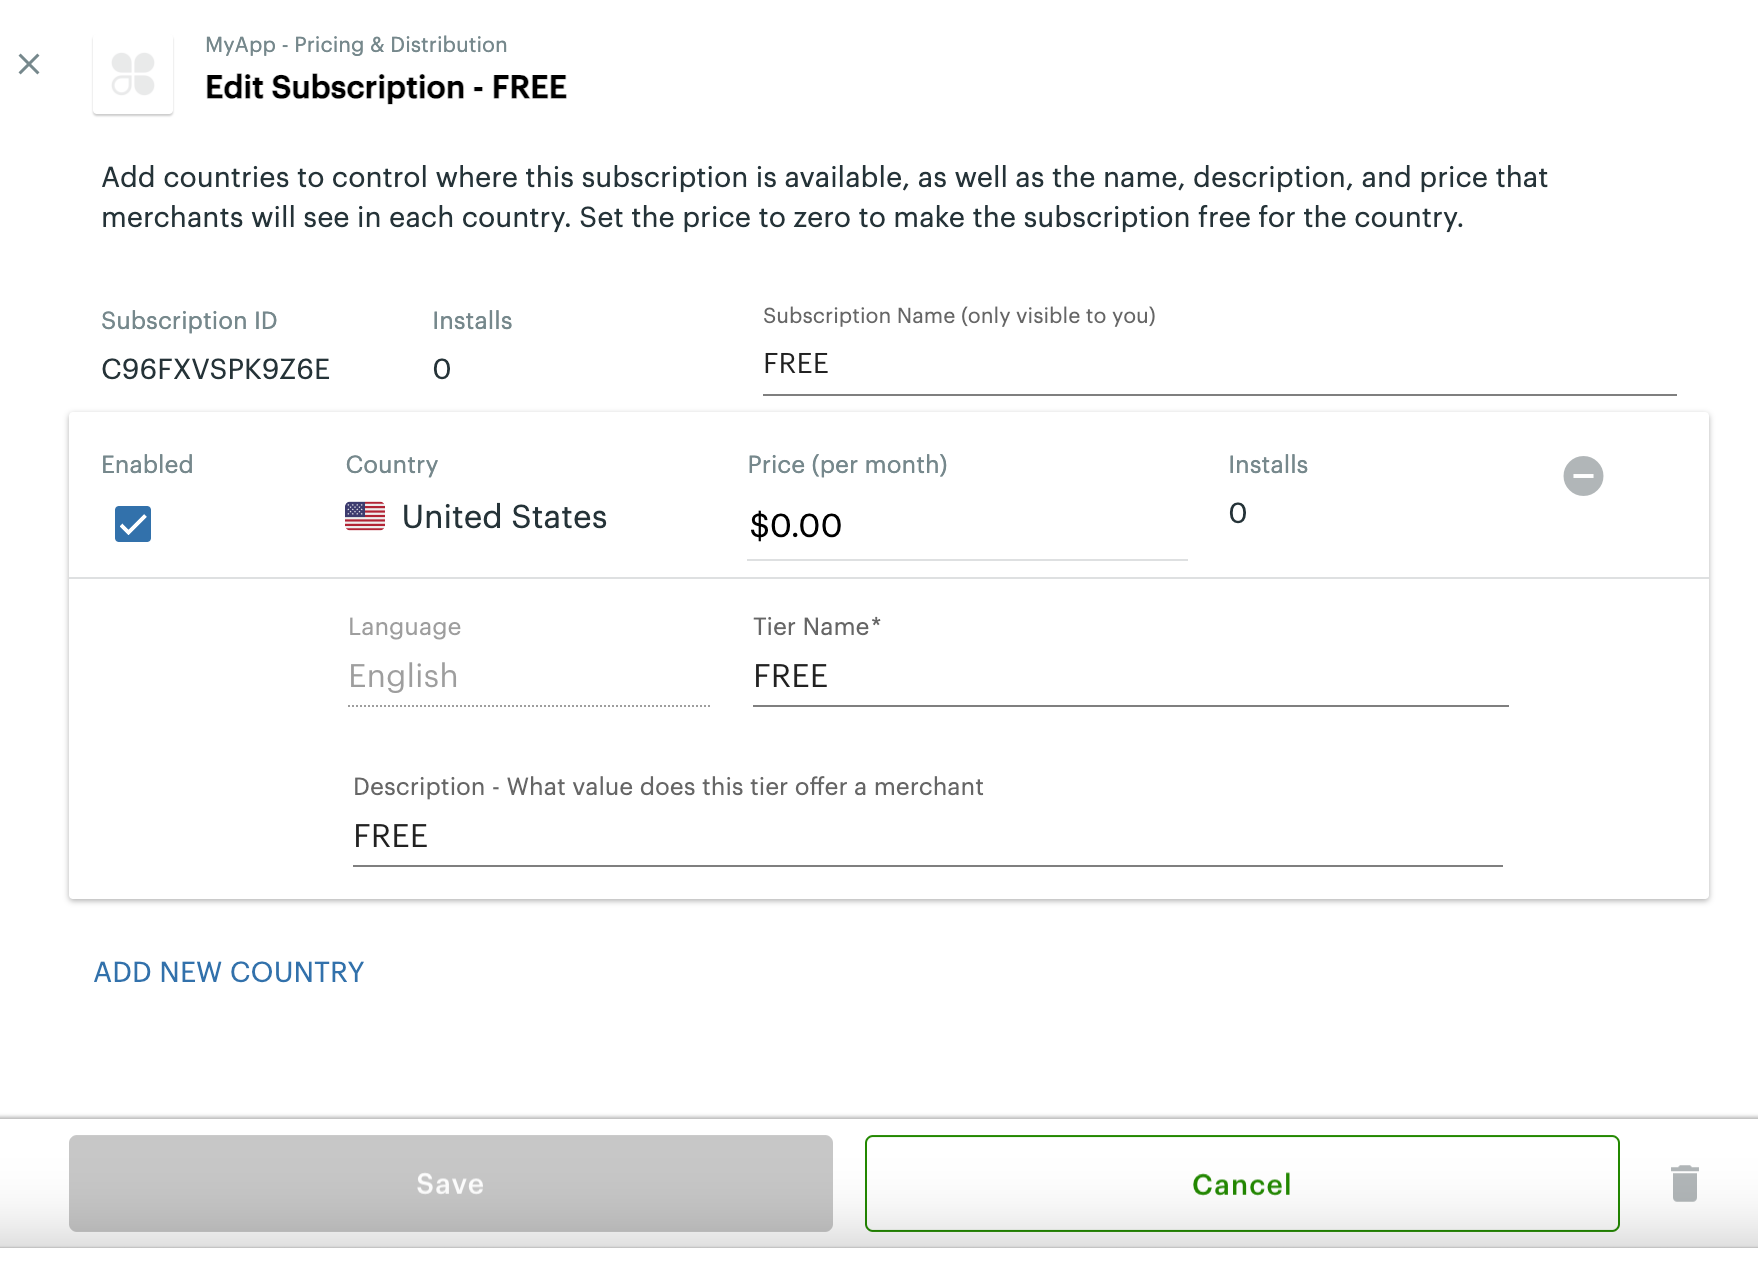
Edit Subscription - Free pop-up
-
Review the information in the fields and update the following:
Field Description Subscription name Subscription name, such as Free, Trial offer, Premium. This name is only visible to you. Price (per month) Enter a monthly price for paid apps or use the default value as 0.00 if the app is free. Tier Name Enter a tier name, such as Basic, Pro, or Premium. Description - What value does this tier offer a merchant Enter a description for the tier; for example, Basic allows the use of 5 out of 20 features, Pro offers 10 out of 20, and Premium offers all features of the app. -
Click Save. The updated information displays in the Subscription Pricing section.
Add subscription tier pricing for a country
- Log in to the Developer Dashboard.
- From the left navigation menu, click Your Apps > app name > Pricing & Distribution. The Pricing & Distribution page appears.
- In the Subscription Pricing section, click Add Tier. The Add Subscription Tier page appears.
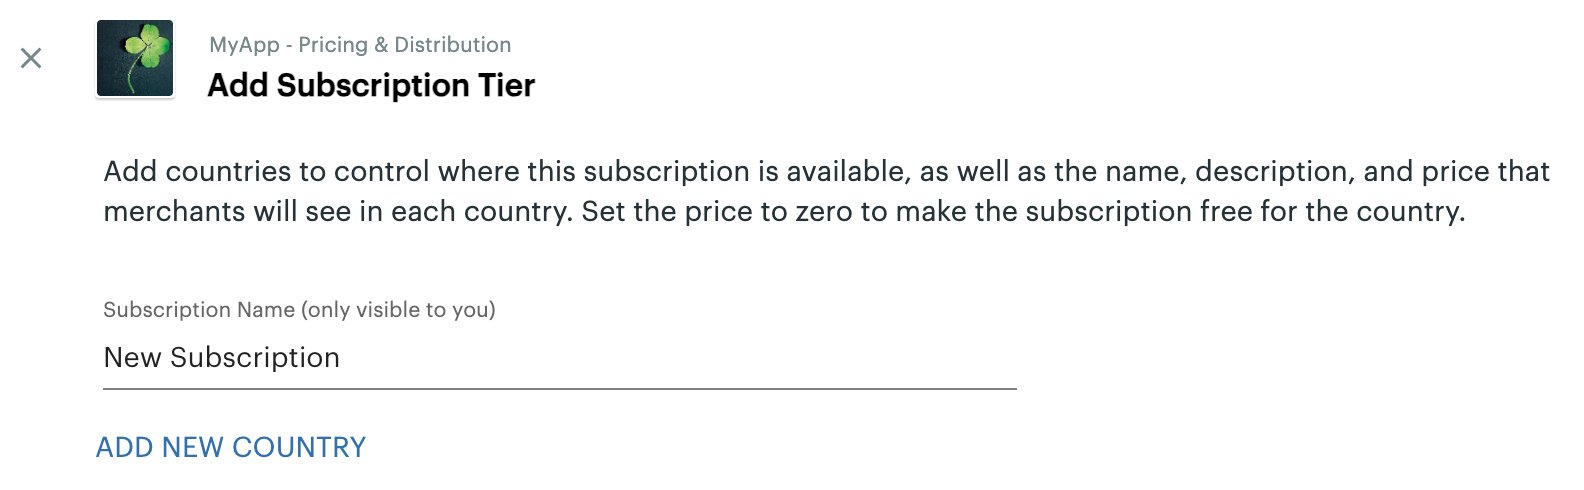
Add Subscription Tier pop-up
- Enter a new subscription name.
- Click Add New Country to indicate where to make the subscription available. Additional fields display on the pop-up.
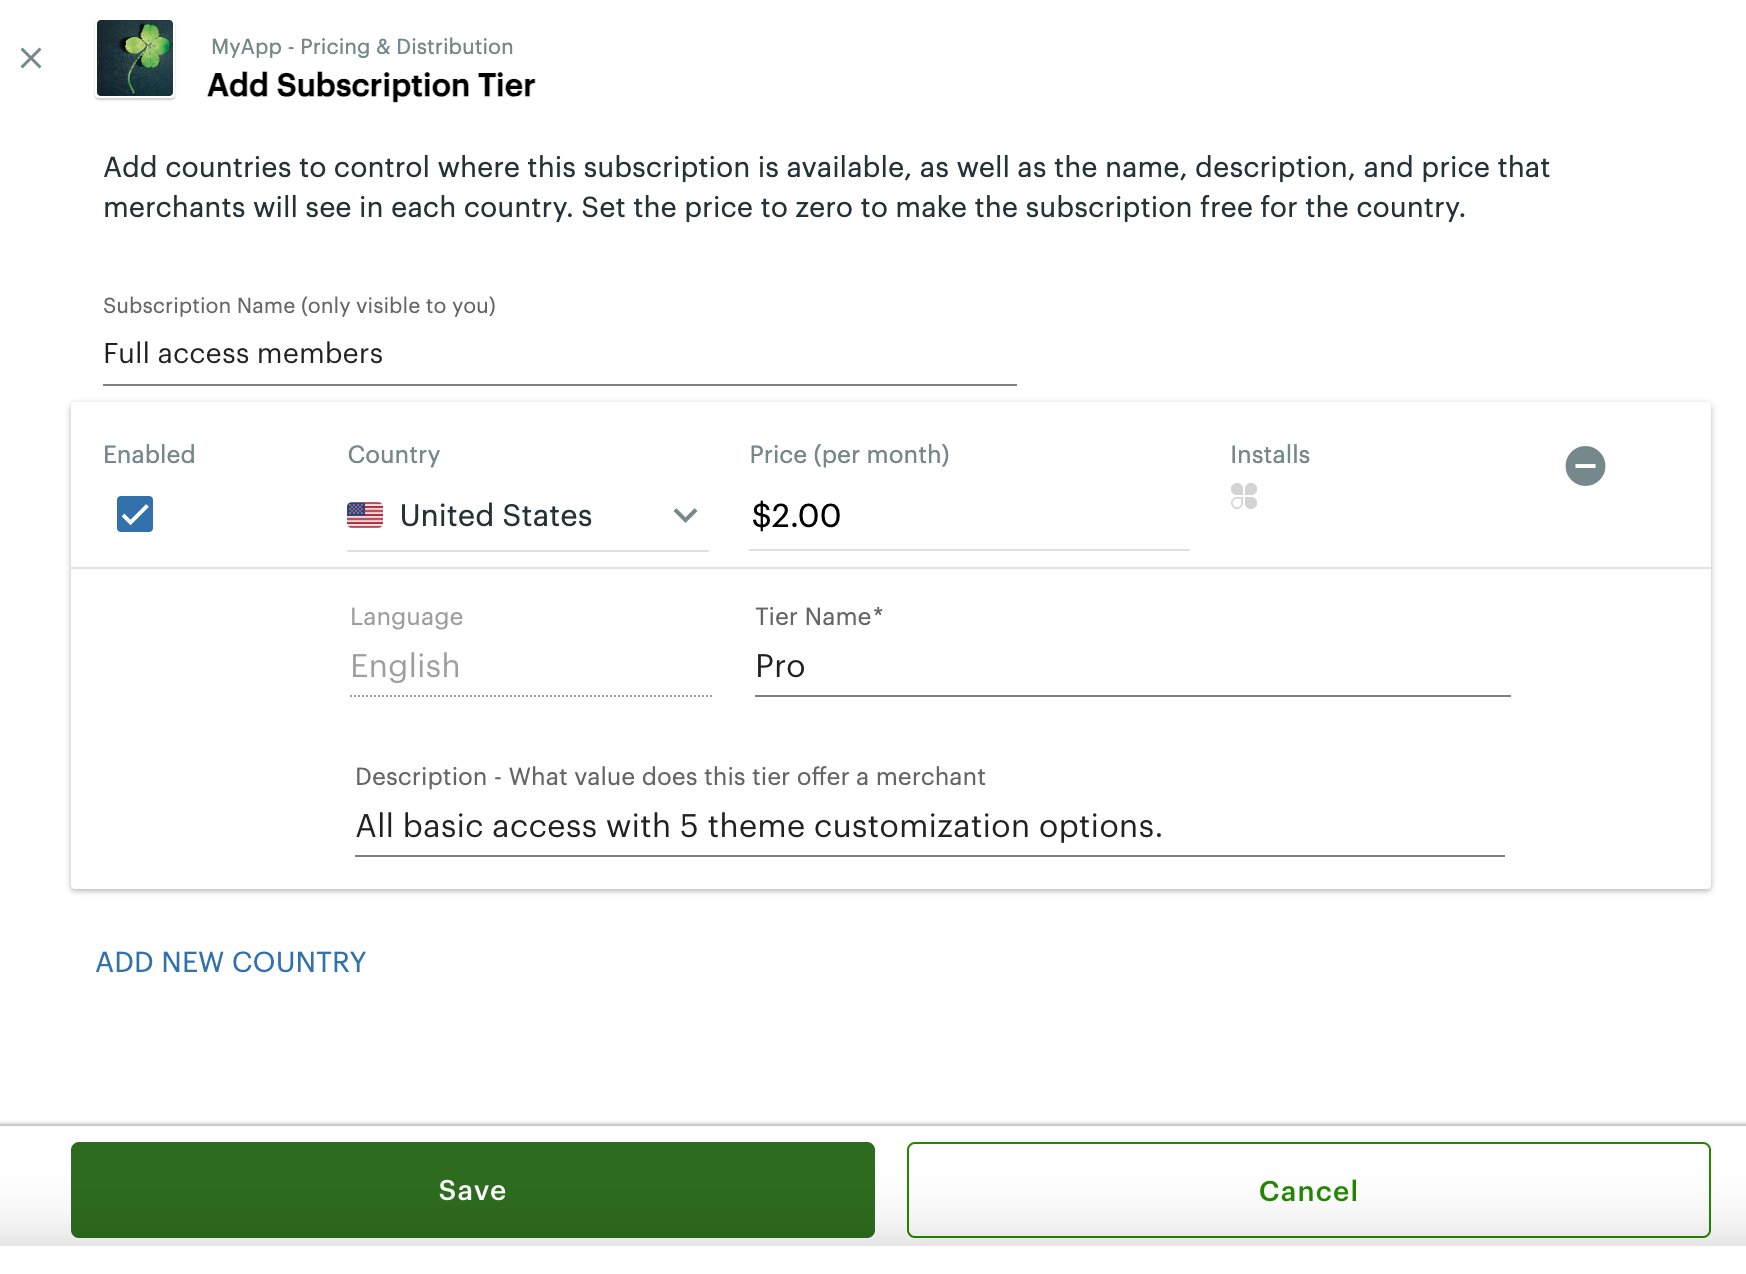
Add Subscription Tier
-
Complete information in the fields as follows:
Field Description Enabled Select the checkbox to enable the tier immediately for merchants. Country From the drop-down list, select a country to make the tier available. Price (per month) Enter a monthly price for paid apps or use the default value as 0.00 if the app is free. Tier Name Enter a tier name, such as Basic, Pro, or Premium. Description - What value does this tier offer a merchant Enter a description for the tier; for example, Basic allows the use of 5 out of 20 features, Pro offers 10 out of 20, and Premium offers all features of the app. -
Add additional countries as needed. If your app is available in different countries and you want similar tiers in these countries:
- Create a single row to capture subscription prices for a single tier.
- Click Add New Country in the tier to add additional tiers for different countries.
- In each country's row, add the price you'll charge in the currency of that country.
-
Click Save. The updated information displays in the Subscription Pricing section.
Work with metered event pricing
- Log in to the Developer Dashboard.
- From the left navigation menu, click Your Apps > app name > Pricing & Distribution. The Pricing & Distribution page appears.
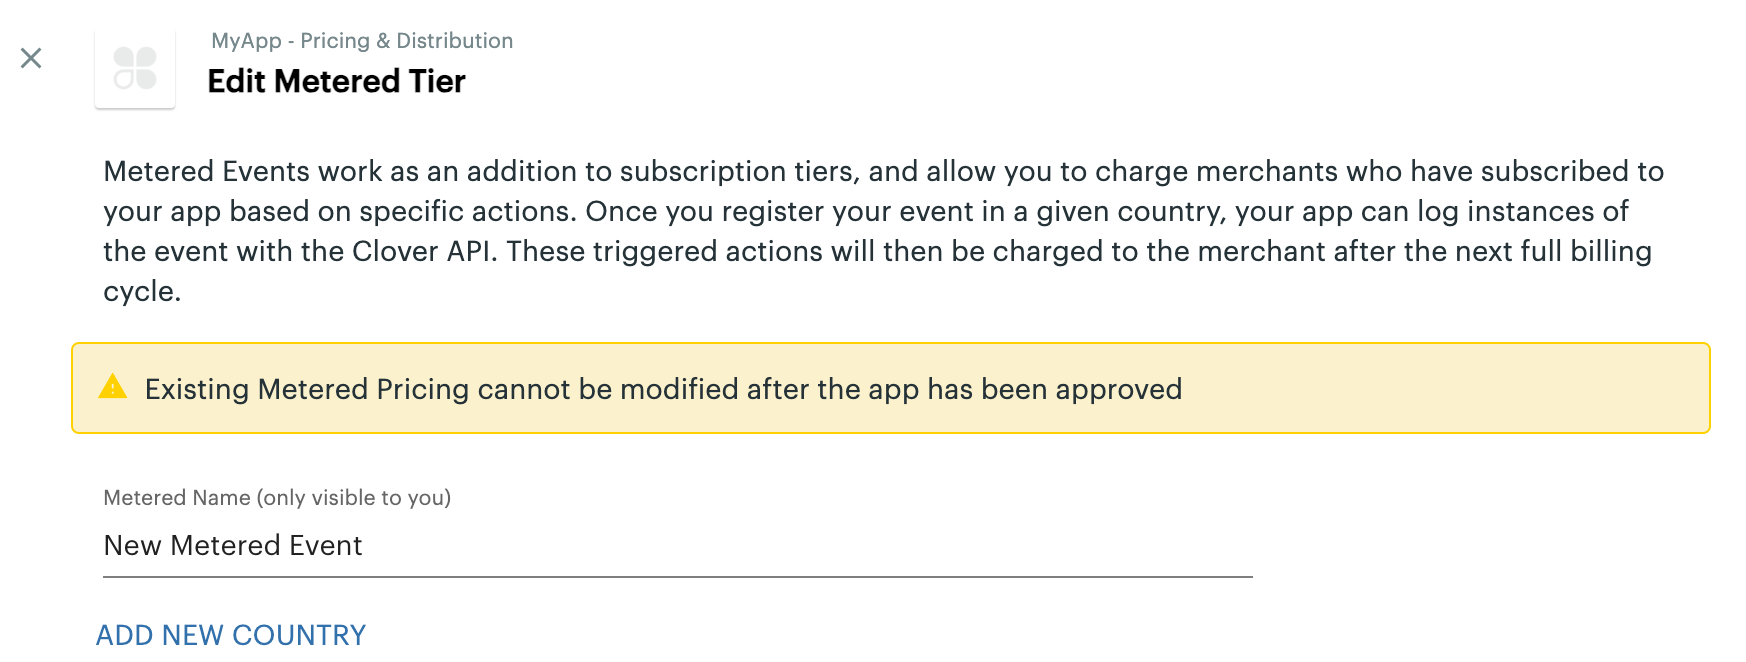
- In the Metered Pricing section, click Add Tier. The Edit Metered Tier page appears.
Edit Metered Tier pop-up
- Enter a new metered event name.
- Click Add New Country to indicate where to make the metered event pricing available. Additional fields display on the pop-up.
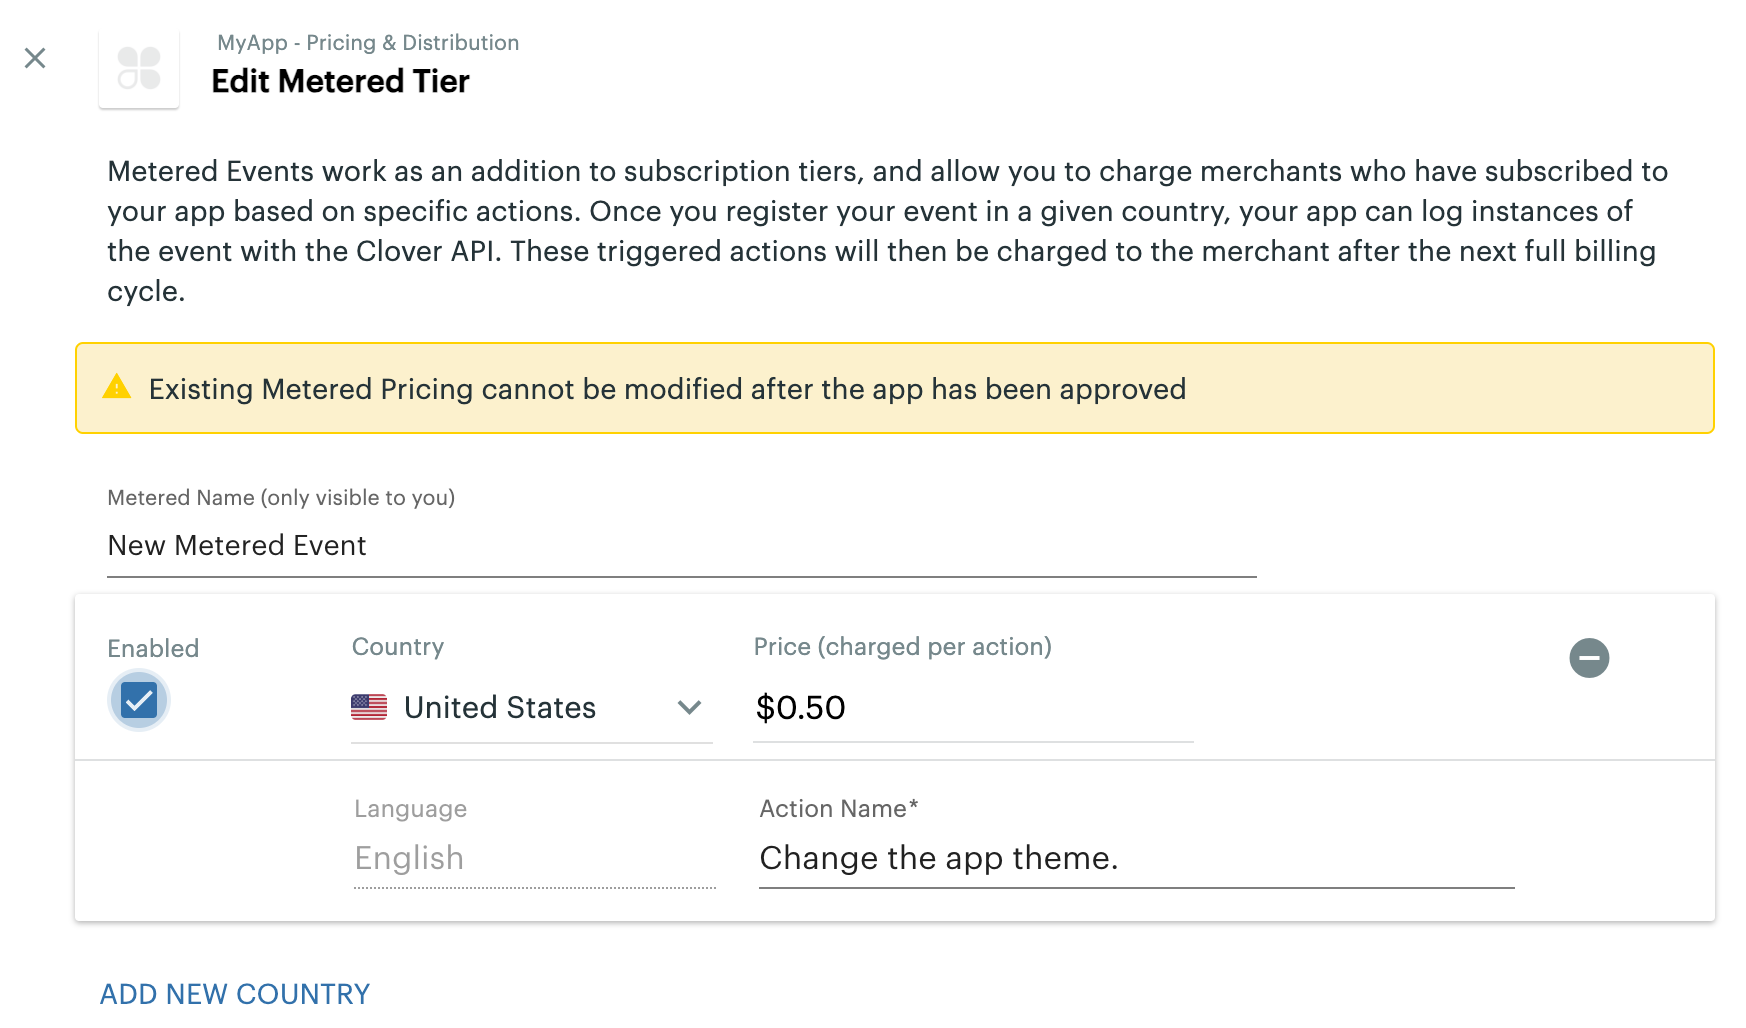
Edit Metered Tier pop-up with new metered event and country added
-
Complete information in the fields as follows:
Field Description Enabled Select the checkbox to enable the metered event immediately for merchants. Country From the drop-down list, select a country to make the metered event available. Price (per month) Enter a price to charge per action value. This value cannot be zero (0) or in the negative. Action Name Enter the action name to trigger the metered event pricing. -
Add additional countries as needed. To add countries to your app:
- Create a single row to capture metered prices of a single tier.
- Click Add New Country in the tier to add additional tiers for different countries.
- In each country's row, add the price you'll charge in the currency of that country.
- Track the metered events only once for each pricing tier.
-
Click Save. The updated information displays in the Metered Pricing section.
-
Track the metered events and send them to Clover billing. For more information, see Track metered events.
Updated 4 months ago