Use Postman with REST Pay Display API
Clover provides a complete Postman collection for testing REST Pay Display API and working through common payment scenarios for POS integrations. This collection:
- Lets you quickly generate and use an OAuth token for your test merchants.
- Supports only cloud connections for ease of setup.
1. Set up your test app
To use Postman for testing all available endpoints, you need to create a Clover app configured with proper permissions for REST Pay. See Create an app in the sandbox environment.
When setting up the app's REST configuration, set the site URL to the Postman client you want to use:
- Desktop—
https://www.postman.com/oauth2/callback - Web—
https://oauth.pstmn.io/v1/browser-callback
2. Install the test app
- Log in to the Developer Dashboard.
- On the App Settings page, select More > Preview in App Market.
- Copy the App ID and App Secret values to a temporary location for use in a later section.
The More Tools page appears.

- In the test app field, click Connect, and then click Accept.
3. Open the collection
Click the Run in Postman button to open the collection in a workspace of your choice.

4. Set environment variables
A few variables are used in requests to identify your app and the test merchant. To set these variables:
- Log in to the Developer Dashboard.
- Navigate to Your Apps Dashboard.
- In the Your Apps list, click your REST Pay app. The App Settings page appears. Leave this browser tab open.
- In Postman, click Environments.
- Click the Clover Sandbox environment. The variables table appears.
- For the
appIdvariable, copy your App ID value from the App Settings page and paste it into the Current Value field. - For the
appSecretvariable, copy your App Secret value from the App Settings page and paste it into the Current Value field. - From the left navigation menu, click Dev Kits.
- For the
mIdvariable, copy your test merchant ID (mId) and paste it in the Current Value field.
Note: mId is a 13-character alphanumeric string in the Test Merchant column. - For the
deviceIdvariable, copy the serial number of the device and paste the device serial number in the Current Value field. - For the
clientIdvariable, enter a name for the client making requests through your app, for example:myPOS. - For the
emailvariable, enter a valid email address to receive web receipts for test transactions. - For the
phonevariable, enter a 10-digit phone number to receive SMS receipts for test transactions. - Select the checkbox for the
siteUrlvariable with the same value as that configured for your test app. - Click Save and then close the Clover Sandbox environment tab.
- In the Environments list, select the Set active checkbox for the Clover Sandbox.
5. Retrieve an OAuth token with Postman
Once your test app is installed for your test merchant and you've set up your environment, you can request an OAuth token. This token has the necessary permissions to access and update merchant information. To create the token:
- In Postman, click Collections and select Clover REST Pay API. The Clover REST Pay API tab appears.
- On the Authorization tab, click Get New Access Token. The Postman OAuth 2.0 window appears and redirects to the Clover dashboard login.
- Enter your sandbox credentials and click Log in. If you have multiple test merchants, the Select a Merchant page appears.
- Click the merchant that installed the REST Pay API app. The request is processed, and an API token is returned.
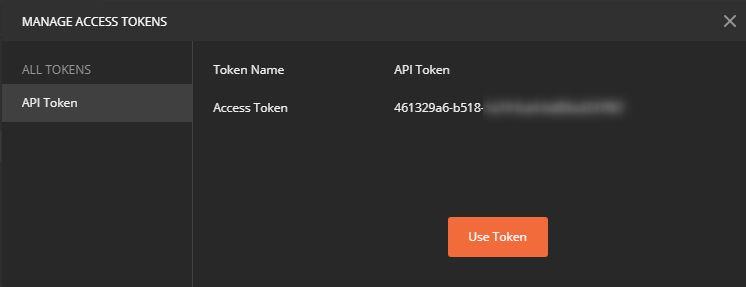
- Click Use Token.
- Click Save. The collection's authorization setup is complete.
6. Connect to a Clover device
Once you set the needed variables and retrieve an API token, finish setting up the collection and test the connection to your Clover device.
- In Postman, click Collections, and select Clover REST Pay API > Setup.
- Send each setup request to check connectivity, configure the device printer, and finalize the setup.
Your environment is configured and ready for use.
Updated about 2 months ago