Capture pre-authorized payments
Pre-authorizations
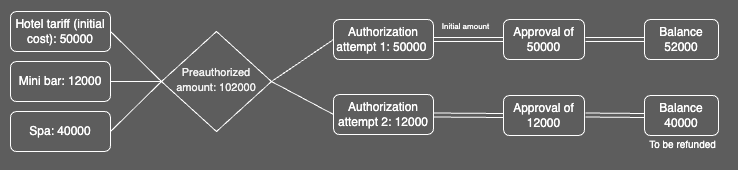
Pre-authorization (pre-auth) allows you to place a temporary hold on a card for a specific amount for predetermined time periods. This process is used to reserve funds that can be captured or refunded later. For example, hotels and car rental companies authorize the initial cost of the service but may capture a different amount if additional charges are incurred, such as minibar usage or car damage.
When you create a payment, you can place a hold on an eligible payment method. The validity of the pre-authorization depends on the transaction and card type, so it's important to capture the funds before the authorization expires
In this process:
- Pre-authorize the card for an initial amount.
- Add the cost of additional service to the initial amount.
- Capture the updated amount — initial + additional amount. The balance is refunded.
Example of incremental authorization
Incremental authorizations
Incremental authorizations allow you to increase the authorized amount before capturing a payment, for example: when the total price changes or the customer adds a good or service.
Incremental authorizations are only available for:
- Card types—Mastercard®, Discover®, and Visa® cards.
- Merchant types—aircraft rentals, amusement parks, bicycle rentals, boat rentals, car rentals, cruise lines, drinking places, eating places, equipment rentals, lodgings, motor home rentals, motorcycle rentals, trailer parks/campgrounds, and truck rentals.
Prerequisites
- Point of sale (POS) is connected to the device using a network or cloud connection.
- Clover device is idle; that is no payment is being taken.
Pre-authorize without incremented amounts
-
Use the /v1/payments endpoint to start the transaction on the Clover device with the minimum required data:
amountto be charged in centscaptureindicator set to FalseexternalPaymentId
{ "amount": 50000, "capture": false, "externalPaymentId": "{externalPaymentId}" } -
Send a POST request to the
/v1/paymentsendpoint with the required headers:
X-Clover-Device-IdX-POS-IdIdempotency-Key
The payment flow is started for the specified amount. After the authorization is complete, a success message appears.
- Copy and save the
idvalue from the success message. - Create a request with the final
amountto charge.
{
  "amount": 50000
}- Send a POST request to
/v1/payments/{authId}/capture, where{authId}is the id value you saved in step 3.
The system captures the preauthorization and returns the finalpaymentId. - To return to the welcome screen, send a POST request to the
/v1/device/welcomeendpoint.
Pre-authorize with incremented amounts
- Use the /v1/payments endpoint to start the transaction on the Clover device with the minimum required data:
amountto be charged in centscaptureindicator set to FalseexternalPaymentId
{
  "amount": 50000,
  "capture": false
  "externalPaymentId": "{externalPaymentId}"
}-
Send a POST request to the
/v1/paymentsendpoint with the required headers:X-Clover-Device-IdX-POS-IdIdempotency-Key
The payment flow is started for the specified amount. After the authorization is complete, a success message appears.
-
Copy and save the
idvalue from the success message. -
Create a request with the incremented
amountto charge.
JSON
{
  "amount": 12000
}-
Send a POST request to
/v1/payments/{paymentId}/incrementwith the required headers:, where{authId}is the id value you saved in step 3. Required headers are:X-Clover-Device-IdX-POS-IdIdempotency-Key
The incremented amount is added to the initial authorization amount. After the authorization is complete, a success message appears.
-
Create a request with the final
amountyou want to capture.
{
  "amount": 62000
}- Send a POST request to
/v1/payments/{authId}/capture, where{authId}is theidvalue you saved in step 3.
The system captures the preauthorization and returns the finalpaymentId. - To return to the welcome screen, send a POST request to the
/v1/device/welcomeendpoint.
Updated 4 months ago