Create a semi-integrated app
The Clover platform provides tools for developers to design, configure, test, and manage app integrations for Clover merchants. This platform offers a consolidated developer experience with access to the Global Developer Dashboard. On the Global Developer Dashboard, you get an intuitive and seamless experience for developer account management and for developing and launching integrations. You can log in with a single global developer account and switch between sandbox and production environments.
The Clover sandbox environment lets you develop and test your application separately from real merchant accounts and transactions. To integrate your point of sale (POS) with a Clover Dev Kit, you need to create a sandbox app that your test merchant can install. The app lets you configure the required merchant permissions and links (URLs) needed to retrieve OAuth tokens.
After you test your app in the sandbox environment, you need to recreate it in the production environment. You must have an approved developer account before you can submit your app for approval.
Prerequisite
Create a global developer account.
1. Create new app
- Log in to the Global Developer Dashboard.
- Click the Sandbox toggle icon to go to either the sandbox or the production environment.
- Do one of the following:
- Click Create new app and complete the initial setup.
- In the My Apps section, click an app. The App name - App Settings page displays.
2. Complete and manage app settings
On the App name - App Settings, you can add and manage settings for your app, along with other relevant information.
Set the app type
External point-of-sale (POS) apps using the REST Pay Display API are not available on the public Clover App Market, but your Clover app is visible to the merchants using your integrated POS. To set the type of your app:
- When you create an app, select the following options:
- Step 1: Name and country.
- Step 2: App Type, such as Payment app.
- Step 3: Platform, such as the devices to run your app, and in the Web app section, select Web.
- Click Create App. The App-name- App Settings page appears. The App Type section displays a Remote App identifier (RAID) that uniquely identifies your semi-integrated app. RAID is necessary to establish an OAuth connection and allows Clover to associate payments with your integration. For more information, see Create your Remote App ID.
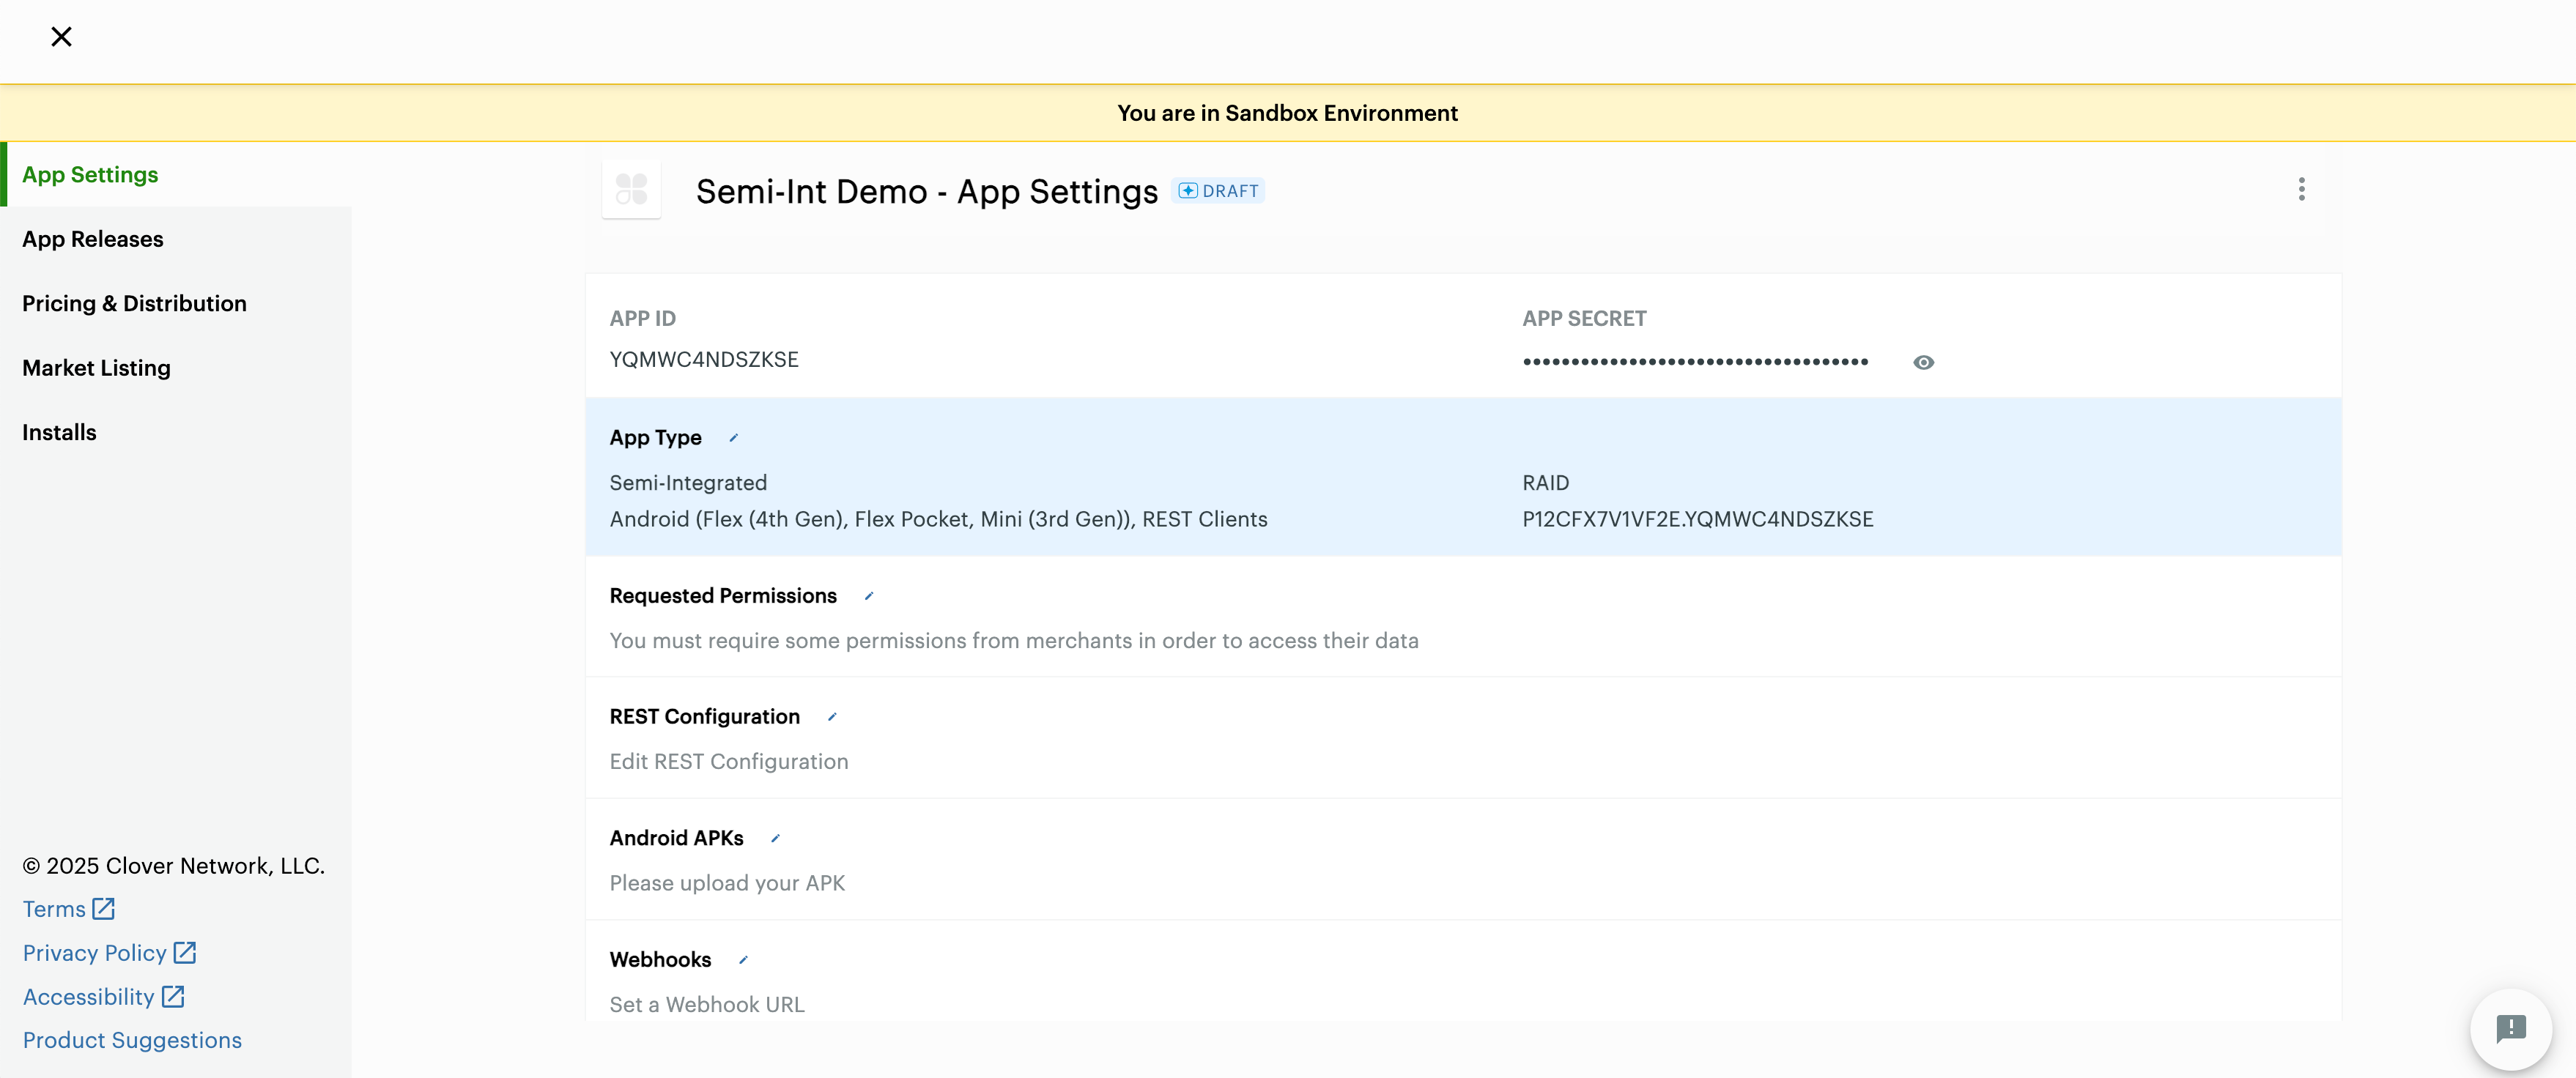
Semi-integrated app: App Settings page
- Click App Type. The App Type page appears. The option—Is this app an integration of an existing point of sale?—is selected as Yes by default and indicates that app integrations related to non-Clover POS are not available in the Clover App Market.
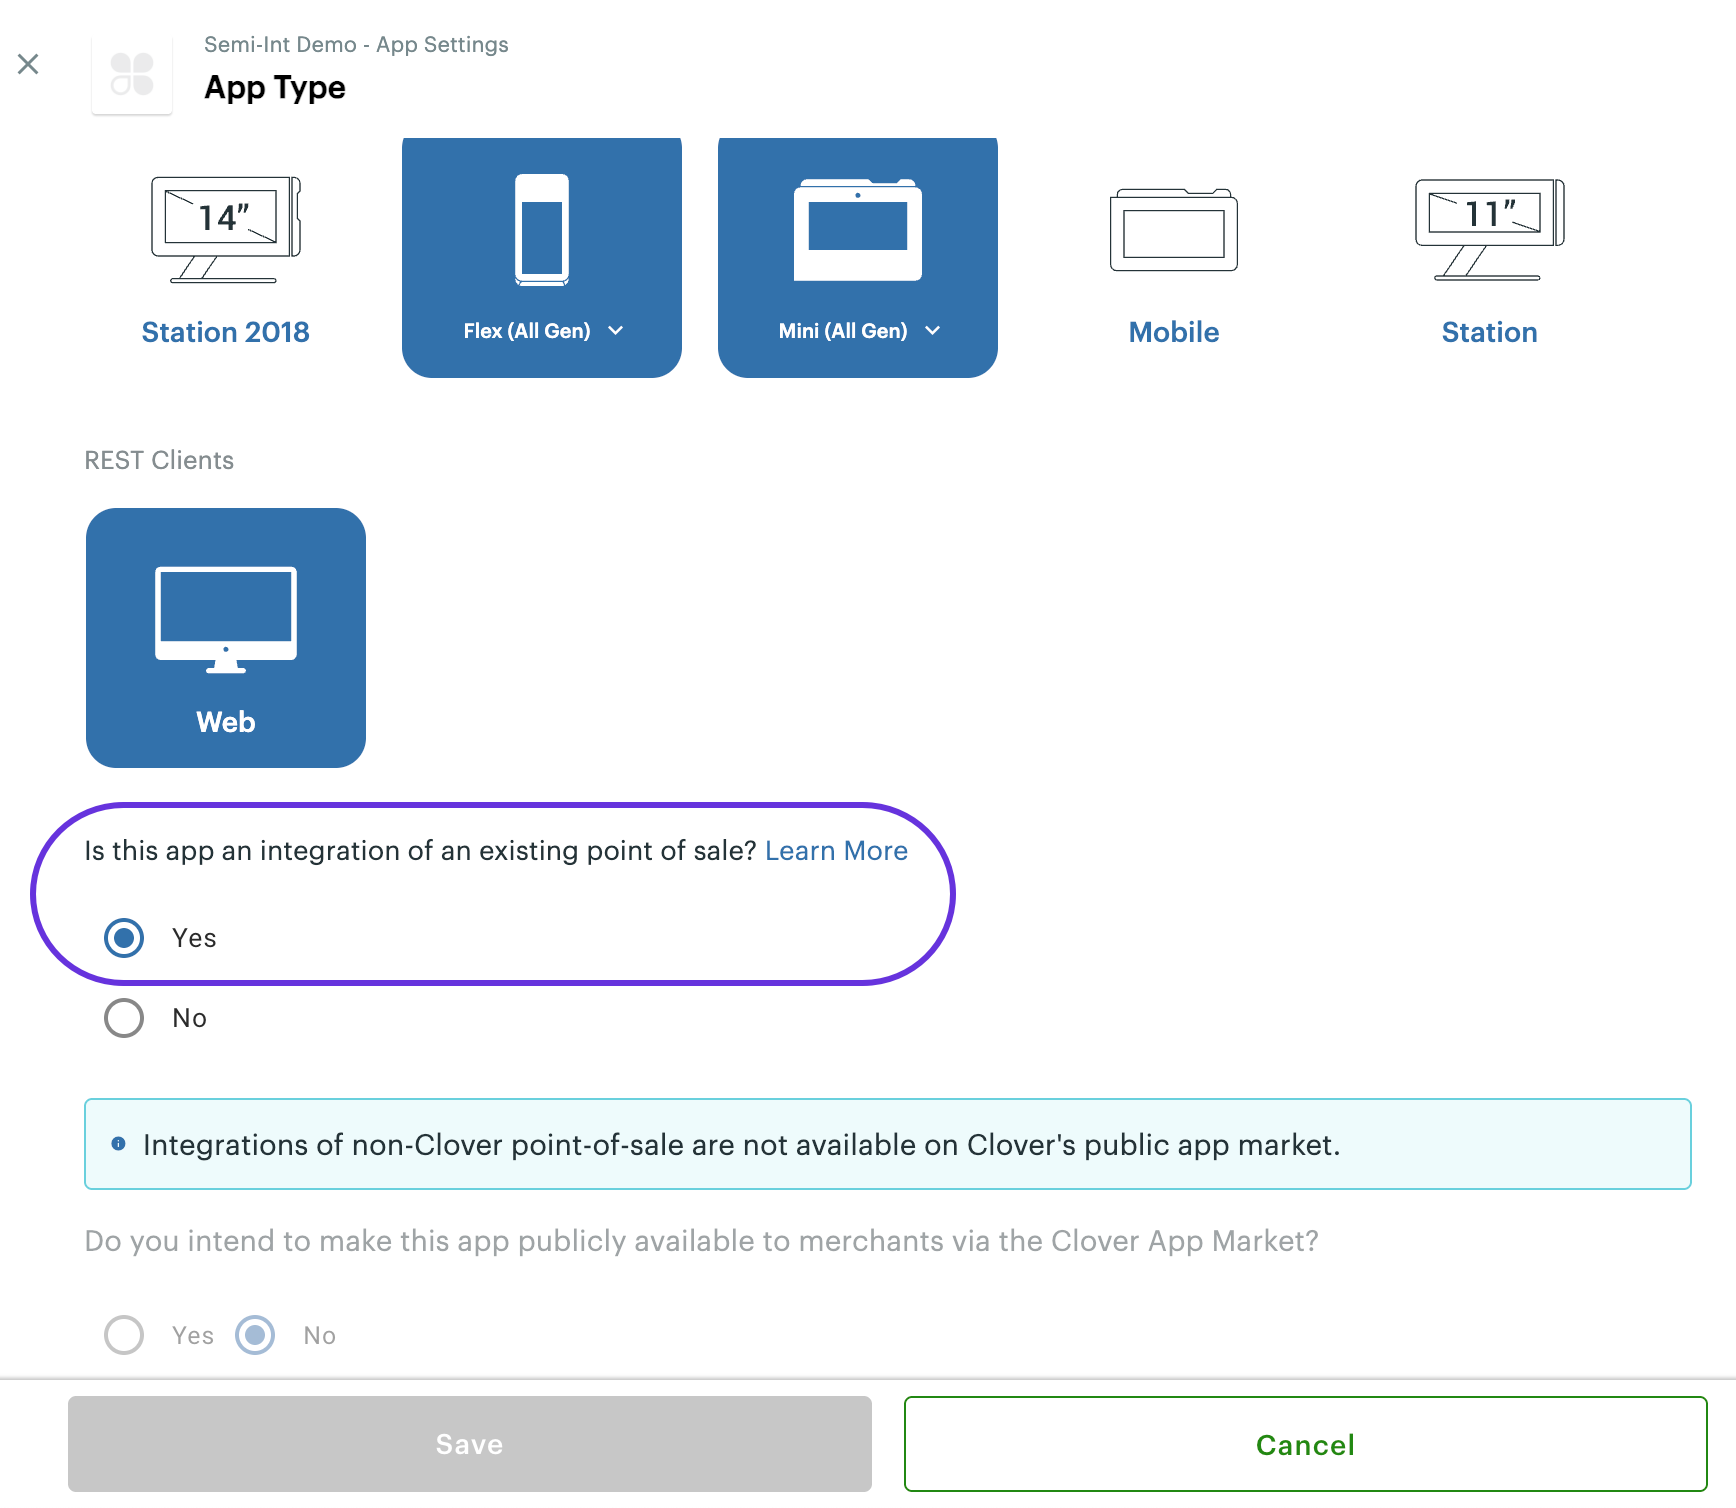
Semi-integrated app: App Types page
- Click Cancel to return to the App Settings page.
Set app permissions for card-present transactions
To complete payment on the Clover device, you must authorize your app to read merchant data from Clover.
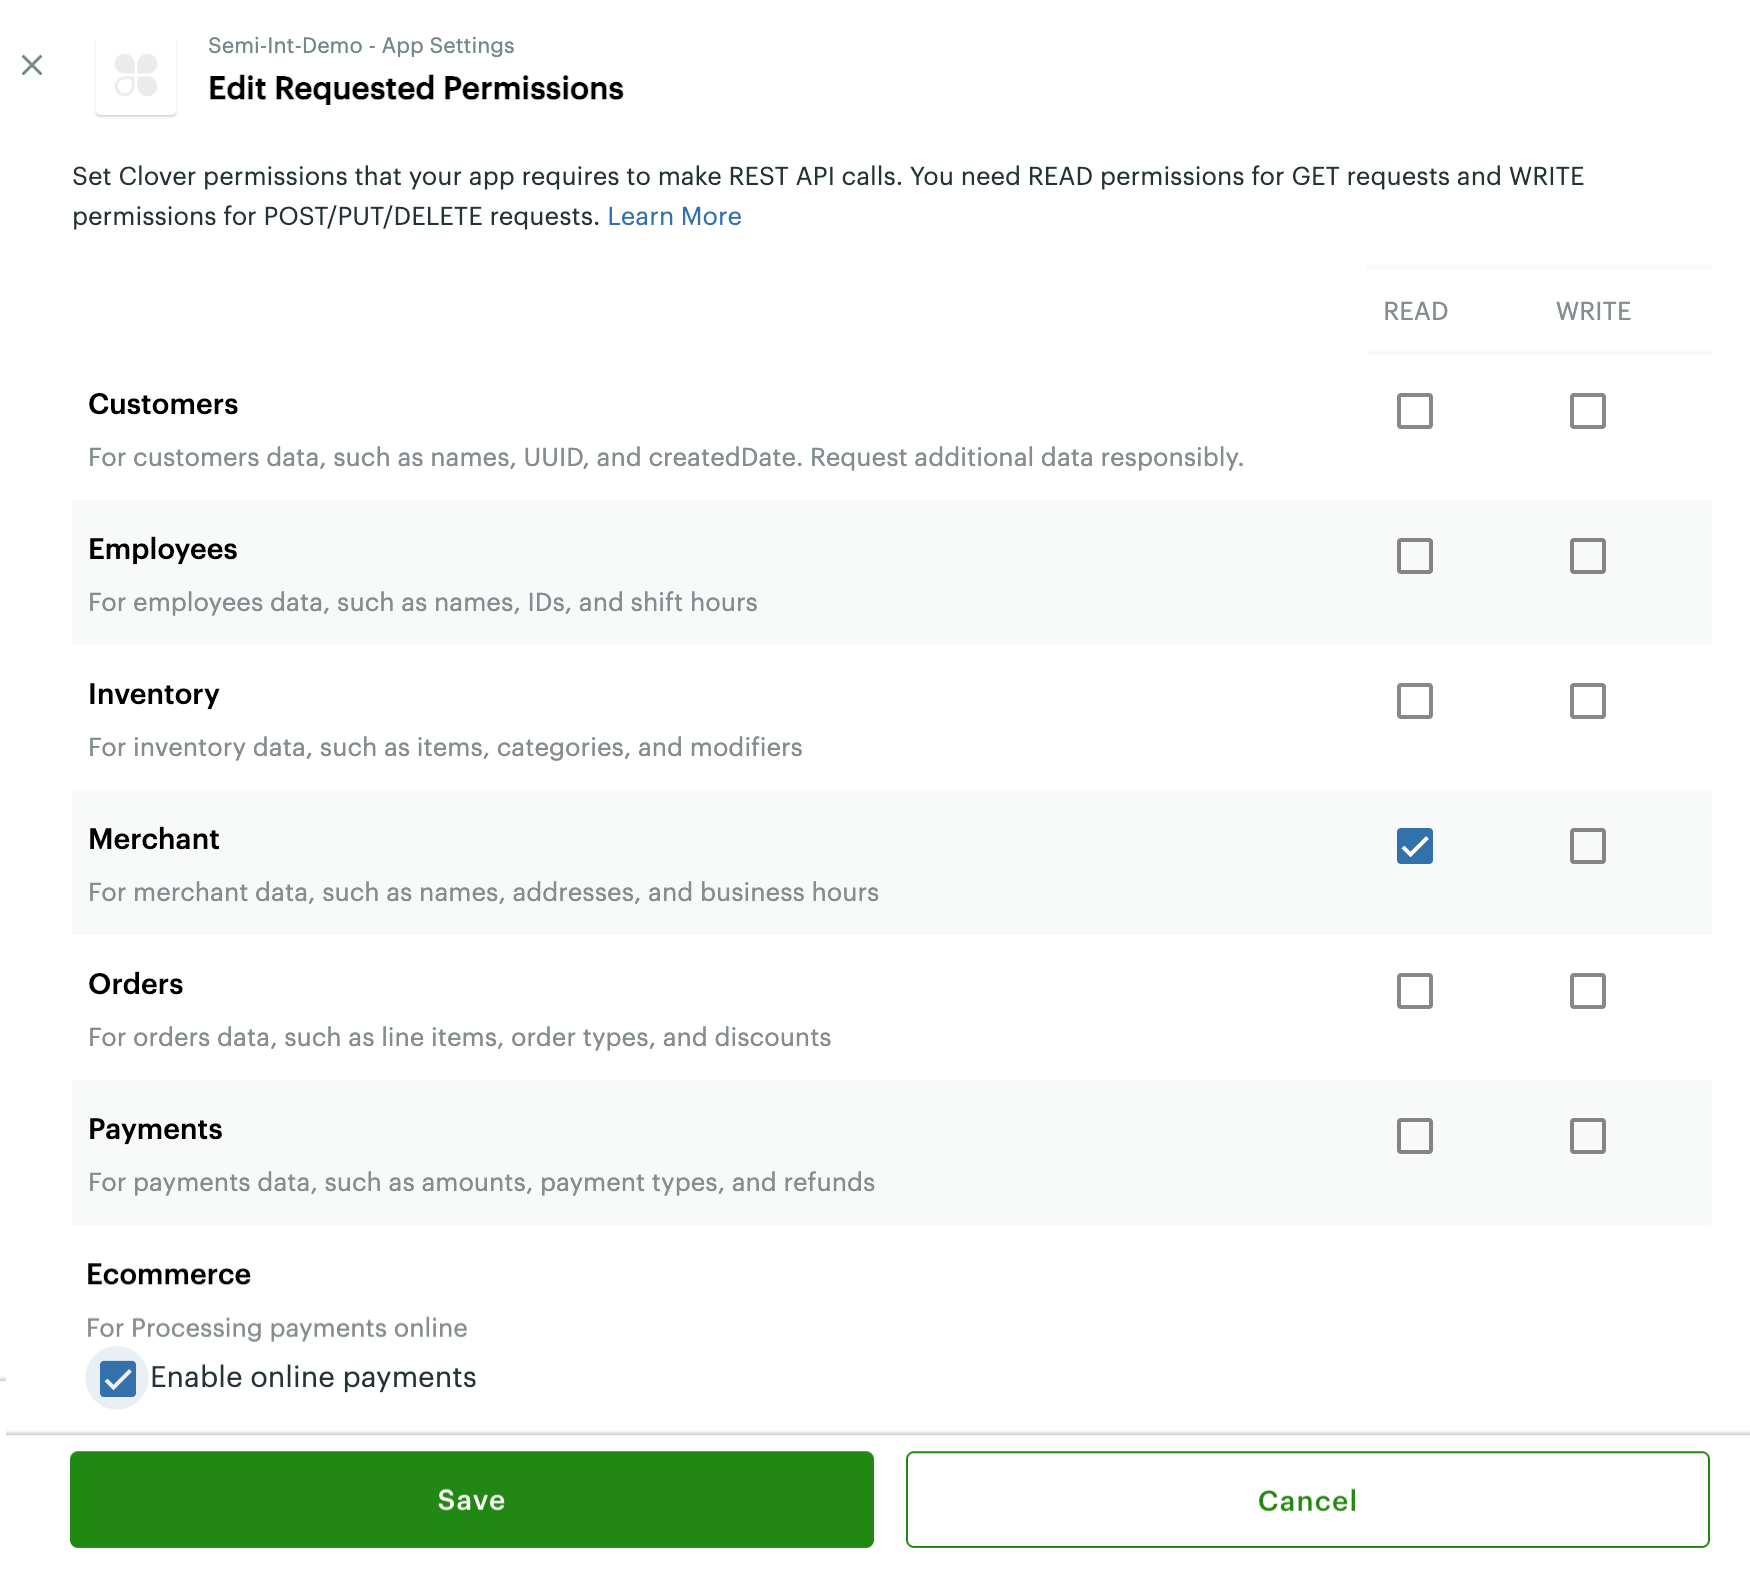
- On the App Settings page, click Requested Permissions. The Edit Requested Permissions page appears.
- Select the READ checkbox for Merchant.
- Click Save. The app permissions are updated.
(Optional) Set app permissions for card-not-present transactions
If your app allows merchants to create and use ECOMM_COMPAT card tokens for card-not-present (CNP) transactions, you also need to configure your app for the Ecommerce API. For more information, see REST Pay Display interoperability with Ecommerce API
- On the App Settings page, click Requested Permissions. The Edit Requested Permissions page appears.
- Select the READ checkbox for Merchant
- In the Ecommerce section, select the Enable online payments checkbox. The Ecommerce Settings section displays on the App Settings page.
Semi-integrated app: Edit App Permissions page
- Click Save. The app permissions are updated on the App Settings page and the Ecommerce Settings section appears.
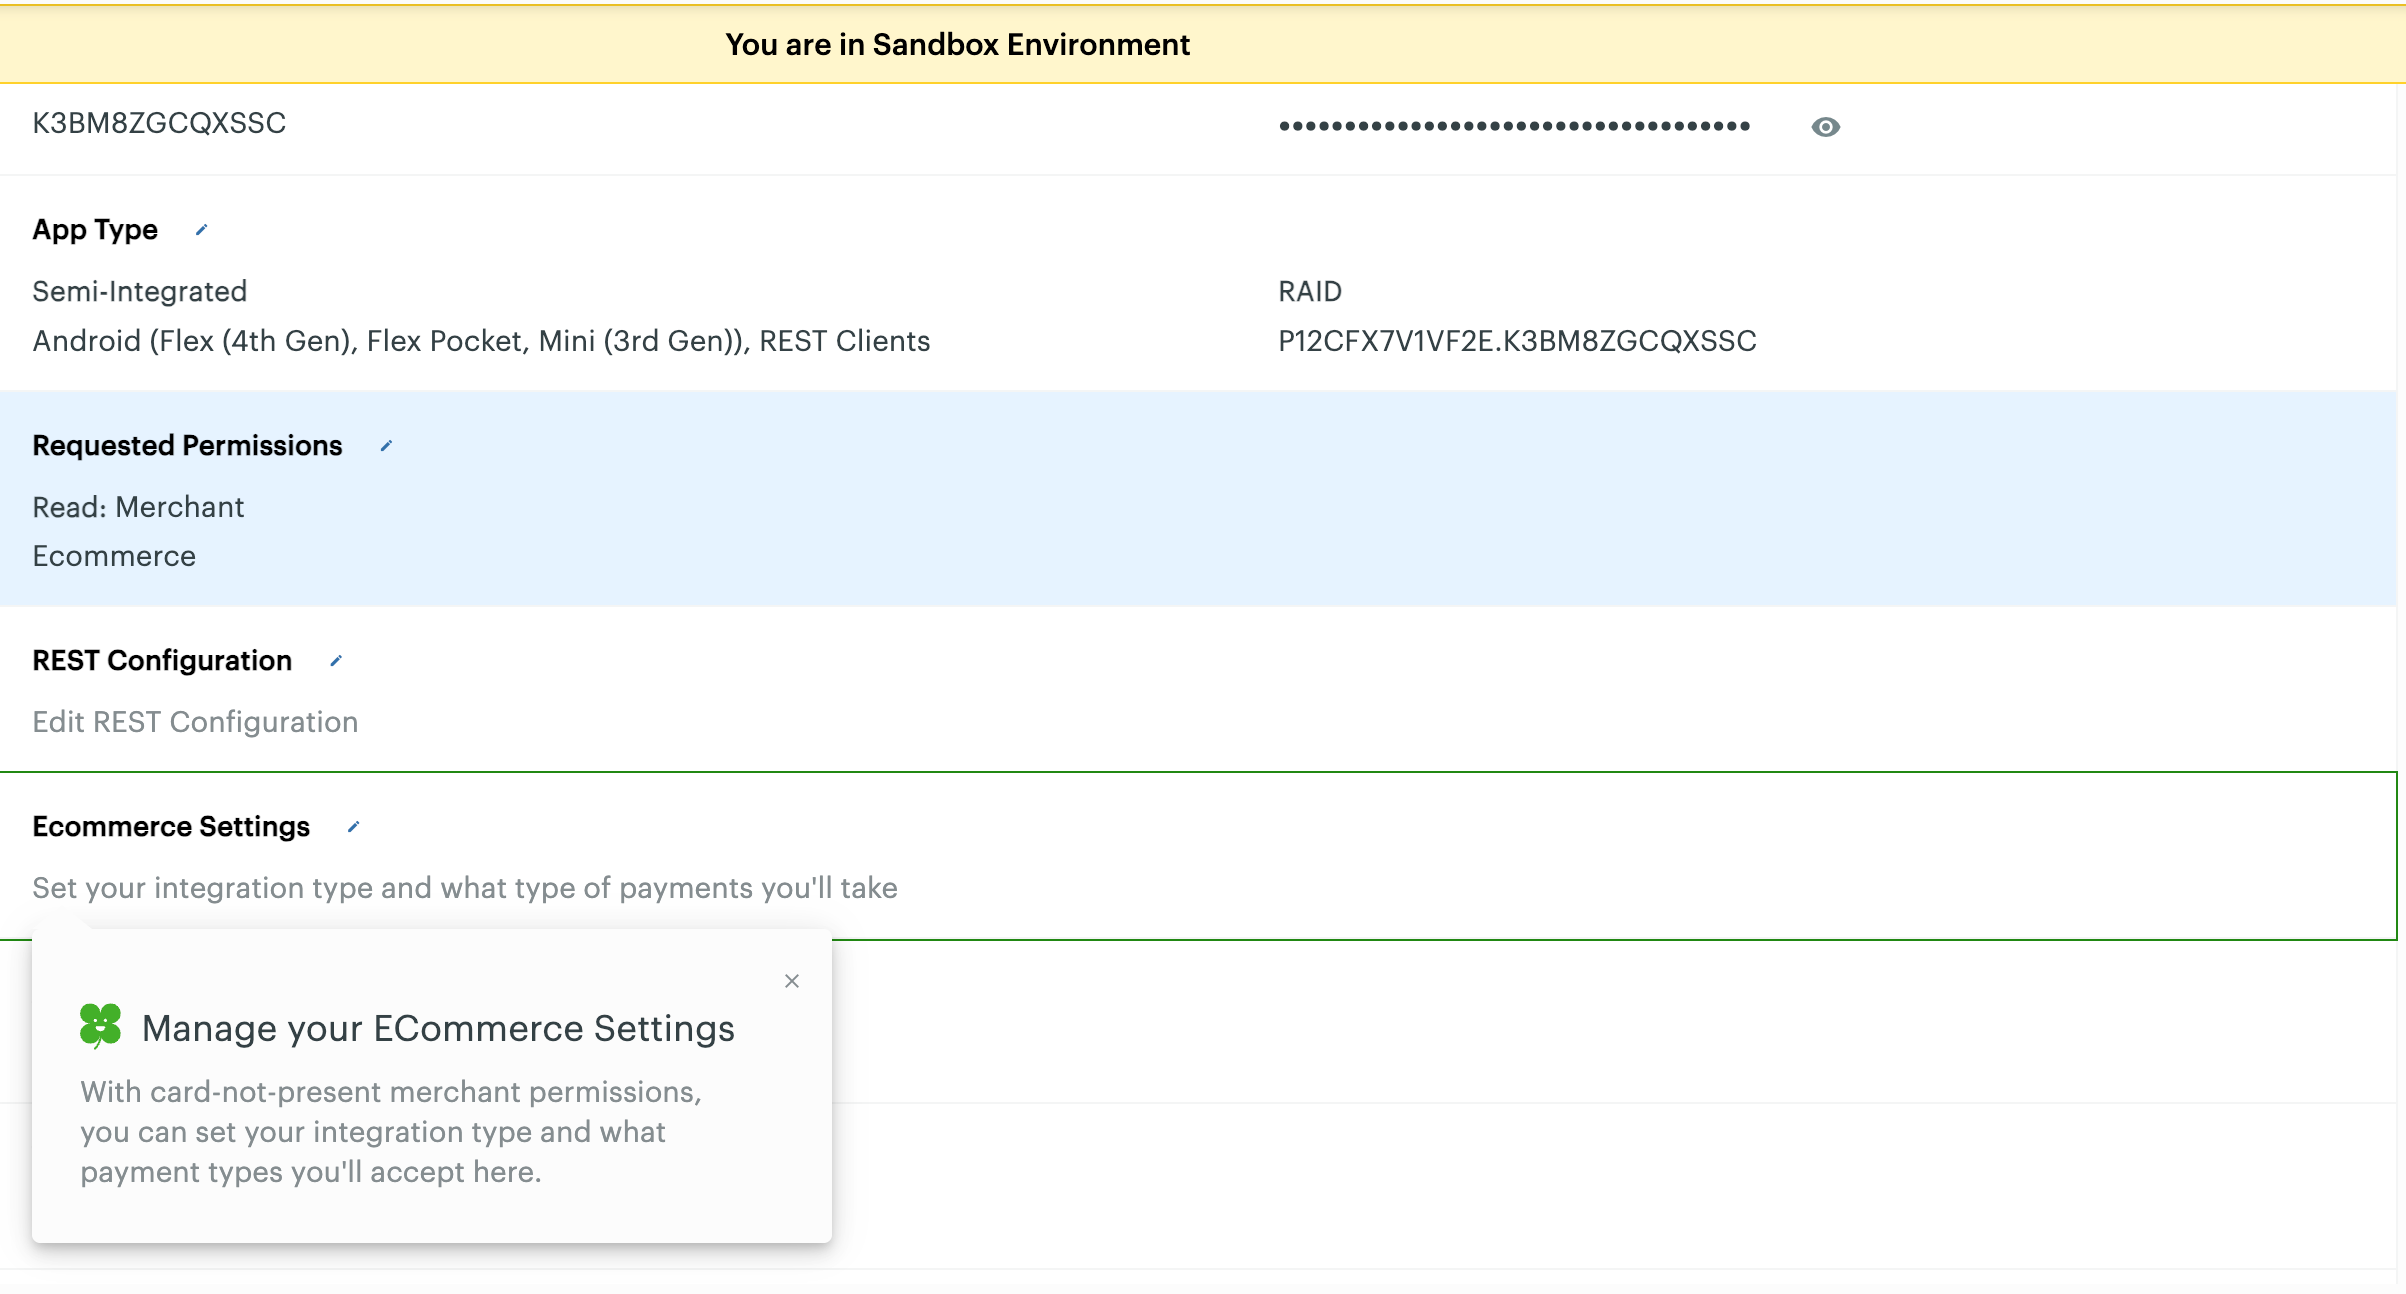
Semi-integrated app: Ecommerce settings
- Click Ecommerce Settings. The Edit Ecommerce Settings page appears.
- Select the API checkbox.
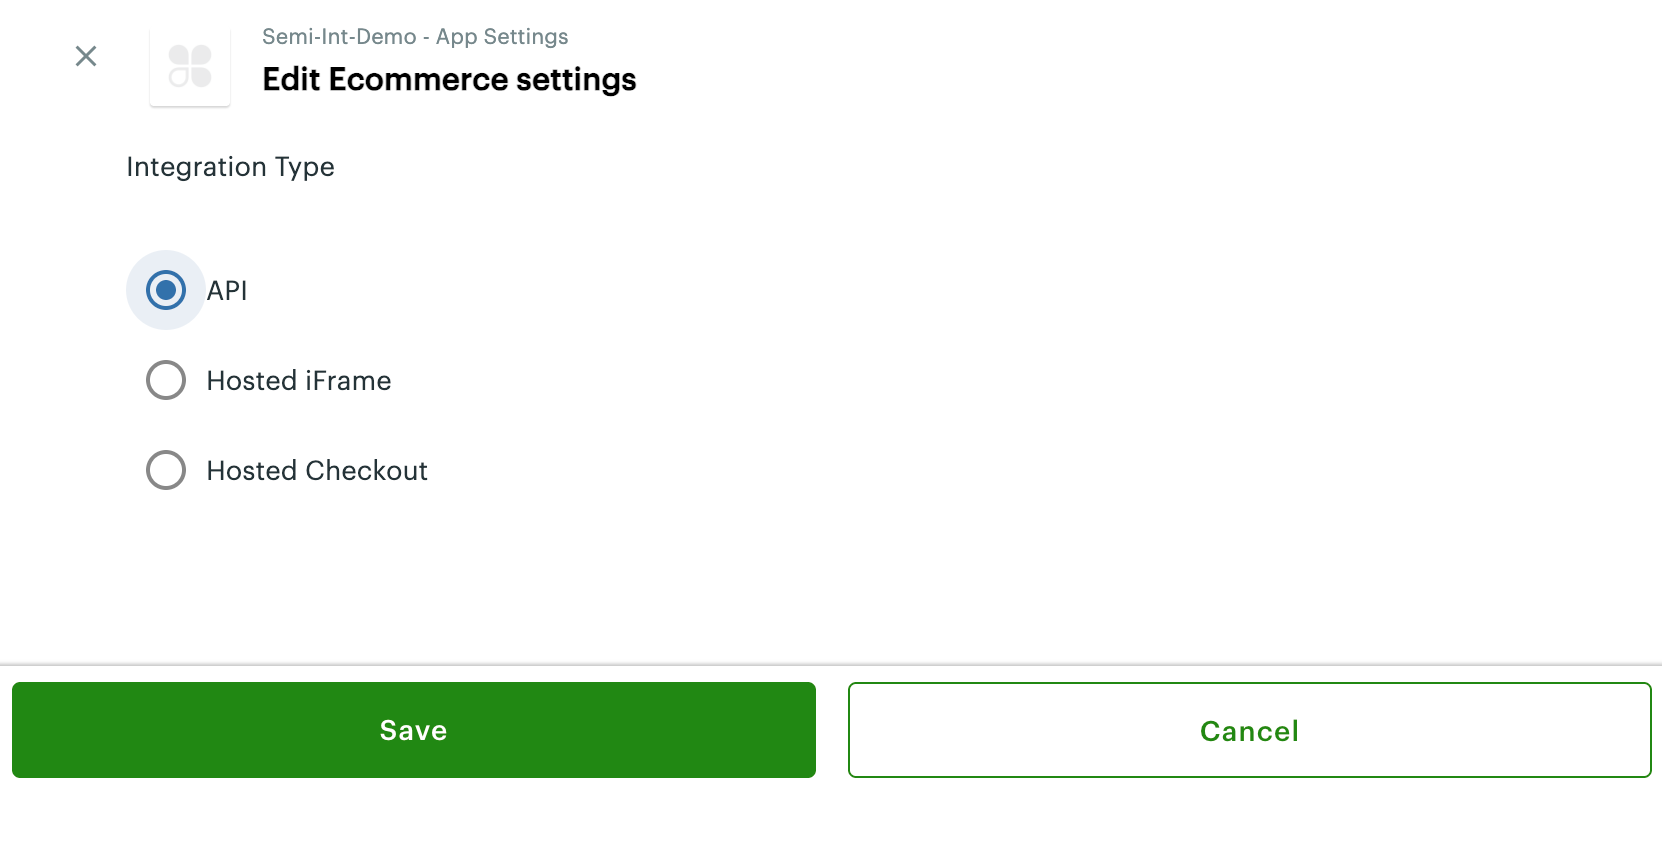
Semi-integrated app: Edit Ecommerce Settings
- Click Save.
Set up the REST configuration
Your app needs OAuth tokens to authenticate API calls. You must configure a link (URL) for the OAuth flow:
- On the App Settings page, click REST Configuration. The Edit REST Configuration page appears.
- In the Site URL field, enter the main link (URL) of the homepage of your web app. Example:
https://www.example.com/myapp - In the Alternate Launch Path field, enter the alternate link (URL) of your app. The alternate launch path is required when the app OAuth is initiated from the left navigation menu on the Merchant Dashboard or directly from the Clover App Market, outside the standard install-and-launch flow. Example:
/www.example.com/myapp/launch. - Optionally, if you are integrating with Cloud Pay Display, enter a domain link (URL) in the CORS Domain field. When you set a CORS domain URL, your web app can call the Clover REST API without requiring an intermediate app server. For more information, see Set app URL and CORS.
- In the Default OAuth Response field, select Code. When your merchant is authorized through OAuth 2.0, you receive an authorization code. This code is required to request an API token for your app permissions.

Semi-integrated app: Edit REST Configuration
- Click Save. The web configuration settings display on the App Settings page.
Updated 4 months ago