Configure a local connection
Your point of sale (POS) can connect to the Clover Flex or Clover Mini using a local network connection or a cloud connection to the Clover servers. A local connection uses an embedded server within the REST Pay Display app on the Clover device to transfer messages between your POS app and the device. This topic provides information on setting up the Clover device for a local connection.
Prerequisites
- Fully functional developer app that uses REST Pay Display API.
- Clover REST Pay Display app installed and running on your merchant’s device.
- OAuth flow completed by your merchant. Your app must have the bearer token to authenticate requests. See Build a local connection request for details.
Secure configuration
REST Pay Display uses an HTTP server on the Clover device to establish an HTTPS (secure) connection.
Device server certificates for sandbox and production environments
Local connection requires your POS to trust the Clover certificate authority (CA) that has issued the HTTP server certificate. By default, the Clover Prod Terminal Server Root certificate authority (CA) issues the device server certificate. The certificate must be installed in the Trusted Root Certification Authorities store. If the certificate is not installed in the correct store, a certificate chain error message appears when you attempt to connect.
Clover provides separate certificates for development and production use. Before working in the sandbox environment, you need to enable the sandbox development certificate.
| Sandbox/development device server certificate | Production device server certificate |
|---|---|
| Test merchants on the sandbox environment with devices running REST Pay Display need to have the device server certificate installed on the POS hardware. The Clover Device Server Root CA issues the device server certificate hosted at: https://sandbox.dev.clover.com/v2/device_ca_certificate https://sandbox.dev.clover.com/v2/device_ca_certificate.der https://sandbox.dev.clover.com/v2/device_ca_certificate.crt Note: These are the same links in different formats. | Production certificates apply to your real merchants and test merchants in production environments. The Clover Prod Terminal Server Root CA issues the device server certificate hosted at: https://www.clover.com/v2/env_device_ca_certificate https://www.clover.com/v2/env_device_ca_certificate.der https://www.clover.com/v2/env_device_ca_certificate.crt Note: These are the same links in different formats. |
Change the device certificate for development
To enable the development certificate authority (CA) in the sandbox environment:
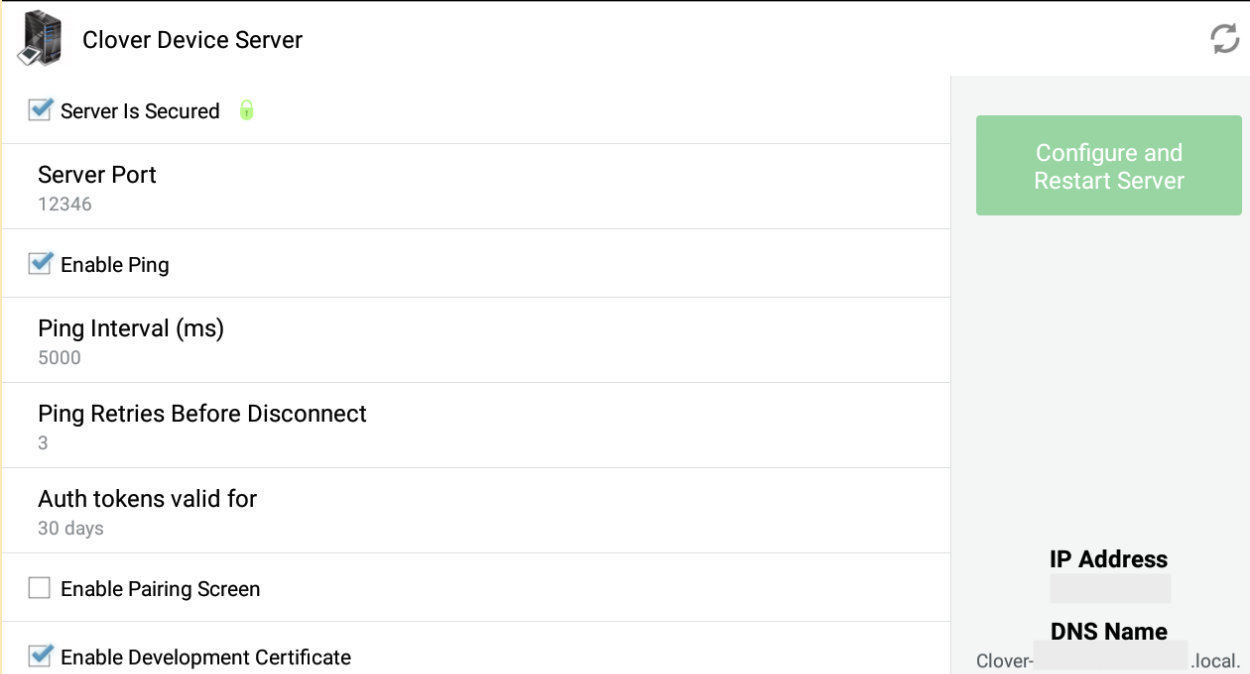
- In the REST Pay Display app settings, select the Enable Development Certificate option.
- Select Configure and Restart Server.
- Restart the server to update the certificate authority (CA).
- Select View Certificate Details to verify that the Clover certificate authority (CA) issued the device certificate.
REST Pay Display settings on the device
The following procedures are for setting up REST Pay Display on the device on both sandbox and production environments for test and real merchants.
Important
You must enable HTTPS connection in production. You can use non-encrypted HTTP connection for development and testing in the sandbox environment.
View the current certificate and server settings on the Clover device
- On the Clover device, tap View Certificate Details to verify that the Clover certificate authority (CA) issued the device certificate.
- On the Clover device home screen, tap REST Pay Display.
- Tap the menu icon, and then tap Settings. The Clover Device Server settings appear. Note that the Enable Development Certificate checkbox is selected.

NOTE
Pairing is not enabled for REST Pay Display so do not tap the Enable Pairing Screen check box.
Change the connection protocol on the device
The connection between a POS and a Clover device is over HTTPS by default. As this is payment-related data, Clover strongly recommends using HTTPs. However, the Clover device server also supports non-encrypted HTTP connections that can be used only for development and testing. You must enable an HTTPS connection in production.
To change the connection type on your device:
- On the Clover device home screen, tap REST Pay Display.
- Tap the menu icon, and then tap Settings.
The Clover Device Server settings appear. - Tap the Server is Secured checkbox to clear it.
- Tap Configure and Restart Server.
The green lock icon next to the Server is Secure checkbox changes to red unlocked.
The device URLs change from https:// to http:// on the REST Pay Display screen.
Change the server port on the device
By default, the connection between a POS and a Clover device uses port 12346.
To change the port on your device:
- On the Clover device home screen, tap REST Pay Display.
- Tap the menu icon, and then tap Settings.
The Clover Device Server settings appear. - Tap Server Port. The Enter Server Port Number page appears.
- Enter a new port number.
- To change the device ping settings, edit one or more of the following values:
- Enable ping—Selected checkbox enables the device to check that the connection is open at specified intervals.
- Ping interval—Indicates the length of time between pings in milliseconds.
- Ping retry before disconnect—Number of times the server attempts to ping the client before disconnecting.
- Tap Save.
- Tap Configure and Restart Server. The server port is changed.
Note
If another process on the Clover device is using the new port a message displays that the address is already in use. You need to enter a different port number.
Updated 4 months ago
