iOS—Clover Go SDK quick start guide
v1.0.0
Clover Go software development kit (SDK) quick start guide explains how to take a payment using the iPhone Operating System (iOS®) Clover Payment SDK and your Clover Go reader.
Prerequisites
- See Overview of the Clover Platform.
- Set up a developer account, including your test merchant settings.
- Order a Clover Developer Kit (Dev Kit).
- Use Xcode 14 or higher.
- Install Cocoapods.
- Use an iOS Device (iOS 14+).
- Use an iOS Developer Account.
- Install CloverPayments SDK from Cocoapods.
- Charge Clover reader—Device battery charging requirement. Several operations on your Clover Go reader require at least 30% battery. Charge your device before you configure your iOS project using the instructions in this guide.
OAuth authentication
Clover uses OAuth to authenticate the users of your app to Clover servers. Use the steps in this topic to:
- Create a Clover app and install it on your test merchant to enable OAuth. The Clover app has an associated App ID and App Secret that Clover transfers to the iOS app to give it permissions to perform OAuth.
- Use Associated Domains in the iOS app and an
apple-app-site-associationfile on a server you control to enable OAuth callbacks from Clover login servers to your app.
Steps
1. Create a test app on Clover Developer Dashboard
- Click Create App and follow the instructions provided.
- Use the following settings as a baseline for your test app.
- App Type: REST Clients
- Requested Permissions: All on
- REST Configuration:
- Site URL: Location where your
apple-app-site-associationfile is hosted. - Default OAuth Response: Code
Note: Only use the Code response in production because it is more secure.
- Site URL: Location where your
- Ecommerce Settings: Integrations Enabled: API
- Note the App ID and App Secret to configure the iOS app later.
2. Create your iOS app and import the SDK
-
In Xcode, create a new iOS App project titled Go SDK Intro.
- Interface: Storyboard
- Language: Swift
-
Change the Project Format to Xcode 13.0-compatible.
-
Close your new project.
-
Extract the Clover Payment SDK into a folder at the level of your new project folder.
-
In a terminal window, navigate to the folder containing your project.
-
pod init -
open -a Xcode Podfile -
Overwrite the contents of your
podfilewith the following code.platform :ios, '14.0' workspace 'Go SDK Intro' use_frameworks! # ignore all warnings from all pods inhibit_all_warnings! target 'Go SDK Intro' do pod 'CloverPayments', '~> 1.0.0-rc' post_install do |installer| installer.pods_project.targets.each do |target| target.build_configurations.each do |config| config.build_settings["BUILD_LIBRARY_FOR_DISTRIBUTION"] = "YES" if config.build_settings["SDKROOT"] == "iphoneos" config.build_settings["EXCLUDED_ARCHS[sdk=iphonesimulator*]"] = "arm64" config.build_settings['IPHONEOS_DEPLOYMENT_TARGET'] = ['14.0'] end if target.name == 'RxSwift' if config.name == 'Debug' config.build_settings['OTHER_SWIFT_FLAGS'] ||= ['-D', 'TRACE_RESOURCES'] end end end end end end -
pod install -
open -a Xcode Go\ SDK\ Intro.xcworkspace
-
3. Configure OAuth
IMPORTANT
The location of your
apple-app-site-association, your Associated Domain in your iOS App configuration, and the REST Configuration Site URL in your Clover App configuration all must match for the OAuth flow to work properly.
-
In Xcode:
a) In Signing & Capabilities for your project, click + Capability.
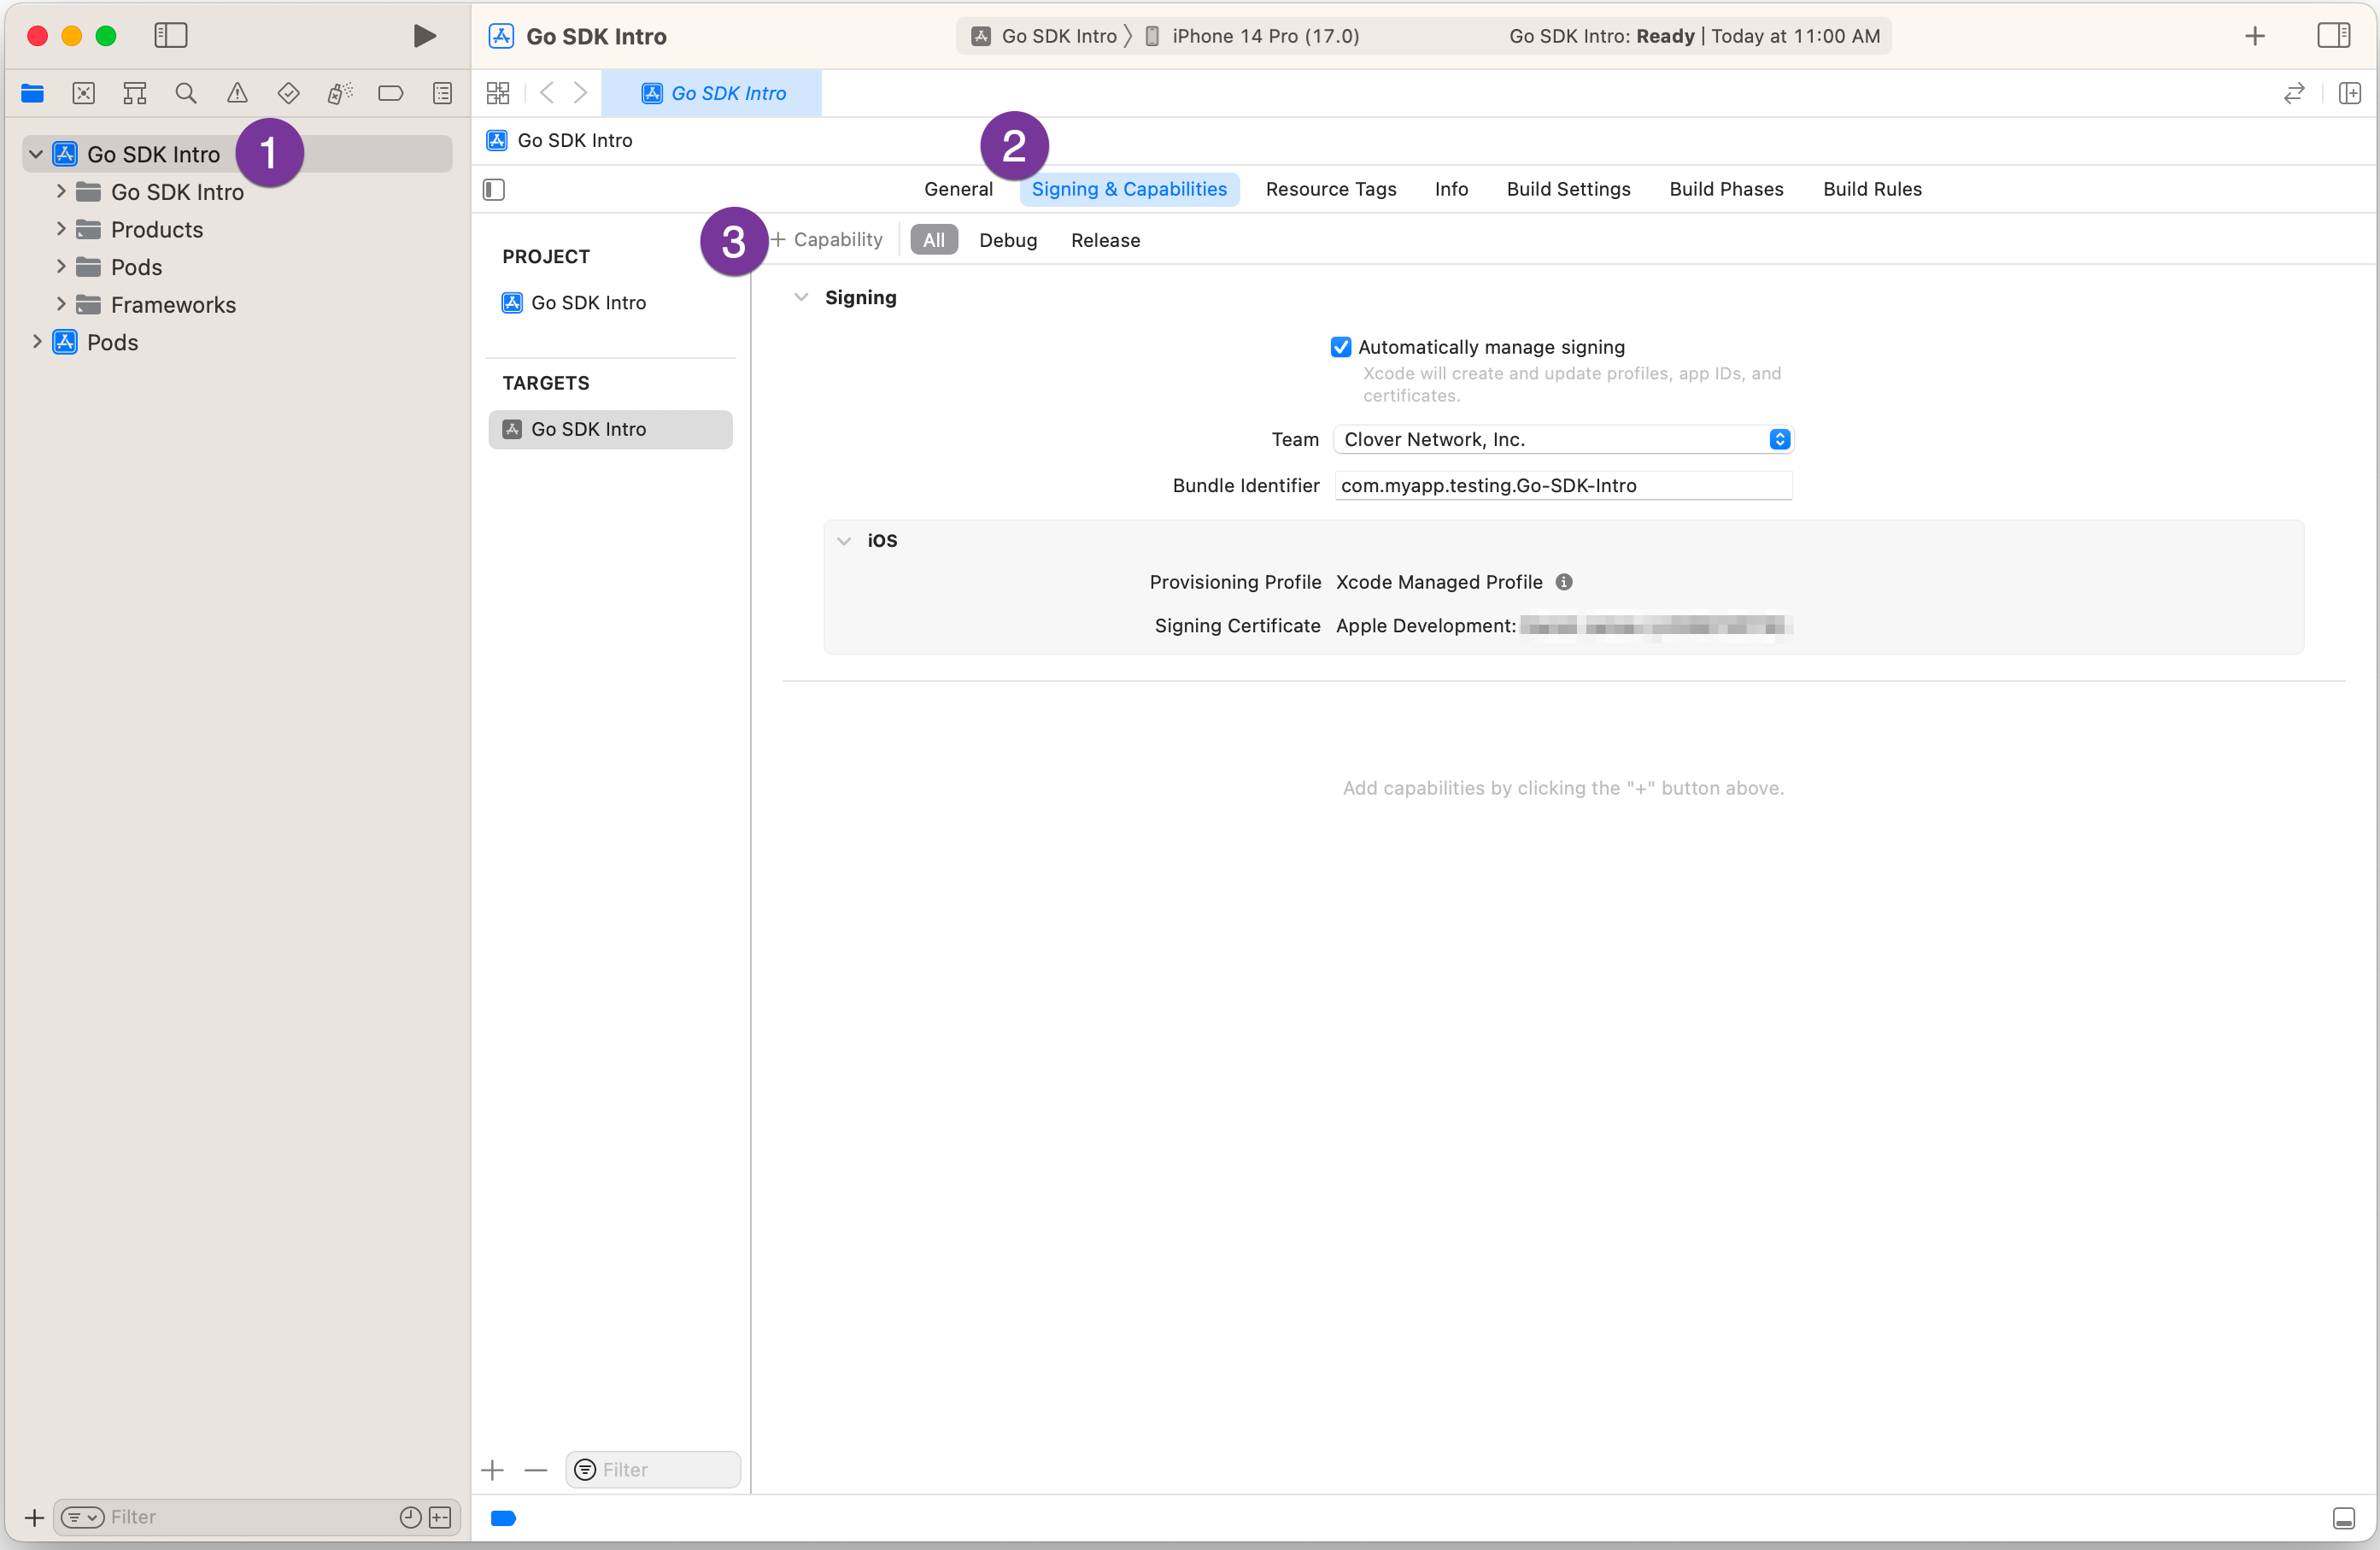
GO SDK Intro - Signing & Capabilities tab
b) Select Associated Domains.
- In the new Domains item under Associated Domains, change the default credentials to:
applinks:<your domain>, where your domain is the root URL of your apple-app-site-association file is installed. For example, myexampleapp.com.
Note: If you are not ready to publish your
apple-app-site-associationfile on your official public server, GitHub Pages are available and properly configured to host your file.- Replace the contents of your Scene Delegate with the following code.
//
//  SceneDelegate.swift
//  CloverPayments SDK Intro
//
//  Entry point for our incoming URIs, used to receive the OAuth tokens.
//

import UIKit
import CloverPayments

class SceneDelegate: UIResponder, UIWindowSceneDelegate {

    var window: UIWindow?

    func scene(_ scene: UIScene, continue userActivity: NSUserActivity) {

        // Check if the userActivity contains a URL
        guard let incomingURL = userActivity.webpageURL else { return }

        // Check if this is an OAuth return URL, and then pass along to the OAuthToken Manager
        // During the OAuth flow, we first access a user login page, which then redirects to the app using an associated domain.  After the user logs in and selects a merchant account, we'll get a callback here through that associated domain.  We'll check to be sure it's the OAuth URL (associated domains can be used for many things, only one of which is OAuth flows), and if it is we pass it along to the SDK for processing and secure storage.
        if let fullOAUthFlow = configuration.oauthFlowType as? FullOAuth,
           let scheme = incomingURL.scheme,
           let host = incomingURL.host,
           fullOAUthFlow.redirectURI == (scheme + "://" + host + incomingURL.path) {
            CloverPaymentSDK.shared.receivedOAuthCodeOrToken(url: incomingURL)
        }
    }
}
Note: This code provides the input path for the OAuth callback from Clover login servers to your app. Clover passes the input path to the SDK for handling the incoming code or token—including keychain storage—of these sensitive values.
- In the new Domains item under Associated Domains, change the default credentials to:
-
On your server, create an
apple-app-site-associationfile and place it in the root of the server referenced in the previous step.{ "applinks": { "apps": [], details": [ { "appID": "<TEAM_ID>.<BUNDLE_ID>", "paths": ["/OAuthResponse/*"] }] }
Note: The apple-app-site-association file does not have an extension, but your server still needs to return a content type of application/json when the file is requested, or iOS may not parse it properly. See the specific configuration documentation for your server.
If you have trouble with step 2, you can temporarily put your apple-app-site-association on GitHub Pages. Eventually you need to host this file on your public web server, but GitHub Pages is a short-term way to get up and running quickly during development.
4. Configure the SDK
- In Xcode, create a new Swift file named Configuration.swift in your project with the following content:
import CloverPaymentSDK
let configuration = CloverPaymentSDK.Configuration(
    environment:<#CloverEnvironment.EnvironmentType - this is the server environment that we will use to communicate with Clover.#>,
    appID: <#App ID registered on your Clover Developer Portal, used by the OAuth Flow to match permissions to your app when your merchant logs in.#>,
    appSecret: <#App Secret obtained from your Clover Developer Portal.  This is the secret associated with your App ID.#>,
    apiKey: <#API Key for server access. Contact your Developer Relations representative for a valid Key and Secret.#>,
    apiSecret: <#API Secret for server access. Contact your Developer Relations representative for a valid Key and Secret.#>,
    oauthFlowType: FullOAuth(redirectURI: <#URI used in the OAuth flow to get the code/token back to your app.  This should be an Associated Domain registered to your app.  See documentation for details.#> )
)
- In the Swift file, enter the configuration.
| Property | Description |
|---|---|
| environment | Environment you want to connect to on Clover servers. Start with .Sandbox for development. |
| appID | App ID of your Clover app on the Developer Dashboard. See 1. Create a test app on Clover Developer Dashboard. |
| appSecret | App Secret of your Clover App on the Developer Dashboard. |
| apiKey | Ask your Developer Relations Representative for this value. |
| apiSecret | Ask your Developer Relations Representative for this value. |
| oauthFlowType | OAuthFlowType object Supported options: - CloverPaymentSDK.FullOAuth - CloverPaymentSDK.PartialOAuth Provide one object to configure the SDK. Provide the same object type between sessions. - FullOAuth—Allow the SDK to call out to the OAuthProvider in the default external browser when needed. You must pass the response string from the external browser back to the SDK. See the SceneDelegate.swift code example. The SDK attempts to initiate login if the token or refresh tokens are invalid or expired. - PartialOAuth—Your code implements the OAuth Flow. Provide the code to the SDK when you initialize in this object. The SDK maintains the final token between instances, and refreshes the token when needed. The SDK never attempts to initiate login if the token and refresh tokens are invalidated. |
FullOAuth
| Property | Description |
|---|---|
| OAuthFlowRedirectURI | http://<yourdomain>/OAuthResponse, domain where your apple-app-site-association file is located.When the OAuth flow starts, this URI is passed to Clover login servers. After the user authenticates, this is the URI called by the Clover servers to link back to your app. This value is validated with: - The Site URL you configured on Clover servers before it is called by the Clover servers. - The your apple-app-site-association paths, as well as the Associated Domain configured in your project configuration by iOS.- Add a path to differentiate this app from your other apps. Update the path in your apple-app-site-association file.- iOS loads your apple-app-site-association file only once—at first install of your app. If you need to make updates to the apple-app-site-association file, you also need to uninstall and reinstall your app to get updates. |
PartialOAuth
| Property | Description |
|---|---|
| codeResponse | Optional—OAuthCodeResponse containing the code response you received from the OAuth flow. When a user logs in to the OAuth Provider site, you receive a code, merchantId, clientId, and employeeId in the response string from the server. Parse the response string and provide those values in the OAuthCodeResponse object.Between sessions you do not need to re-authenticate the user. Provide the PartialOAuth object with the codeResponse value as nil in those scenarios. A code response is single-use only, and the SDK maintains the token result between sessions. Only populate the codeResponse object with a parsed code response once for each user login. |
-
Initialize the SDK.
a) Replace the App Delegate implementation with the following code.
import UIKit
import CloverPayments

@main
class AppDelegate: UIResponder, UIApplicationDelegate {

    func application(_ application: UIApplication, didFinishLaunchingWithOptions launchOptions: [UIApplication.LaunchOptionsKey: Any]?) -> Bool {
        Task { @MainActor in
            try? await setupSDK()
        }
        return true
    }


    // Initialize the SDK, if it needs to be
    public func setupSDK() async throws {
        // The SDK hasn't been initialized yet, so we'll call the initializer
        // The SDK can take care of the OAuth Flow automatically, and in this example we'll make use of that. To do that, we'll simply initialize the SDK and it will determine that we don't have a token and kick off the OAuth Flow. The return flow comes back through Associated Domains, and we'll see the success callback called upon successful completion.
        do {
            try await CloverPaymentSDK.shared.setup(configuration: configuration)
            print("CloverPaymentsSDK initialized")
        } catch {
            print("CloverPaymentsSDK initialization failure: \(error)")
            throw(error)
        }
    }
}
b) Run your app on an iOS device to open the Clover login window.
c) Enter your credentials in the login window. The window redirects to your app.
5. Scan for devices and connect
In this step, open a Bluetooth scan, get a list of found devices, and connect to the first found device.
-
Configure privacy requests.
a) Enter a value in the NSBluetoothAlwaysUsageDescription field for your project.
b) In your project on the Go SDK - Info tab:
-
In the project navigator, select the project root directory.
-
Select your app target.
-
Select the Info tab.
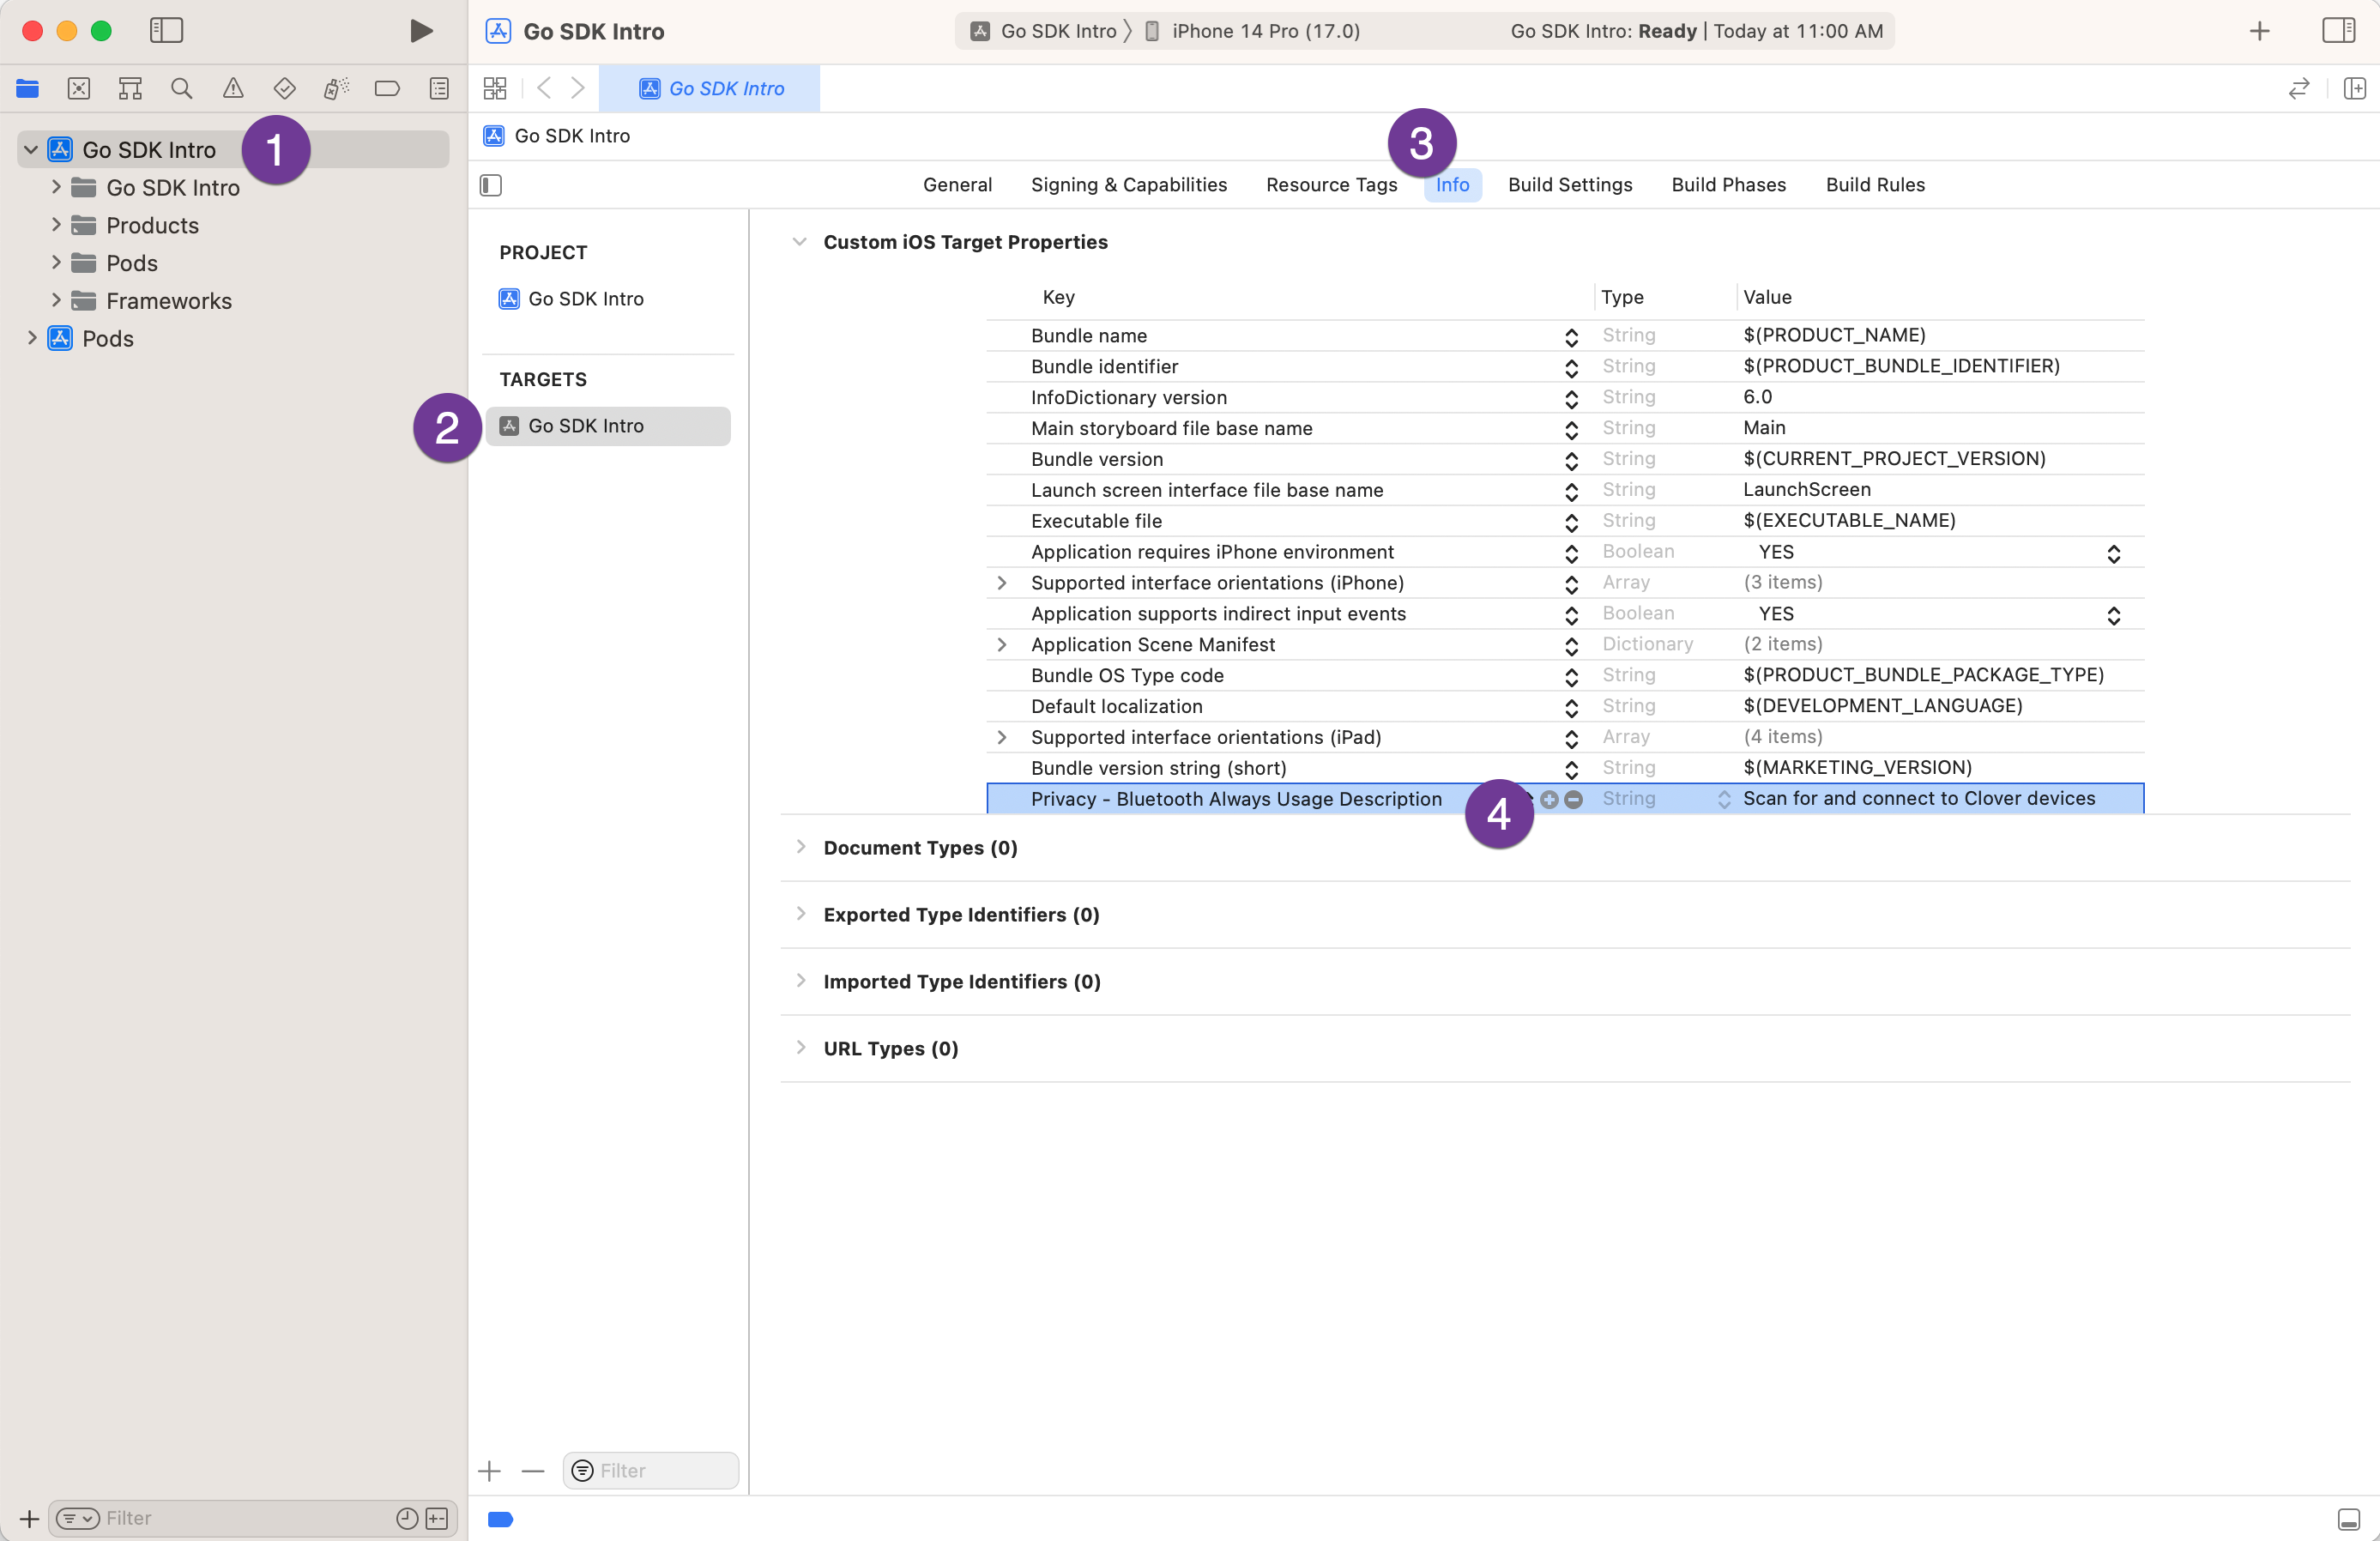
Find and connect to devices
c) On the last entry in the Custom iOS Target Properties section, click the plus button.
-
In the Key block, enter NSBluetoothAlwaysUsageDescription.
-
In the Value block, enter Scan for and connect to Clover Devices.
-
-
Replace the contents of
ViewController.swiftwith the following:// // ViewController.swift // CloverPayments SDK Intro // // import UIKit import CloverPayments import Combine class ViewController: UIViewController { //hold the SDK observer subscriptions private var subscriptions = Set<AnyCancellable>() override func viewDidLoad() { super.viewDidLoad() //observe changes to the battery level CloverPaymentSDK.shared.readerBatteryPct.sink { pct in // ... // update label or graphical indication of battery level // ... }.store(in: &subscriptions) //observe changes to the connection state of the reader CloverPaymentSDK.shared.readerStatus.sink { state in switch state { case .initializing: // Update status label to show "Initializing" state case .updatingFW: // Update status label to show "Firmware Updating" state case .lowBattery: // Update status label to show a Low Battery warning case .ready: // Update status label to show a "Connected" state case .disconnected: // Handle disconnection state default: break } }.store(in: &subscriptions) } override func viewDidAppear(_ animated: Bool) { super.viewDidAppear(animated) Task { @MainActor in do { print("Scanning for Clover Go Readers") var cardReaders = [CardReader]() // Scans for five seconds, returning the readers it finds for try await cardReader in CloverPaymentSDK.shared.scan() { print("Found Reader: \(cardReader.name ?? cardReader.id)") cardReaders.append(cardReader) } // For the simplicity of the example, we'll just connect to the first reader we found // // Optional: Calling `connect()` will stop an in-progress scan, so you may attempt a // connection as soon as you find a specific reader // // Optional: Accumulating the discovered readers in a collection and then // displaying in a tableView for selection by the user may be a more "normal" // flow for your app. if let cardReader = cardReaders.first { try await CloverPaymentSDK.shared.connect(reader: cardReader) print("Connected to Clover Go Reader") } } catch { print("Error scanning or connecting: \(error)") } } } } -
Install and run the app.
-
After the app launches, open the Clover login page in Safari and authenticate.
The app prompts for Bluetooth permission, scans for devices, and connects to the first found device.
6. Take a Payment
-
Update ViewController.
a) Add this function to the ViewController class implementation.
func takePayment() { // Create a Pay Request. For this example, we'll hard code it to 100 cents var payRequest = PayRequest(amount:100) // Set the request to a final sale. See documentation for other ways to use the final and capture flags payRequest.final = true // final sale, captured Task { @MainActor in do { for try await paymentEvent in CloverPaymentSDK.shared.charge(payRequest: payRequest) { switch paymentEvent { case .complete(let payResponse): var messageString = "====================================================================== Payment Successful" if var amount = payResponse.payment?.amount { amount += payResponse.payment?.tipAmount ?? 0 amount += payResponse.payment?.taxAmount ?? 0 if let additionalCharges = payResponse.payment?.additionalCharges { for thisAdditionalCharge in additionalCharges { amount += thisAdditionalCharge.amount ?? 0 } } let amountString = String(format: "%1.2f", (Double(amount) / 100.0)) messageString = "====================================================================== $\(amountString) was charged to the card" } print(messageString) case .progress(let progressEvent): switch progressEvent { case .insertOrTapCard: print("Insert or Tap Card") case .swipeInsertTapCard: print("Swipe, Insert, or Tap Card") case .removeCard: print("Remove Card") case .cardInserted: print("Card Inserted") case .cardRemoved: print("Card Removed") case .cardSwiped: print("Card Swiped") case .cardTapped: print("Card Tapped") case .emvDipFailedTryAgain: print("EMV Dip Failed Try Again") case .emvDipFailedTrySwipe: print("EMV Dip Failed Try Swipe") case .emvCardSwiped: print("EMV Card Swiped") case .contactlessFailedTryContact: print("Contactless Failed Try Contact") case .swipeFailed: print("Swipe Failed") case .pleaseSeePhone: print("Please See Phone") case .multipleContactlessCardsDetected: print("Multiple Contactless Cards Detected") case .configuringReader: print("Configuring Reader") @unknown default: break } @unknown default: break } } } catch { print("Payment Error: \(error)") } } } -
After the card reader connect() call, add a call to the takePayment() method you just added.
	if let cardReader = cardReaders.first {
    	try await CloverPaymentSDK.shared.connect(reader: cardReader)
        print("Connected to Clover Go Reader")

		self.takePayment()
    }
Updated about 2 months ago